
In this blog post, we’ll walk you through building a basic planning application in SAP Lumira, designer edition.
Many organizations have an elaborate system where sales managers must forecast their sales for the coming year. In our example, you’ll build a planning application that supports this forecasting.
The application will allow a user to create a copy of the data as a basis for planning, create functions to enable the managers to make changes to groups of records, and allow the manual input of data to fine-tune the forecast. As a result, managers will be able to create forecasts using the most recent end-of-year expectations.
Collecting Data
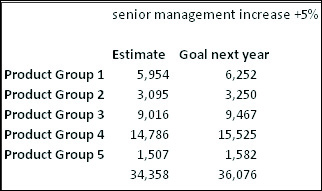
The first step in building this type of planning application is to look at the predicted end-of-year results as a baseline for the coming year. The figure below supplies some mock data to use in this example.
Next, you’ll need to copy the estimated end-of-year number data to the next year and add a percentage (which is the new goal set by management). This process is shown in the following figure.
After the rough goal is set by management, the sales manager looks at his own product groups. Some newly introduced product groups will likely show a steep growth in sales and will carry more of the growth, while other, more mature product groups may be in a different phase of their product lifecycle and probably will lag in terms of growth. The sales manager will want to adjust those product groups accordingly.
In the next figure, you’ll see an example where the sales manager estimated how each group would do. The total goal is now reduced by 1.6% in comparison with the general goal set by senior management earlier.
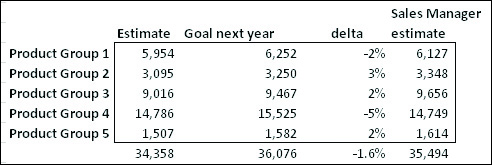
The sales manager will end up with a grand total that differs from the goal set by upper management. That difference then should be discussed between the manager and upper management.
Building the App
The application that you’ll create supports the role of the sales manager in this scenario. The sales manager should be able to prepare data using a planning sequence. Following the first step, the sales manager can make adjustments using a planning function that will allows him to adjust all products within a product group without addressing each product.
The following tasks will be performed:
- Add the crosstab component for reviewing the data.
- Add buttons to invoke the planning functions and sequences to make the scenario described possible.
- Add a Save option to store the data.
- Create an input-ready state button to make manual adjustments possible.
The application you’ll build will be a simplified version of a real-life forecast application. The following steps will show you how to perform the necessary functions.
First, add a button to the application that will reference the planning sequence created to prepare the data. Clicking this button will copy the end-of-year estimate to the first version of the forecast data. This copying will be performed via a sequence of multiple steps already defined in the backend system. The only thing the user needs to do in the application is start it and wait.
The script for the button is given here:
PS_1.execute();
The script is easy because many variables, for example, who is actually logged in, are automatically handled in the backend system. If necessary, you can set some variable values before executing the planning sequence. In this example, let’s assume you need to tell the system which user is starting the planning sequence:
PS_1.setVariableValue("ZUSER", DS_1.getInfo().user);
PS_1.execute();
The second step is to increase the value based on a percentage and a product group selection. To enable this function, you’ll allow the user to select a part of the crosstab component. Then, the selected row’s product group value will be collected and used to apply a filter to the planning function. Furthermore, the user can manually enter a number into an input component:
PF_1.setFilter("PRODUCTGROUP", filter)
PF_1.setVariableValue("INCREASE", INPUTFIELD_1.getValue())
PF_1.execute();
The third step is to divide it over the months. As an additional step, you can add the option to manually include seasonal effects. Normally, you would let your analysts figure out seasonality for inclusion in the calculation. However, for the sake of our example, let’s have the sales manager manually enter a seasonal effect, as shown in the figure below.

In step four, the calculation is performed in the planning function. In SAP Lumira, designer edition, you’ll pass on the values per script, as shown in the following listing.
PF_2.setVariableValue("Jan", INPUT_JAN.getValue());
PF_2.setVariableValue("Feb", INPUT_FEB.getValue());
PF_2.setVariableValue("Mar", INPUT_MAR.getValue());
PF_2.setVariableValue("Apr", INPUT_APR.getValue());
PF_2.setVariableValue("May", INPUT_MAY.getValue());
PF_2.setVariableValue("Jun", INPUT_JUN.getValue());
PF_2.setVariableValue("Jul", INPUT_JUL.getValue());
PF_2.setVariableValue("Aug", INPUT_AUG.getValue());
PF_2.setVariableValue("Sept", INPUT_SEP.getValue());
PF_2.setVariableValue("Oct", INPUT_OCT.getValue());
PF_2.setVariableValue("Nov", INPUT_NOV.getValue());
PF_2.setVariableValue("Dec", INPUT_DEC.getValue());
PF_2.execute()
As shown this listing, many variable values are passed to the planning function. Inside the planning function, the relative size is determined, and the relative total is calculated.
After the automated steps, we move on to the fifth step. Let’s now allow the sales manager to manually change the calculated numbers. The script to allow users to enter data is as follows:
var current = DS_1.isInputReady();
DS_1.configureInputReadiness(!current);
You’ll need to add one last button to save the data that has been changed:
Planning.save();
Additionally, you might want to inform the user if unsaved changes still exist. In the buttons, you can set a script that points to a central function, as shown in the final listing.
var saved = Planning.hasUnsavedChanges
if (saved == true)
{
TXT_STATUS.setText(“Not Saved”)
}
Else
{
TXT_STATUS.setText(“saved”)
}
Finally, save the changes you’ve made.
Conclusion
As you can see, building a basic product planning application in SAP Lumira, designer edition is not all that hard. What other kinds of uses can you think of for such application templates?
Editor’s note: This post has been adapted from a section of the book SAP Lumira, Designer Edition: The Comprehensive Guide by Dwain Chang, Xavier Hacking, and Jeroen van der A.

![How to Create Your First ABAP Program in SAP [13 Steps]](https://5707200.fs1.hubspotusercontent-na1.net/hub/5707200/hubfs/How%20to%20Create%20Your%20First%20ABAP%20Program%20in%20SAP%20%5B13%20Steps%5D.png?height=600&name=How%20to%20Create%20Your%20First%20ABAP%20Program%20in%20SAP%20%5B13%20Steps%5D.png)

Comments