

Link-sensitive graphics (also called image maps) are just links embedded within a graphic. Such an image map defined in HTML consists of three parts.
- Image: This is the actual image that’s added to the HTML document with the img Additionally, within the <img> tag, you must specify the HTML attribute usemap with an anchor to a map element:
<img src="image.jpg" alt="alternText" usemap="#mapname">
- map element: You also need the map element with the anchor name you specified earlier in the img element with the usemap The anchor name in the map element must be specified without the leading # in the name, unlike the img element. Between the introductory <map name="mapname"> and the closing </map>, you can define the linksensitive sections for the graphic. It’s up to you to decide where exactly you write the map element in the HTML document. Thus, you can specify the map element before the img element, for example. In practice, it’s recommended to position the map element at the beginning or end of the document body.
- Coordinates: You need the coordinates with the actual link-sensitive area for the graphic. For this purpose, a separate area element is used between <map> and </map> for each area. Within the <area> tag, you can define square areas, circular areas, or areas with any number of corners (polygon). For each area element, you define a “clickable” area in the image.
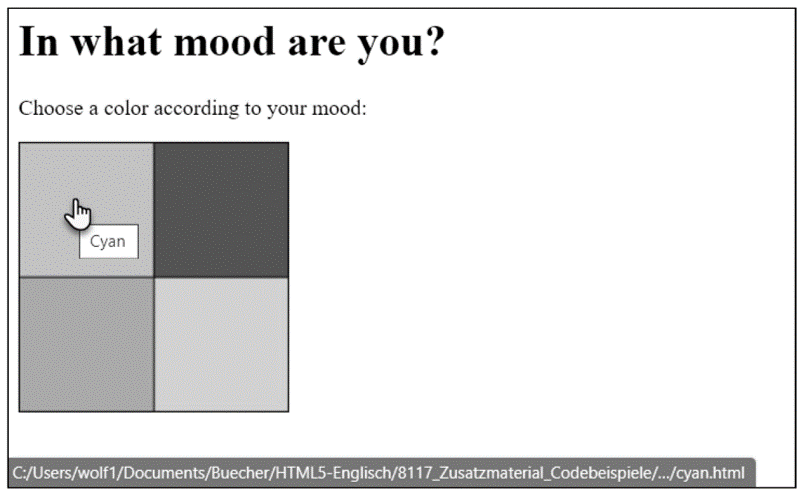
For this purpose, let’s first take a look at a simple example in which four rectangular link-sensitive areas with 100 × 100 pixels were defined in a rectangular graphic with 200 × 200 pixels. First, you need to insert the popart.jpg graphic into the HTML document. For the anchor name, we use the #mood value in the usemap attribute. Up to this point, you have inserted just another ordinary graphic. You can introduce the link-sensitive area with the map element and the name of the image map (here, name="mood"). Between <map> and </map>, you need to specify the coordinates for the links with the area element. You’ll find more information about the area element after the following example:
...
<p>Choose a color according to your mood:</p>
<p>
<img src="images/popart.jpg" alt="Link-sensitive graphic"
width="200" height="200" usemap="#mood">
</p>
...
<map name="mood">
<area shape="rect" coords="0,0,100,100"
href="colors/cyan.html" alt="Cyan" title="Cyan">
<area shape="rect" coords="0,100,100,200"
href="colors/green.html" alt="Green" title="Green">
<area shape="rect" coords="100,100,200,200"
href="colors/yellow.html" alt="Yellow" title="Yellow">
<area shape="rect" coords="100,0,200,100"
href="colors/red.html" alt="Red" title="Red">
</map>
...
I think the connection between the image where you set the anchor name with the usemap attribute and the map element that introduces the link-sensitive area should now be clear to you. The area element is somewhat more complex. For this reason, the following sections provide a basic description of the area element.
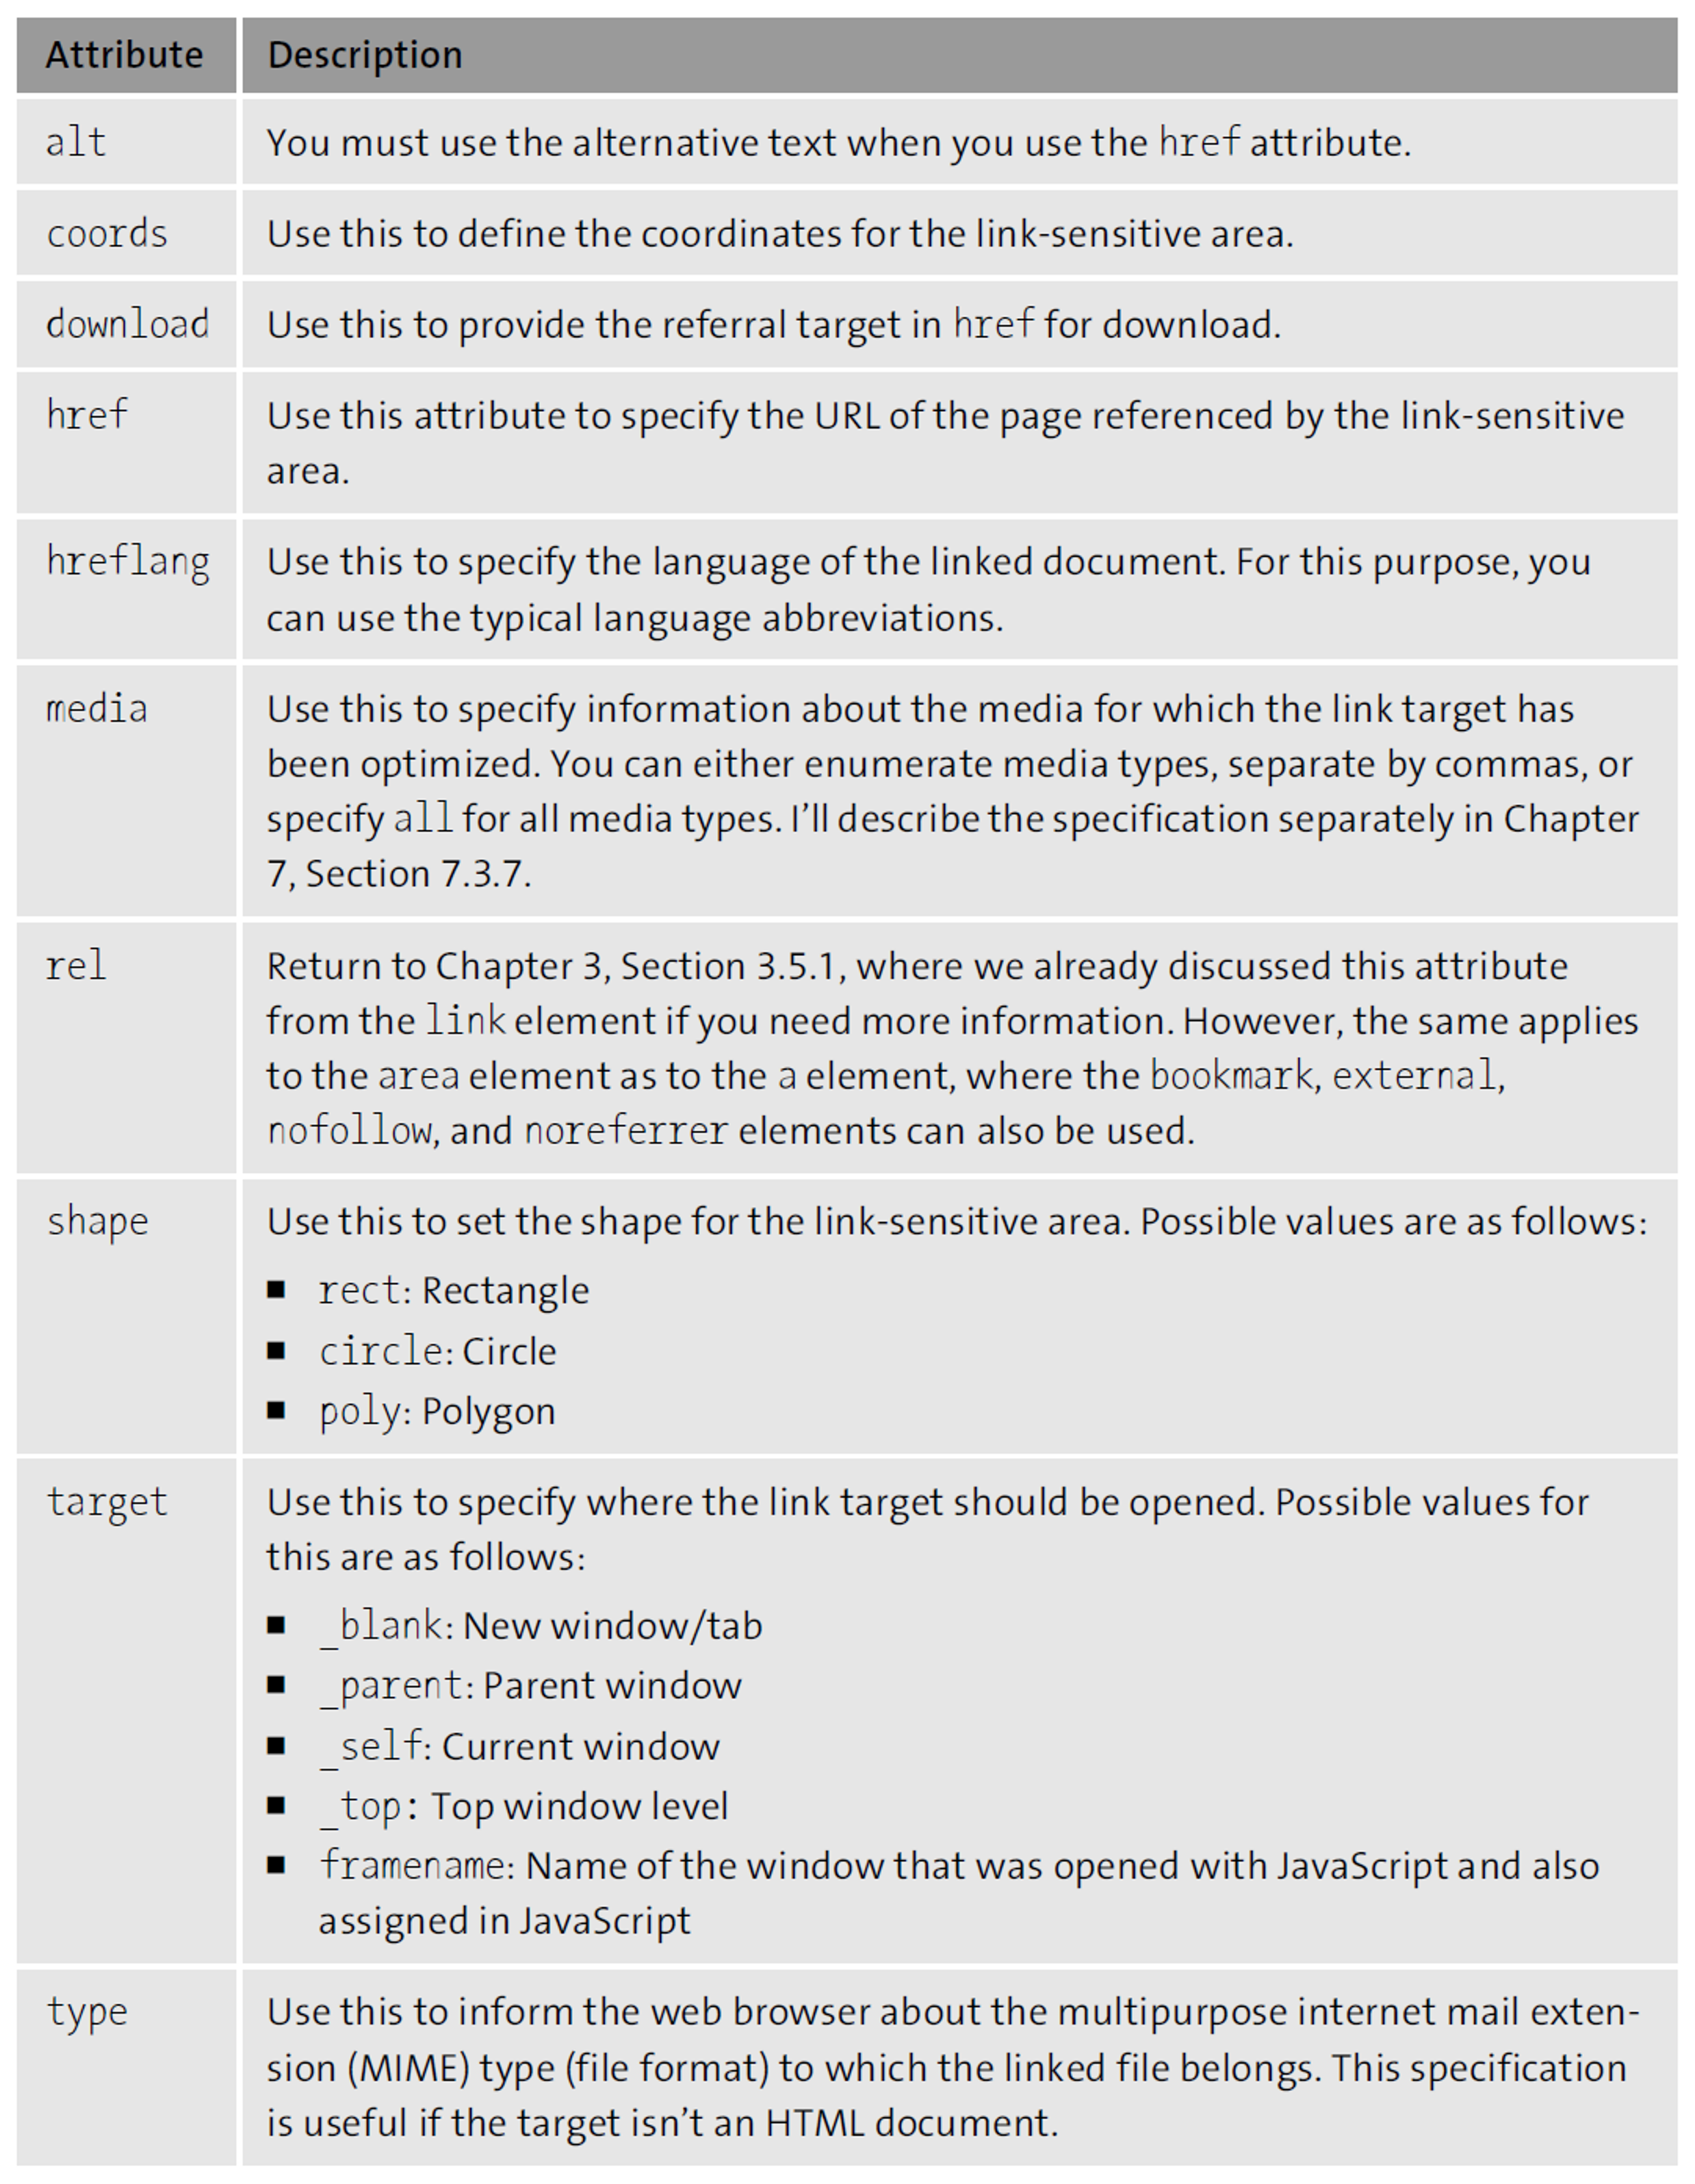
Use HTML Attributes for the HTML Element <area>
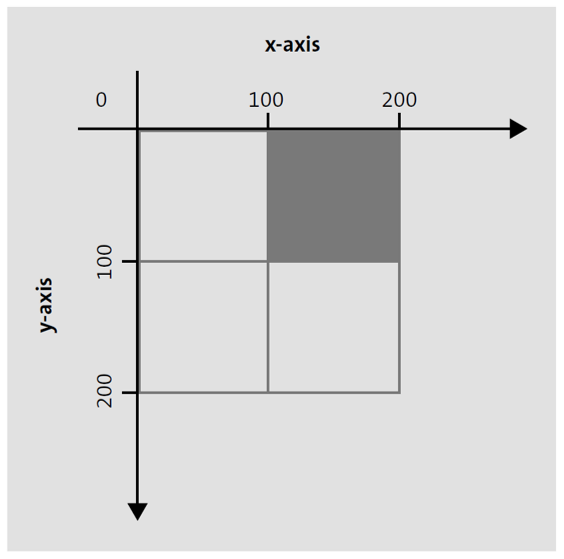
To define the shape of the area type, you need to specify the desired shape in the HTML attribute shape. For this purpose, you can use rect (= rectangle), circle, and poly (= polygon). Besides specifying the shape via shape, you also need to specify the coordinates of the link-sensitive area with the HTML attribute coords (= coordinates). Here, you use absolute values. You can separate multiple values with a comma. With regard to our example, in the following, the values refer to x1, y1, x2, and y2.
<area shape="rect" coords="100,0,200,100" ...>
You can use x1 and y1 to define the upper-left corner of the link-sensitive area that extends to the lower-right corner, which you specify with x2 and y2. In this example, we make an indentation by 100 pixels (x1) from the top corner of the graphic to the right and 0 pixels (y1) down to define the upper-left corner. For the bottom-right corner, we move 200 pixels (x2) from the upper-left corner of the image to the right and move 100 pixels (y2) down from that position (see figure below).
If you use circle for shape, the coordinates are x, y, r (coords="x,y,r"). For example, you would need to specify the following coordinates in relation to the figure:
<area shape="circle" coords="100, 100, 50" ...>
This way, you move 100 pixels from the upper-left corner to the right (x) and 100 pixels down (y), arriving at the center of the square. From there, you would draw a link-sensitive area with a radius of 50 pixels, which would define a 100-pixel diameter circle from the center as the link-sensitive area.
If, on the other hand, you use poly as the shape, you can define any number of coordinates in coords with x1, y1, x2, y2 . . . xn, yn. This enables you to define as many corners as you want. At the end, you have to use the xy coordinates of the first element again to close the polygon.
Referencing Defined Areas of the HTML Element <area>
As with the a element, you need to specify the reference target in the area element using the href attribute. Together with the href attribute, you must also write the alt attribute in the area element.
Pixel Coordinates with a Graphics Program: For more complex link-sensitive areas, such as a map, you can also use special software that allows you to create the link-sensitive area in the corresponding graphic with the mouse and just paste it into your HTML document. If you don’t want to install special software for this purpose, you can find a good online image map editor at www.maschek.hu/imagemap/imgmap, where all you have to do is upload the image and use your mouse to create the link-sensitive areas.
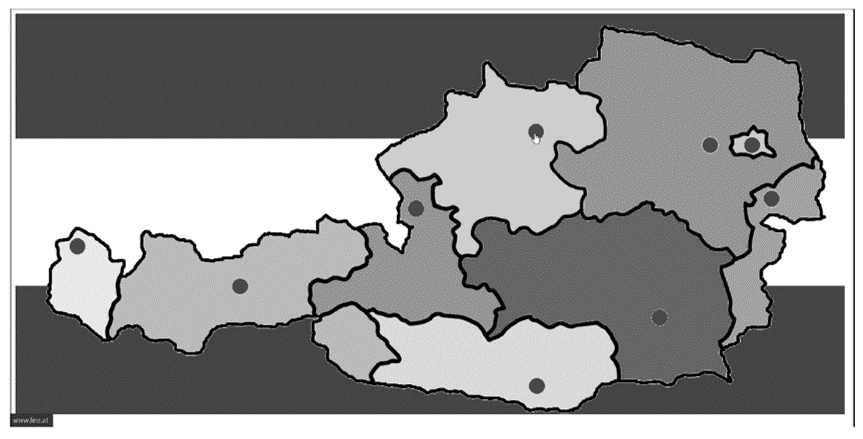
I added the link-sensitive areas in the figure below with the nine federal states of Austria using GIMP software and linked them with the official websites, including the website of the capital of the corresponding federal state.
HTML Attributes of <area>
Here’s a short overview of the attributes of <area>. You’ll notice that the area element contains the same attributes as a hyperlink with the a element.
Use Link-Sensitive Graphics? Since link-sensitive graphics are not responsive, they are rarely used in practice. As an alternative, you can use an SVG graphic where you can specify the appearance of the linked areas with CSS.
Editor’s note: This post has been adapted from a section of the book HTML and CSS: The Comprehensive Guide by Jürgen Wolf. Jürgen is a web and software developer and the author of several seminal works about programming and photography. Find out more about him on www.pronix.de.
This post was originally published 8/2023.


Comments