In this blog post, we’ll teach you how to install Docker on a Windows, Mac, or Linux system.
Installing Docker on Windows
The first versions of Docker for Windows used Hyper-V as a backend. Then, in 2019, Docker moved to the Windows Subsystem for Linux (WSL). Hyper-V is still supported, but only for compatibility with older versions of Windows. In this post, we assume that you use Docker in combination with WSL2. For this, you need a reasonably up-to-date 64-bit installation of Windows 10/11 Home, Pro, or Enterprise. Your computer needs at least 4 GB RAM. (For everyday development use, however, we rather recommend 16 GB.) Furthermore, the virtualization functions of the CPU must be enabled.
You can download the latest version of Docker Desktop here: https://docs.docker.com/docker-for-windows/install.
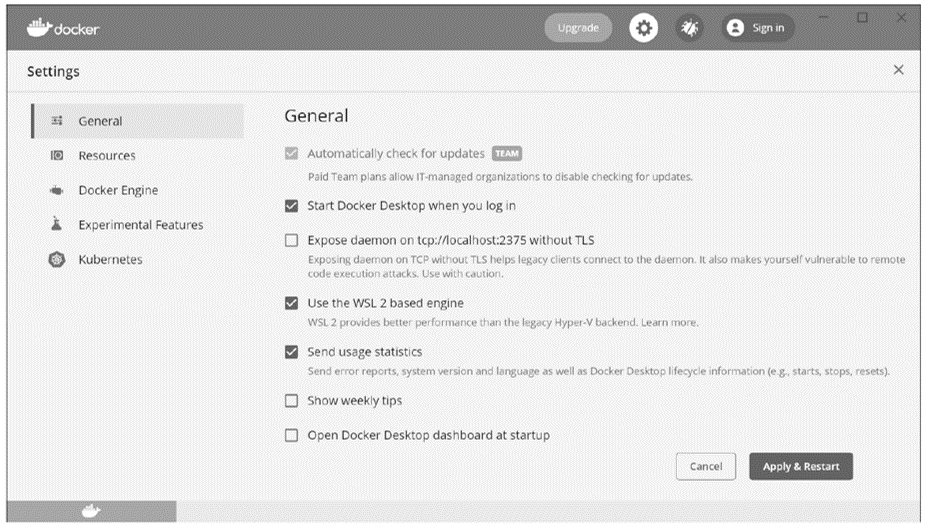
The installation is usually absolutely uncomplicated. You don’t need to set a single option! During the installation process, WSL2 gets activated automatically if that hasn’t already happened on your computer. Once the installation process has completed, you’ll find an entry to start Docker Desktop on the desktop or in the Start menu. This program provides the opportunity to take an initial introductory tour.
Alternatively, you can use PowerShell, cmd.exe, or Windows Terminal to verify that the installation was successful. You just need to run the docker version command, which provides an overview of the installed Docker components and their version numbers. The result should look similar to the following (abbreviated) listing:
docker version
Client:
Cloud integration: 1.0.14
Version: 20.10.6
API version: 1.41
...
Server: Docker Engine - Community
Engine:
Version: 20.10.6
API version: 1.41 (minimum version 1.12)
...
containerd:
Version: 1.4.4
runc:
Version: 1.0.0-rc93
docker-init:
Version: 0.19.0
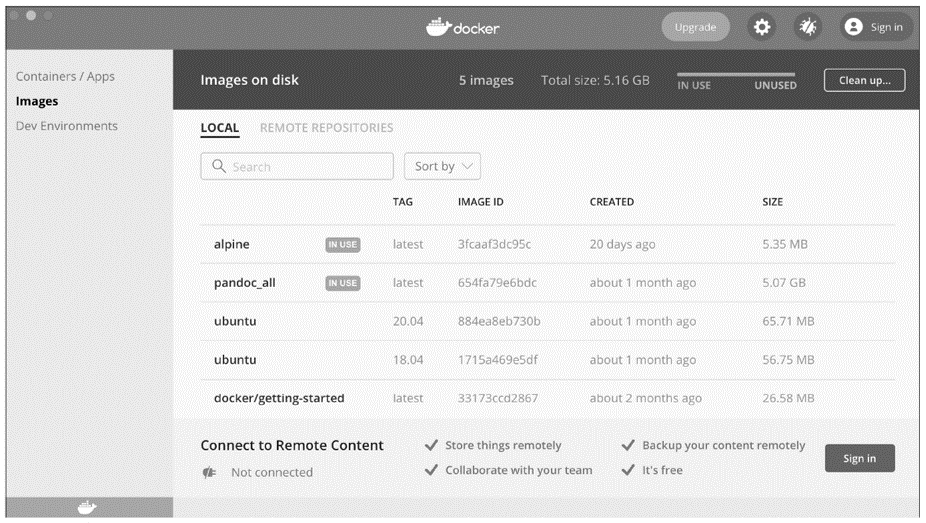
To test that Docker really works, you can start the mini Linux system, Alpine, as a container. Using ping, you can test if the network connection to the external world is working. exit terminates the container, which is also deleted immediately due to the –rm option:
docker run -it --rm alpine
Unable to find image 'alpine:latest' locally
latest: Pulling from library/alpine
540db60ca938: Pull complete
Digest: sha256:69e..cf8f
Status: Downloaded newer image for alpine:latest
ping -c 1 -q google.com
PING google.com (142.250.186.142): 56 data bytes
1 packets transmitted, 1 packets received, 0% packet loss
round-trip min/avg/max = 20.318/20.318/20.318 ms
exit
VirtualBox: Previously, the interaction between Docker and VirtualBox on Windows constituted a problem. Today, however, the biggest problems seem to have been overcome. In our tests, Docker with WSL2 and VirtualBox ran stably side by side.
Installation on macOS
To install Docker Desktop, including all accompanying tools, you need to download the correct DMG file version (there’s one for Intel CPUs and one for ARM [“Apple Silicon”]) that matches your CPU architecture from the following website: https://docs.docker.com/desktop/install/mac-install/.
We tried out many examples on a Mac mini M1 for this post. Here’s a brief summary: The support for the new CPU architecture is excellent! However, because Docker uses a relatively large amount of RAM, a model with at least 16 GB RAM is highly recommended!
To start the installation process, you should simply move the image file to the Applications directory. When Docker starts for the first time, you need to provide your password again so that Docker can set up various drivers. Docker Desktop then runs as a background process and makes itself noticeable in the panel by means of a small icon. This icon takes you to the Docker Desktop (see below).
By default, Docker will be started automatically in the future. Docker Desktop periodically checks for available updates and, if necessary, asks you whether it should install them. In the settings dialog, you can specify how much memory (both RAM and on the SSD) and how many CPU cores Docker is allowed to use. Docker must be restarted after each change to these settings. Any running containers will be terminated in the process.
Installation on Linux
Docker was originally developed for use on Linux, which makes it quite surprising that a Docker installation is easier on Windows or macOS than on Linux. However, there are a couple of reasons for the various variants or additional configuration work required:
- Distributions: There’s only one Windows and one macOS, but there are numerous Linux distributions. Interlocking Docker with the specifics of each distribution isn’t always trivial.
- Security: On Linux, Docker can be run in two ways, namely with or without root Depending on which variant you choose, different installation instructions must be followed. This section covers the currently more common system-wide installation. However, if you want to go rootless, you can install Docker in your local account.
Irrespective of that, it only takes a few commands to get Docker running on most Linux distributions.
Use Docker Package Sources Whenever Possible! Some Linux distributions provide Docker packages as part of the distribution’s own package sources. However, these Docker packages are often outdated. Regardless of which Linux distribution you use, you should always prefer the official packages. During the installation process, a Docker-specific package source is set up in each case from which you subsequently obtain all Docker updates automatically.
Docker Desktop for Linux: Docker Desktop has also been available for Linux since mid-2022. This complete package consists of all necessary Docker components and an additional GUI as on macOS/Windows. Unfortunately, Docker Desktop on Linux comes with significant drawbacks. Specifically, Docker now uses a virtual machine to run Docker containers, as it does on macOS and Windows. This contradicts the lean concept of Docker, which runs containers (almost) like normal processes. In addition, Docker Desktop for Linux can’t be used when Linux itself is running in a virtual machine. (The result would be a nesting of virtual machines: one for Linux and, within it, one for Docker.) Amazingly, installing Docker Desktop is even more cumbersome than a traditional installation. Long story short: The relatively new offer didn’t convince us. The few additional features of the Docker Desktop are dispensable and don’t outweigh the drawbacks. You can find more details about installing Docker Desktop for Linux here: https://docs.docker.com/desktop/install/linux-install/.
Installation on Ubuntu
If necessary, you should remove previously installed packages from the Ubuntu package sources:
apt remove docker docker-engine docker.io containerd runc
Next, you need to first install a few base packages and then use curl to download the key for the new Docker package source, which you can set up using the echo command. After installing Docker via apt install, the program gets started automatically. (All commands must be executed with root privileges. You should therefore put sudo in front, or first switch to the root mode via sudo -s.)
apt install apt-transport-https ca-certificates curl gpg
curl -fsSL https://download.docker.com/linux/ubuntu/gpg | \
gpg --dearmor -o /usr/share/keyrings/docker-archive-keyring.gpg
echo "deb [arch=amd64 \
signed-by=/usr/share/keyrings/docker-archive-keyring.gpg] \
https://download.docker.com/linux/ubuntu \
$(lsb_release -cs) stable" > \
/etc/apt/sources.list.d/docker.list
apt update
apt install docker-ce docker-ce-cli containerd.io
Tip: Instead of an error-prone copying and pasting of the preceding commands, you should copy them from the official installation guide: https://docs.docker.com/engine/install/ubuntu.
If you want to install a trial version of Docker instead of the current stable version, you need to replace stable with test or edge in the echo command given previously. Sometimes this is also necessary if you use a brand-new Ubuntu version. It often takes a few weeks for Docker to provide a stable Docker version for the latest Ubuntu release.
If you use the Uncomplicated Firewall (UFW) on Ubuntu (by default, you aren’t), Docker containers can’t use a network bridge. The culprit is the default setting of UFW, which prevents IP packets from being transferred. A solution to this could be to make the following change in /etc/default/ufw, and then restart the firewall via ufw reload:
# File /etc/default/ufw
...
DEFAULT_FORWARD_POLICY=”ACCEPT”
Debian
The installation process on Debian is similar to that on Ubuntu; the only difference is the name of the package source. (This affects the echo command.) You can find more details on this here: https://docs.docker.com/engine/install/debian
Installation on the Raspberry Pi Operating System
Surprisingly, Docker also runs on Raspberry Pi. However, the Docker documentation indicates that this platform isn’t currently intended for production use. Regarding the installation on Raspberry Pi OS, the best way to proceed is to use a script provided by Docker for this purpose:
curl -fsSL https://get.docker.com -o get-docker.sh
less get-docker.sh
sudo sh get-docker.sh
We’ve only briefly tested Docker on Raspberry Pi OS and didn’t notice any problems in the process. Due to its rather limited speed, however, we don’t consider Raspberry Pi to be an ideal platform for software development apart from electronics projects. However, Docker can help to easily get programming languages or other tools running in versions that Raspberry Pi OS doesn’t yet provide or no longer provides, which can definitely be a big help for tinkering projects or Internet of Things (IoT) applications.
Installation on Red Hat Enterprise Linux 8 and Fedora
If you use Fedora, RHEL 8, or a distribution compatible with them, such as Oracle Linux 8, AlmaLinux, or CentOS Stream, you should consider using Podman. Of course, installing Docker is no problem either. We ran our tests on Oracle Linux 8 and Fedora 34.
Before you begin, you should make sure Podman and its container build system Buildah are uninstalled:
dnf remove podman buildah
Then you need set up a new package source and install Docker using the yum-configmanager from the yum-utils package. The following commands are valid for RHEL and Co:
dnf install dnf-plugins-core
dnf config-manager --add-repo \
https://download.docker.com/linux/centos/docker-ce.repo
dnf install docker-ce docker-ce-cli containerd.io
The same commands can be used on Fedora. However, you’ll need a different package source. For this reason, the dnf config-manager command must be changed in the following way:
dnf config-manager --add-repo \
https://download.docker.com/linux/fedora/docker-ce.repo
Unlike the installation on Debian/Ubuntu, Docker won’t start automatically right away here, but the following two commands can help you in this context:
systemctl enable --now docker.service
systemctl enable --now containerd.service
Other Installation Variants
Installation instructions for other Linux distributions or for trial versions of Docker can be found here: https://docs.docker.com/engine/install/.
Troubleshooting and Logging
To test whether Docker is running, you must execute the docker version command. It should show the version numbers of the Docker client and Docker server. By using journalctl -u docker, you can read the logging messages of the Docker daemon.
Depending on the kernel version, the Docker daemon may provide warnings that certain features aren’t available:
journalctl -u docker | grep warning
warning: Your kernel does not support CPU realtime scheduler
warning: Your kernel does not support cgroup blkio weight
warning: Your kernel does not support cgroup blkio
weight_device
You can safely ignore these warnings. The missing features would give Docker a finer control over how containers are run. On a development computer, these functions are completely irrelevant. Even in production use, the functions are only of secondary importance.
Working without “sudo”
By default, almost all Docker commands must be executed with root privileges on Linux. Instead of docker run ... you need to run sudo docker run .... The following command provides an uncomplicated solution to this and adds the specified user to the docker group:
sudo usermod -aG docker <username>
The group change won’t become effective until after a new login. However, you should take into account that the seemingly harmless group assignment indirectly assigns root privileges to the user in question. As far as security is concerned, it’s better to run Docker containers entirely without root privileges.
Editor’s note: This post has been adapted from a section of the book Docker: Practical Guide for Developers and DevOps Teams by Bernd Öggl and Michael Kofler.


Comments