The SAP Fiori launchpad is the central entry point for all SAP Fiori apps.
Whether you’re rolling out transactional applications for end users or enabling analytical dashboards for decision-makers, the launchpad determines how people find, launch, and interact with your apps. Setting it up correctly ensures smooth access, security, and a modern user experience across your SAP landscape.
In this guide, we’ll walk through the entire lifecycle of the launchpad: activating and deploying the underlying infrastructure, creating and configuring catalogs and tiles, and keeping your environment up to date with the latest SAP Fiori designs. Along the way, we’ll highlight options for both SAP S/4HANA and SAP Business Suite landscapes, as well as cloud scenarios.
For advanced adjustments beyond setup, you can explore our deep-dive resources:
- SAP Fiori Launchpad Customization: Learn how to tailor navigation, groups, and layouts.
- How to Create and Maintain SAP Fiori Themes in the SAP Fiori Launchpad: See how to brand your system with custom themes.
How to Deploy SAP Fiori
Let's start by discussing the different SAP Fiori deployment options for SAP S/4HANA and SAP Business Suite systems, and emphasize recommended deployment options, the pros and cons of each, and so on.
We’ll start with on-premise, followed by cloud deployment.
On-Premise Deployment
For SAP Fiori on-premise, there are two deployment options:
- Central hub
- Embedded
In both cases, business data is consumed from an on-premise SAP system. The difference is in the location of SAP Fiori UI components: with the central hub option, the SAP Fiori components are deployed on a separate (SAP Gateway) server, while for the embedded option, they reside on the same server.
Central Hub
In the beginning, when SAP Fiori was introduced, the central hub was the only deployment option. A separate SAP Gateway installation was required to expose SAP Business Suite data to the SAP Fiori UI using OData. Nowadays, this limitation for SAP Business Suite systems doesn’t exist anymore, but the deployment option is still recommended for the SAP Business Suite backend (see figure below).
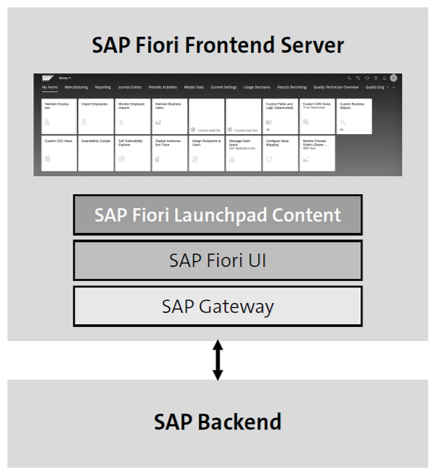
It can also be used for SAP S/4HANA in a single system scenario, although the recommended approach is to use embedded deployment. There are specific use cases where there can be exceptions to this rule—for example, if you have a requirement to have backend and frontend server systems in separate network zones, to protect the backend system from exposure on the internet. However, this brings some complexity, which we’ll cover at the end of this section, when we go through the list of advantages and disadvantages of central hub deployment.
The real advantage of the central hub deployment option is in scenarios in which you have multiple backend systems and want to use the central hub as a central entry point through which you’ll expose the SAP Fiori UI.
The first use case is a scenario with multiple backend SAP Business Suite systems, as shown in this figure.
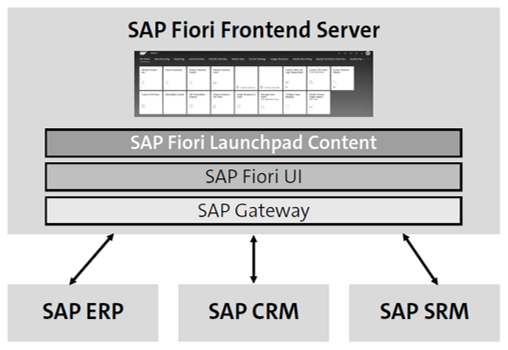
Because the SAP Fiori UI components of SAP Business Suite systems are compatible with multiple backend versions, it’s possible to connect backend systems on different release versions to a central SAP Fiori frontend server. It’s also important to mention here that the SAP Fiori frontend server can run on any database.
The next use case covers scenarios in which you have a single SAP S/4HANA system together with one or more SAP Business Suite systems, as shown below.
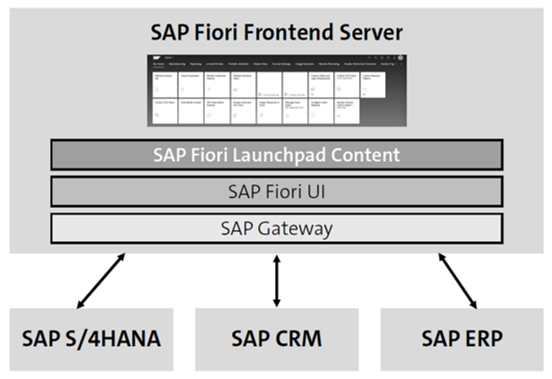
Because you’re using a single SAP Fiori frontend server to expose content from both the SAP S/4HANA and SAP Business Suite backend systems, the SAP Fiori frontend server has to be on the exact release that corresponds to the SAP S/4HANA product. More details are presented in the second table below.
The recommended, but not mandatory, database system for the frontend server in this scenario is SAP HANA.
Now, let’s expand the previous scenario with an additional SAP S/4HANA system. It will look as shown.
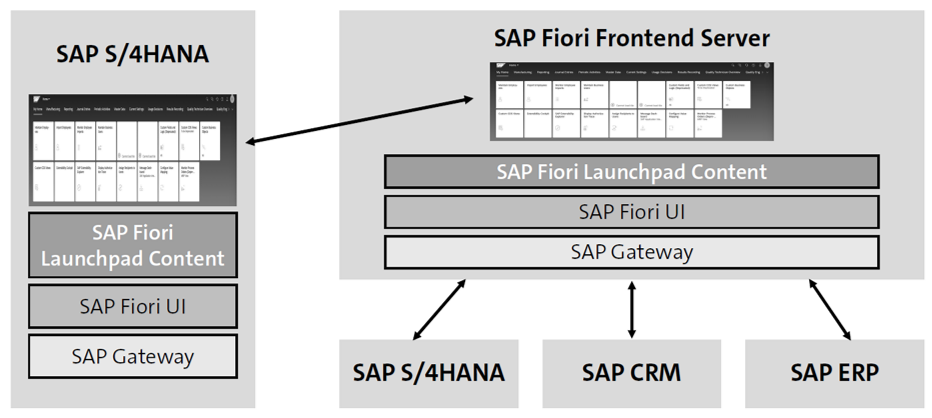
As a consequence, there will be an additional SAP Fiori launchpad for every additional SAP S/4HANA system. The way to connect the central SAP Fiori launchpad with local SAP S/4HANA launchpads is to introduce a URL tile, which in turn would launch the local launchpad of the dedicated application in the target system. This is not the common scenario, and it’s mostly used in complex landscapes in which SAP Business Suite systems are being upgraded to SAP S/4HANA.
The major restriction of this approach is related to UI integration capabilities due to multiple launchpads.
To overcome the limitations of this scenario, you should consider using SAP Launchpad service on SAP BTP.
Finally, let’s consider a scenario with multiple SAP S/4HANA systems, as shown in the next figure.
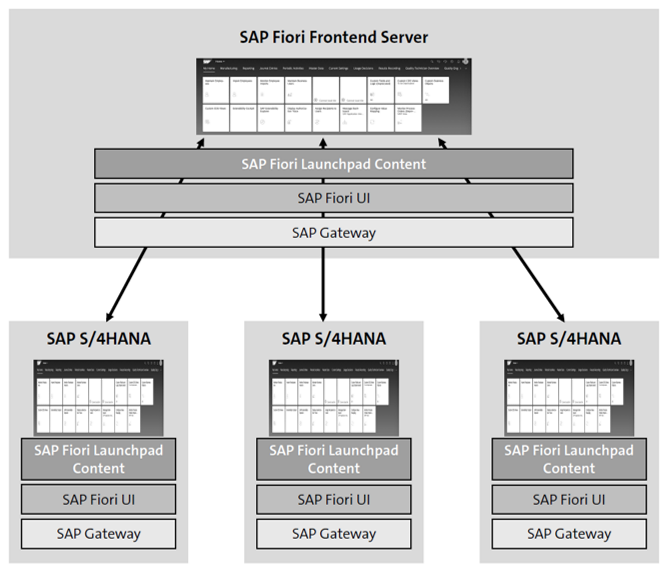
For this specific scenario, the recommended approach is to use the embedded deployment option. However, if you still want to use a central SAP Fiori launchpad, this can be implemented via an SAP Fiori frontend server with custom tiles that will launch the local launchpads via URL integration in a separate browser window. As SAP S/4HANA systems that are involved in this scenario are potentially on different versions, only release-independent UIs such as the My Inbox app or custom apps can be deployed centrally.
The same limitations that apply for UI integration capabilities are present here as well, and the same recommendation is applicable as well: consider using SAP Launchpad service on SAP BTP.
Now that we’ve gone through the different scenarios for the central hub deployment option, let’s summarize advantages and disadvantages of this approach.
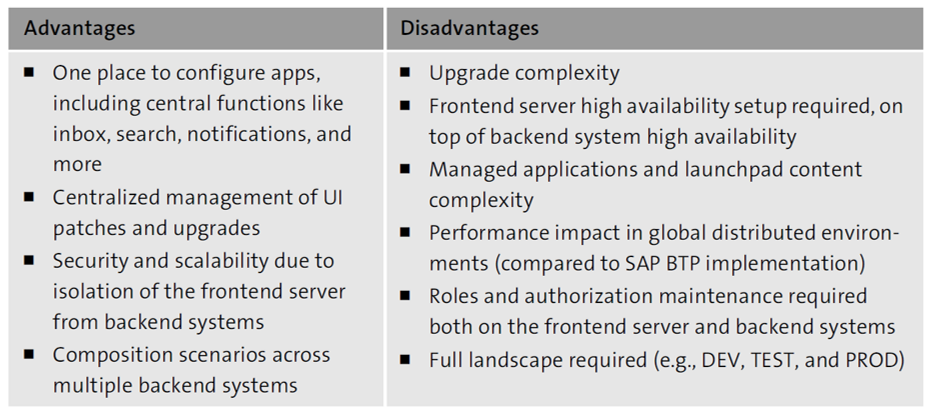
Embedded
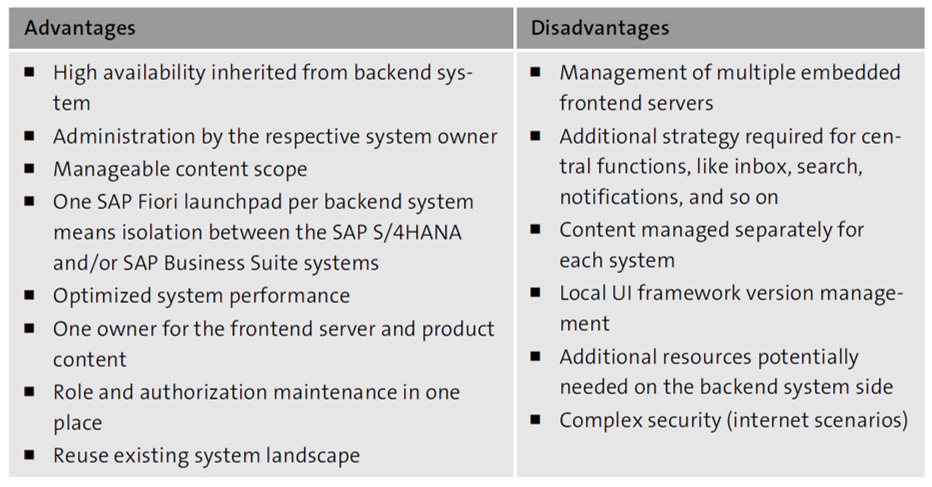
In embedded scenarios, the SAP frontend server and backend are integrated into one system. Although this configuration brings advantages such as reduced total cost of ownership (TCO) and direct access to structures and business logic, there are some considerations to take into account, such as dependency between versions of the SAP frontend server and backend component versions, the component lifecycles, and so on. At the end of this section, we’ll go through the list of advantages and disadvantages of the embedded scenario.
The embedded scenario is the recommended setup for single and multiple SAP S/4HANA system deployments, but it can be used for SAP Business Suite applications as well. The figure below shows one example of an embedded scenario for a single system.
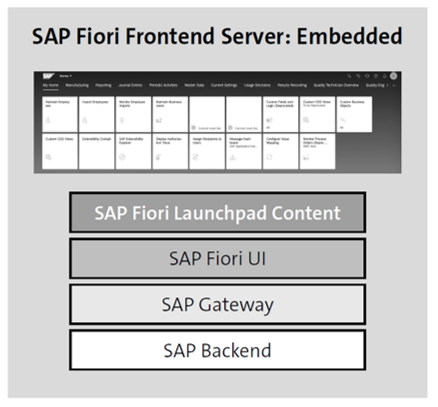
A scenario with multiple SAP S/4HANA systems would look as shown here.

The major advantages and disadvantages of the embedded scenario are listed in the following table.
Central Launchpad on SAP Business Technology Platform
You can expect that modern, complex landscapes will consist of multiple on-premise and/or cloud systems. For example, the landscape can contain SAP S/4HANA systems and SAP software-as-a-service (SaaS) solutions (SAP SuccessFactors, SAP Ariba, etc.), but also custom-built applications and extensions running in SAP BTP. This landscape needs one central entry point, which due to the hybrid landscape has to be deployed in SAP BTP. To help organizations address this challenge, SAP provides the SAP Launchpad service on SAP BTP (see below). It is currently available in multiple regions, on Amazon Web Services (AWS) and Microsoft Azure infrastructure, and also available via Alibaba in China.
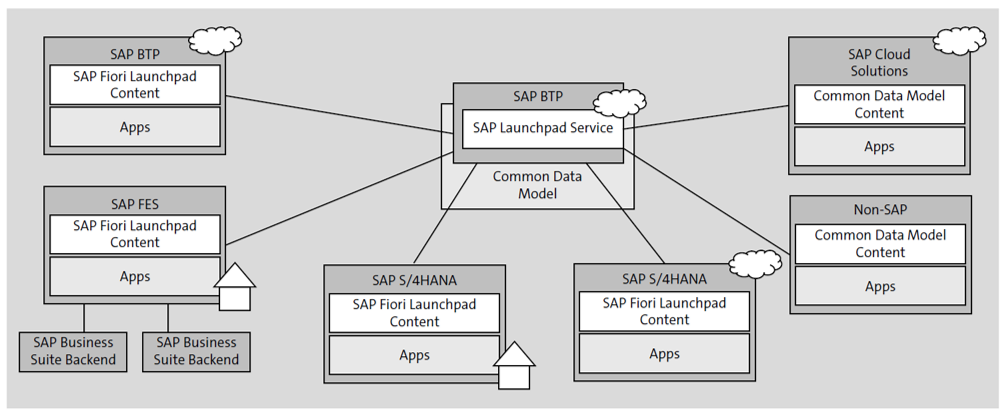
From an operations perspective, the underlying systems still have their own software lifecycle, authorization management, and business content. While each system still has its own launchpad, the SAP Launchpad service enables business users to have one central place where they can access all their applications, without having to switch between the multiple backend systems.
There are two approaches to integrating applications into the central SAP Fiori launchpad:
- Manual integration using templates for common UI technologies, like SAPUI5, Web Dynpro, SAP GUI for HTML, and so on. It’s also possible to integrate web applications using a generic URL launcher. Applications integrated using this approach can be configured to open in place or in a new tab.
- Content federation using SAP products as common data model (CDM)–compliant content providers, exposing business content via roles, applications, and related metadata.
The table below shows some examples of applications that can be integrated using the manual integration or content federation approach.

The SAP Launchpad service is configured using Site Manager tools:
- Site Directory: Manage the sites in an SAP BTP subaccount.
- Content Manager: Manage business content in an SAP BTP subaccount. The integration can be done, as already said, using a manual integration or content federation approach. Business content can be used in any site that belongs to the same SAP BTP subaccount.
- Provider Manager: Manage content providers.
- Settings: Manage settings such as for the error log, notifications, alias mapping, and so on. Here you’ll also find an option to migrate SAP Fiori launchpad sites from a Neo to a Cloud Foundry environment.
Note that more information and the latest documentation about SAP Launchpad service can be found at http://s-prs.co/v544905.
How to Activate the SAP Fiori Infrastructure in SAP Business Suite
Initially, 25 SAP Fiori apps were released for the SAP Business Suite systems to address the casual needs of users. With the introduction of SAP Fiori, a new task was added to the worklist that an SAP Basis person (or an SAP system admin) would normally cover. In the initial few years, this was a manual and tedious task with a high risk of missing steps, activation of a service, maintaining some configurations, and so on, resulting in additional troubleshooting time needed. However, SAP Fiori has evolved a lot since then and has introduced some automated task lists that significantly speed up the configuration of SAP Fiori and lower the number of errors. You can run these tasks lists just like any other software installer on your system and provide some prerequisites parameters, and it would get the job done for you.
An SAP Fiori architecture for SAP Business Suite comprises the following components as shown in the figure below:
- HTML or web client (web browsers, e.g., Chrome, Edge, Safari)
- ABAP FES
- ABAP BES
- SAP Web Dispatcher

The ABAP FES typically contains central UI components, that is, UI-related libraries and SAP Fiori launchpad artifacts (UI apps and OData services required to run the launchpad), and the SAPUI5 components (SAP Fiori apps and a gateway component to read data from the backend). The ABAP backend data contains the core business components and relevant business data, as well as a gateway component to enable the business data to be read.
The ABAP FES and BES are logical components and can be both present on the same system or on two different systems connected to each other via a trusted remote function call (RFC). When both the ABAP FES and BES components are installed on the same system, the setup is called an embedded deployment; when both the ABAP FES and BES components are installed on different systems, the setup is called a hub deployment.
For SAP Business Suite systems, the SAP recommendation is to use a hub deployment, that is, to separate the frontend components containing the UI-related content from the backend components that contain the business logic and data.
To set up and activate the infrastructure to support SAP Fiori apps, the following activities (described at a high level) need to be performed on an SAP Business Suite system:
- Creating and maintaining SAP Fiori users
- Performing basic configuration
- Connecting the FES to the BES
- Configuring SAP Web Dispatcher and embedded search
- Setting up the SAP Fiori launchpad and SAP Fiori launchpad designer
- Accessing the launchpad for the first time
The table below lists the standard SAP task lists that can be executed to set up the SAP Fiori infrastructure on an SAP Business Suite system. Depending on the required deployment option, Transaction STC01 can be used to run these task lists in either the FES or BES. For each task list, you can select the relevant task from the list and execute it. Note that some of the tasks require manual steps or parameters before executing them.

The next figure shows the first task, SAP_GATEWAY_BASIC_CONFIG, which is used to set up the SAP Gateway component on the FES. The task list is used to activate services, schedule some background jobs, and maintain some recommended settings/configurations. In addition, the Parameter column lists the input parameters for the relevant task step. For example, the Configuration Parallelization of Batch Queries (/IWBEP/BATCH_CONFIG) step has a parameter requirement as its prerequisite.

In addition to these tasks, you also need to configure SAP Web Dispatcher if you’re rolling out the SAP Fiori fact sheet apps. If you only plan to deploy transactional apps, the use of SAP Web Dispatcher is optional.
Note: For more information regarding SAP Web Dispatcher, go to the SAP Help Portal (http://help.sap.com), and navigate to Browse by Product > Technology Platform > SAP NetWeaver > SAP NetWeaver Application Server for ABAP 7.52 > SAP NetWeaver Library: Function-Oriented View > SAP NetWeaver Application Server for ABAP Infrastructure > Application Server Infrastructure > Components of SAP NetWeaver Application Server for ABAP > SAP Web Dispatcher.
We recommend using the latest SAP Web Dispatcher version. For more information, see SAP Note 908097.
The SAPUI5 applications are typically based on HTML5 and JavaScript, and they can access data from multiple backend systems via OData services. However, as the JavaScript code is constrained by the same origin policy (i.e., the origin or source of the UI resources should be the same as the source of data), the use of SAP Web Dispatcher is required to serve as a reverse proxy. Therefore, all the systems are exposed to the browser (web clients) through SAP Web Dispatcher, which ensures a common origin.
Just like an ABAP application server (AS) instance, SAP Web Dispatcher requires SAP Kernel and a set of profiles configured via profile parameters. Below shows an example configuration of the SAP Web Dispatcher parameters used for accessing SAP Fiori fact sheet apps. These parameters typically contain security configurations such as Secure Sockets Layer (SSL), Private Security Environment (PSE), and mapping rules for requests.
wdisp/ssl_encrypt = 1
wdisp/ssl_auth = 1
wdisp/add_client_protocol_header = 1
wdisp/ping_protocol = https
icm/HTTPS/verify_client = 1
DIR_INSTANCE = ./
ssl/ssl_lib = /sapmnt/ABA/exe/uc/amd64/libsapcrypto.so
ssl/server_pse = /usr/sap/WEB/W0/sec/SAPSSLS.pse
ssl/client_pse = /usr/sap/WEB/W01/sec/SAPSSLC.pse
wdisp/ping_protocol=https
icm/HTTPS/verify_client = 1
icm/server_port_0 = PROT=HTTPS,PORT=1081,TIMEOUT=120
wdisp/system_0 = SID=FES, MSHOST=dewdfias415.wdf.sap.corp, MSPORT=8101,
SRCSRV=*:1081,
SRCURL=/sap/opu/;/sap/bc/; /sap/public/bc/;/sap/saml2/;/ui2/nwbc/,CLIENT=0001
wdisp/system_1=SID=ERP,MSHOST=dewdfias414.wdf.sap.corp,MSPORT=8101,
SRCSRV=*:1081,SRCURL=/sap/es/, CLIENT=100
wdisp/system_2=SID=HDB,EXTSRV=https://dewdfias414.wdf.sap.corp:4330,
SRCSRV=*:1081,SRCURL=/sap/hba/;/sap/hana /
After adding/configuring the relevant profile parameters of SAP Web Dispatcher, you need to save the instance profile and restart your SAP Web Dispatcher.
Note: Our discussion has aimed to provide a high-level understanding of some typical SAP Web Dispatcher parameters. Refer to the SAP Help Portal to learn more.
Once your infrastructure is activated, you can configure catalogs and tiles to make apps available to users.
11 Steps to Follow to Deploy an SAP Fiori Tile to SAP Cloud Platform Portal
Here are the steps to follow to deploy an SAP Fiori tile to SAP Cloud Platform Portal. This example uses SAP Cloud Platform Portal as the admin UI.
1. In SAP Web IDE, choose the MyTile project, and deploy your project by choosing Deploy > Deploy to SAP Cloud Platform.
2. Leave the default options unchanged and click Deploy.
3. Wait for this step to complete, then click Register to SAP Fiori Launchpad in the pop-up window once it appears.
4. Keep all things default and click Next twice, then click Finish.
5. Click OK to close the pop-up window.
6. Open a new browser window, then open the Administration page of SAP Cloud Platform Portal.
7. Follow menu path Content Management > Apps in the left panel.
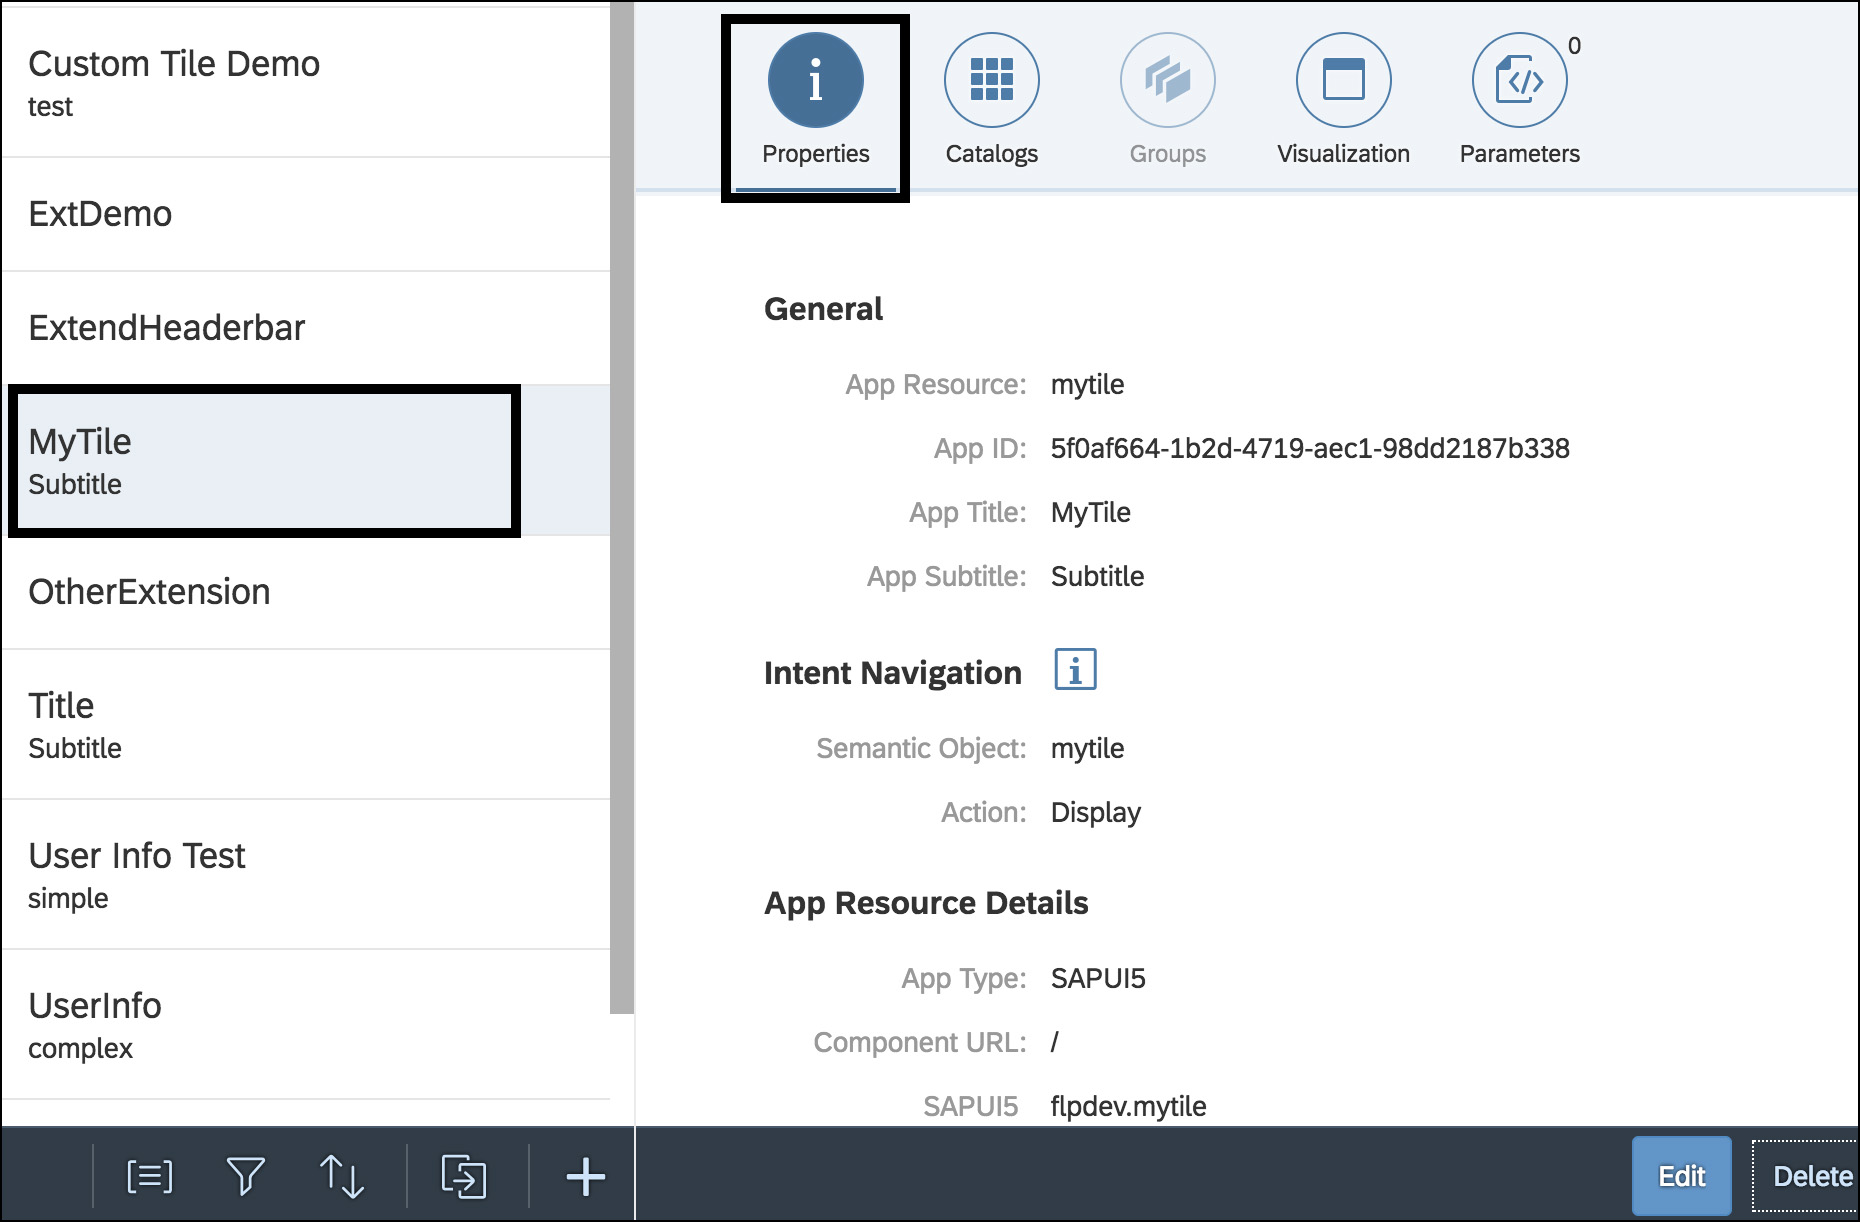
8. Locate MyTile, click it, and click Edit, as shown below.
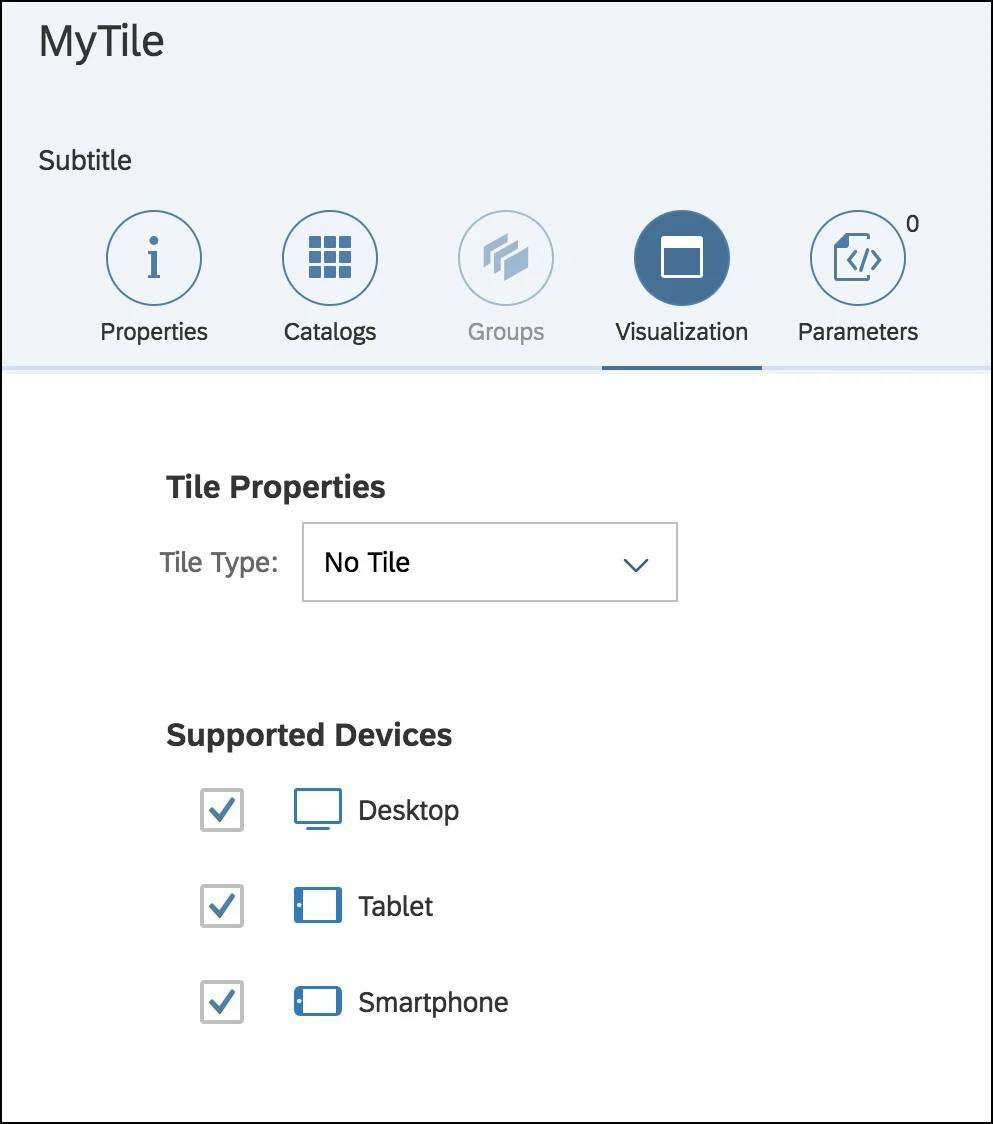
9. Switch to the Visualization tab and choose No Tile for the Tile Type property, as shown in the following figure. The tile is not like a normal SAPUI5 application. We add the tile here just so it can be accessed via SAP Fiori launchpad, and we choose No Tile because it doesn’t need a tile display in SAP Fiori launchpad.
10. Click Save.
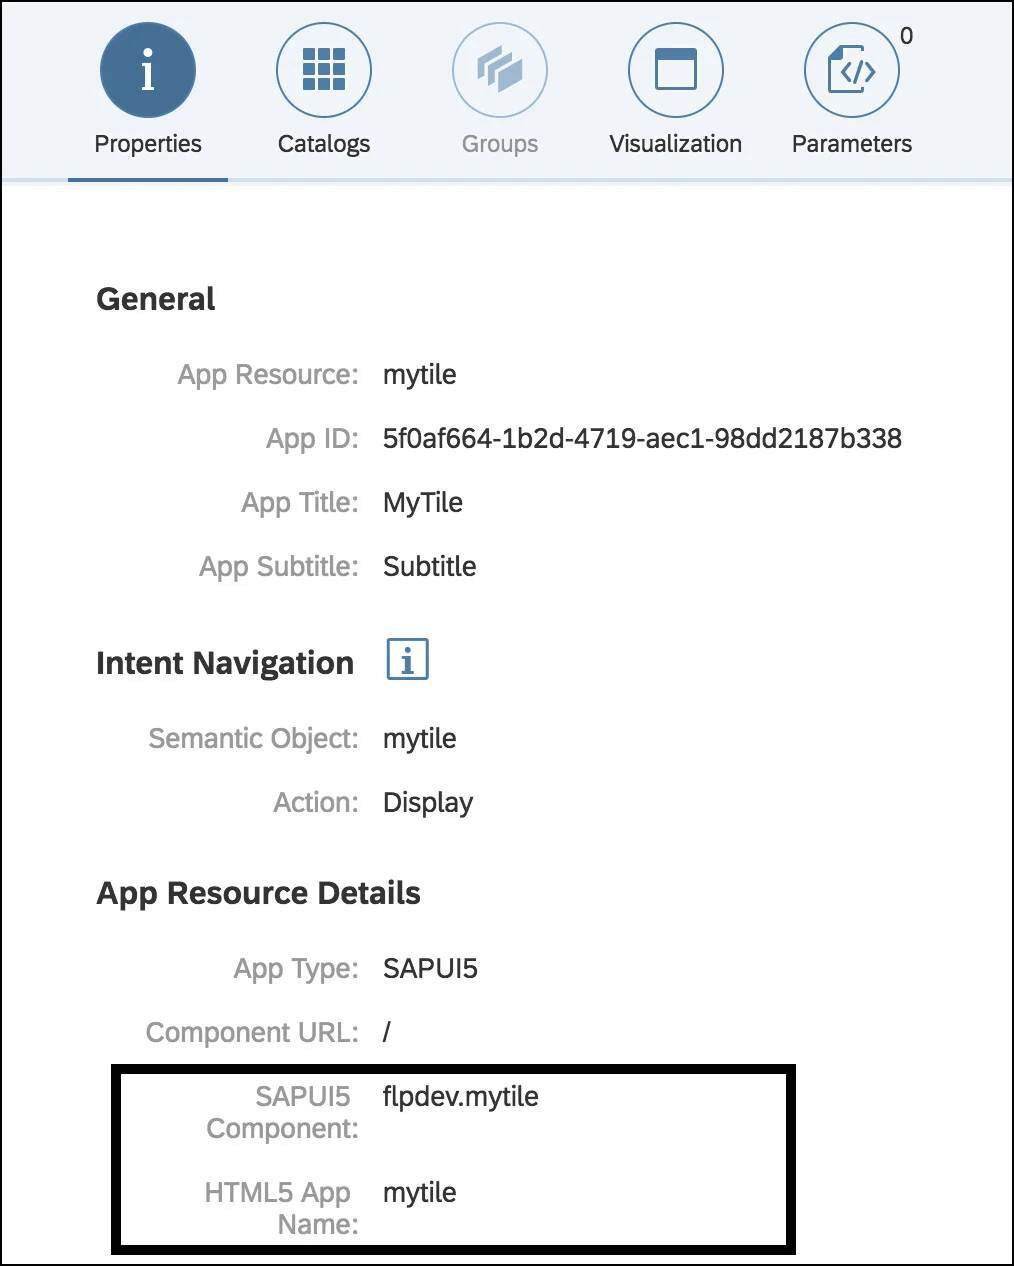
11. Switch to the Properties tab, scroll down, find the App Resources Details section, and jot down the values for SAPUI5 Component and HTML5 App Name. You’ll use these values when setting visualization options for your app. This tab is shown below.
You’ve deployed your tile successfully in SAP Fiori launchpad! From here, you can use your tile for a previously created app. To learn how to organize pages, groups, and roles, see our customization post here.
How to Get the Latest SAP Fiori Design in Your SAP System
Since its release, SAP Fiori has been constantly evolving, improving the UX and implementing the latest design standards. The current version is SAP Fiori 3. Here's how to perform a sample SAP Fiori upgrade process.
Preupgrade Considerations
The first prerequisite you need to take into account is component versions. The central component is SAP_UI, but it’s dependent on the following components:
There are some minimal requirements that can be found in the online documentation, but the optimal versions are shown in this figure.
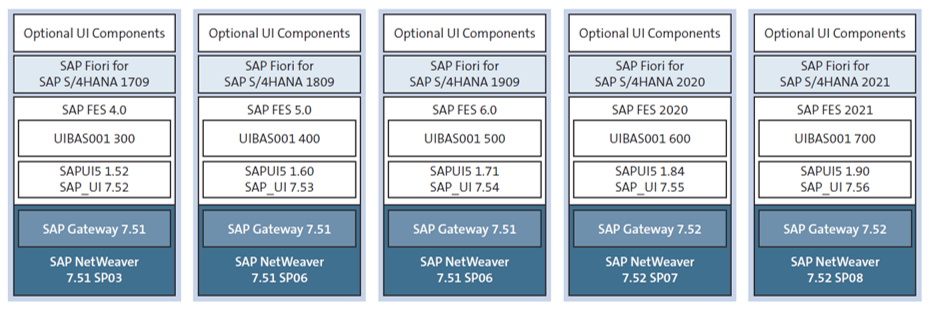
In the documentation, you also can find information about key capabilities and prerequisites.
Note: The current documentation can be found at http://s-prs.co/v544908. From there, navigate to Set Up and Configure SAP Fiori > Setup of SAP Fiori System Landscape.
Upgrading an Existing SAP Fiori Landscape
The recommended approach for any SAP software maintenance, including SAP Fiori upgrades, is to use Maintenance Planner and SUM.
Maintenance Planner will determine the required packages and their dependencies, and you will execute the upgrade process in SUM. For the upgrade itself, SUM uses the stack XML file generated by Maintenance Planner.
Note: More details about SUM can be found at https://support.sap.com/sltoolset.
Sometimes, an upgrade of SAP Fiori frontend components requires an upgrade of the backend as well. A combined upgrade of the frontend and backend is also supported and can be executed in one run using Maintenance Planner. But before executing the upgrade, it’s recommended that you familiarize yourself with the release SAP Notes for your specific SAP S/4HANA version.
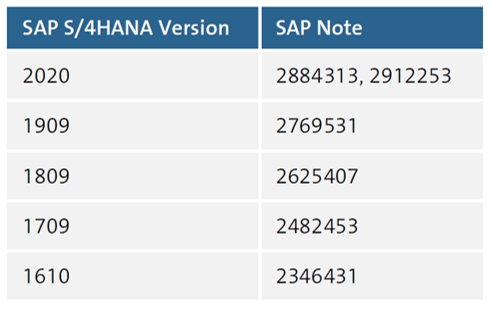
For example, if you want to upgrade the frontend in version 1909, SAP Note 2769531 will offer information about dependencies with the backend version, as shown below (see highlighted text).

To access the Maintenance Planner, go to https://support.sap.com/mopz. This opens the Maintenance Planner home page (see figure below), which contains a lot of useful information, including links to navigate to more detailed documentation.
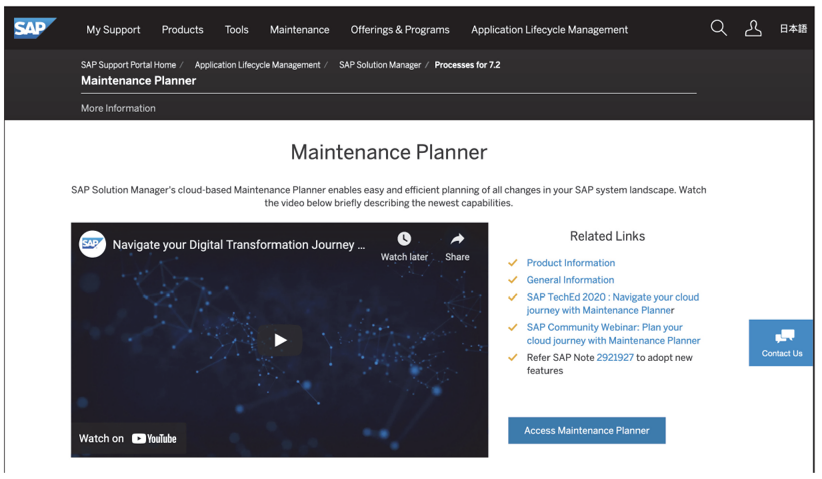
From here, navigate to the next page by clicking the Access Maintenance Planner link. The resulting page looks as shown in the next figure. This is the new, recently updated Maintenance Planner dashboard.
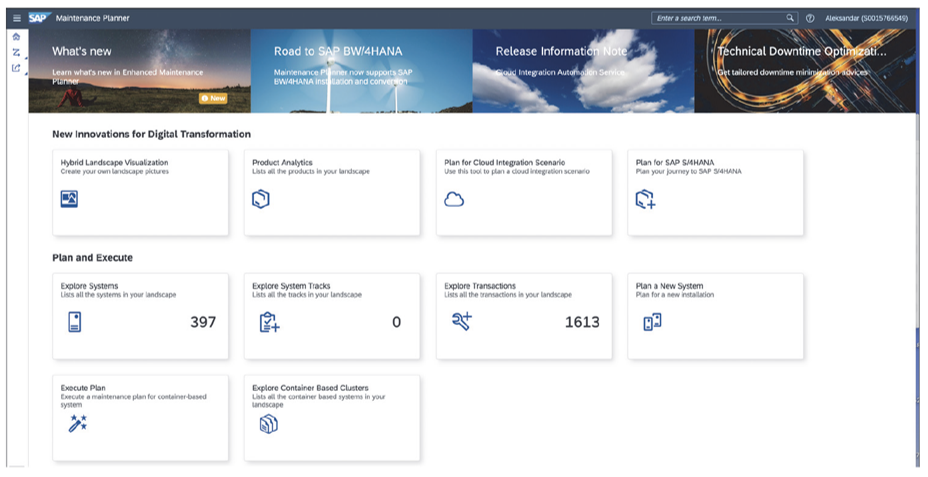
Next, you’ll select the system on which you want to perform the upgrade via the Explore Systems tile. In the example shown below, the system ID is S19.

The next screen presents lifecycle options for the selected system, as shown here.
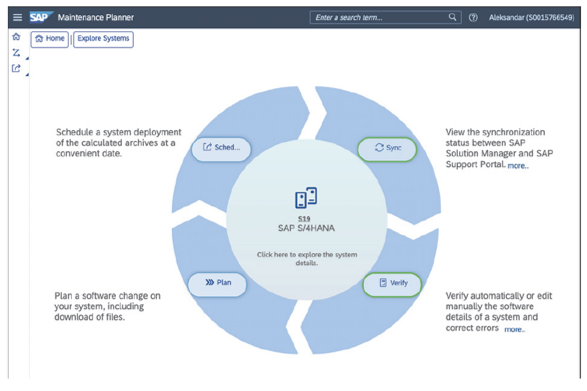
From here, navigate to Plan to reach the screen shown in the next figure.
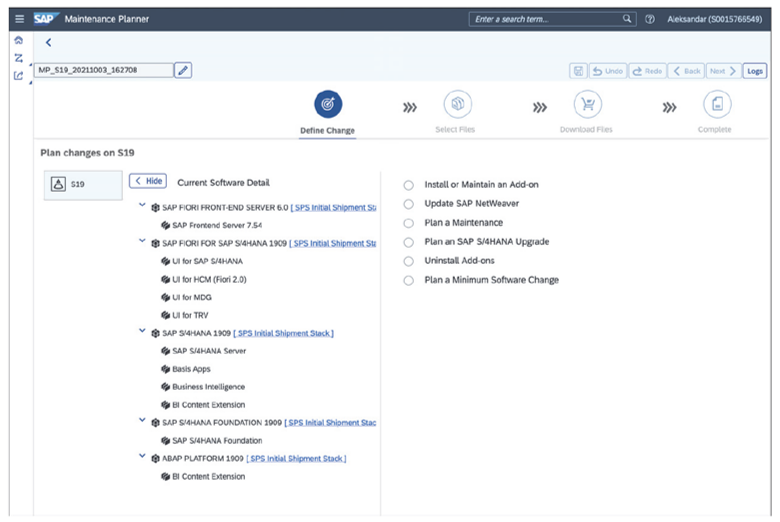
In the left part of this screen, you’ll see the current information about your system, and to the right, you’ll see the different maintenance options available for this system. Among other options, in the example above, you can see Plan an SAP S/4HANA Upgrade, as this system is on SAP S/4HANA 1909. But the option you’re looking for to proceed is Install or Maintain an Add-on. If you click this option, you’ll navigate to the screen shown in the next figure.
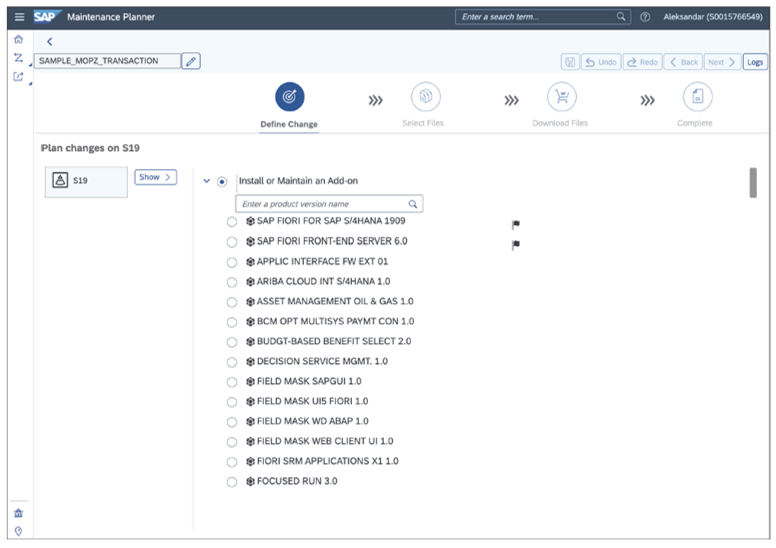
Flags to the right show which add-ons are already installed and can be patched. Now select the component you want to upgrade, and then select the Support Package Stack (SPS) from the dropdown to the right (see below).
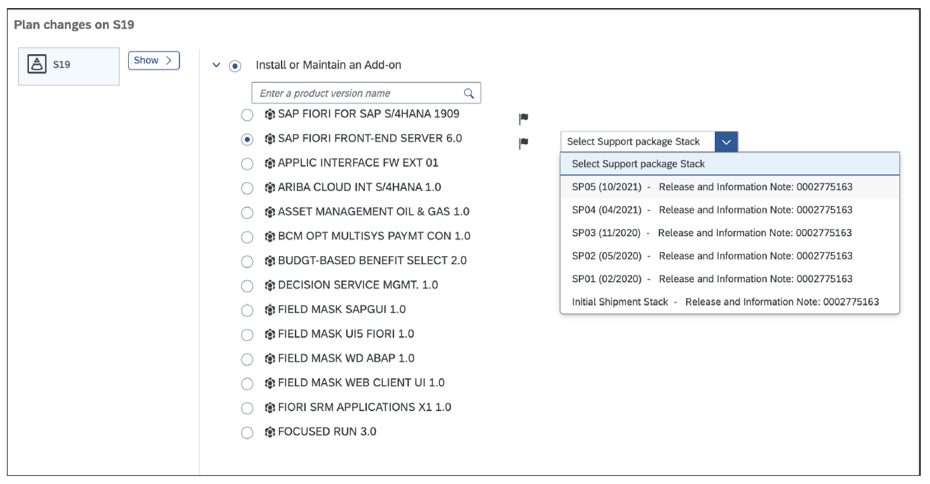
Once you confirm the selection, Maintenance Planner will calculate the necessary files. Once the calculation is done, Maintenance Planner will bring you back to the planning screen. Now we have the option to select additional components to be installed or patched, or proceed to the next step by clicking Next.
After that, Maintenance Planner will navigate you through a series of screens where you can see selected and add additional files—first OS/DB files, and then ABAP/non-ABAP files.
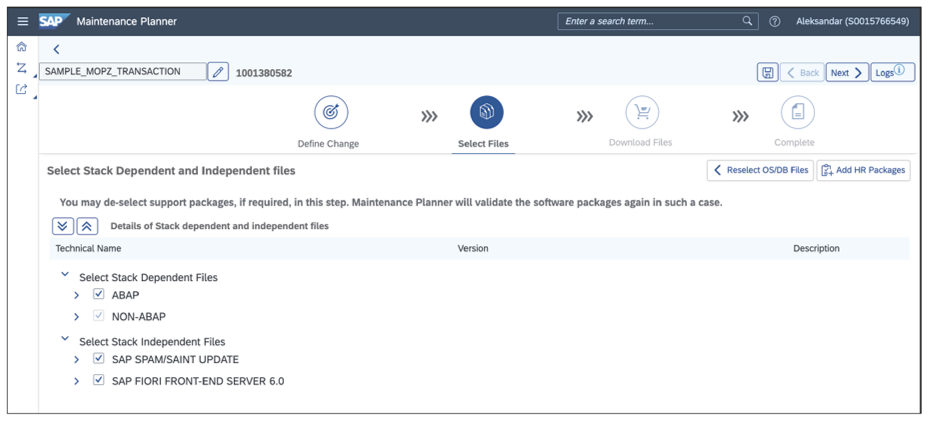
Clicking Next takes you to a screen with a list of files to be downloaded, as shown in this figure.
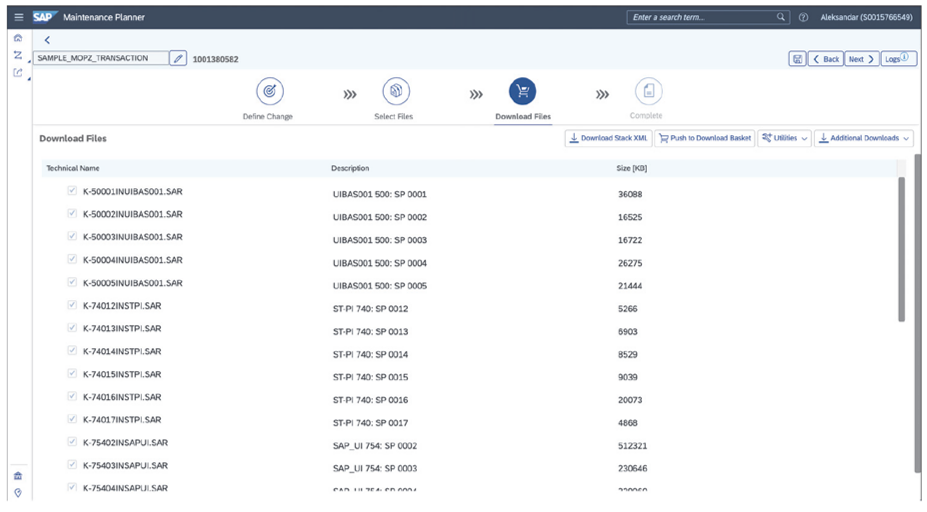
On this screen, you have the option to download the stack XML file that will be used by SUM and to push files to a download basket. After you push files to a download basket, you can use Download Manager for mass file download.
In order to brand your updated UI, see our SAP Fiori theme creation page.
Learn SAP Fiori in Our Rheinwerk Course!
It’s time to get to know SAP Fiori, SAP’s newest UX. See what’s changed since the SAP GUI days. Explore SAP Fiori’s user-based roles and its transactional, fact sheet, and analytical apps for business. Learn how to personalize your SAP Fiori experience to make it your own! Get access to course recordings by clicking the banner below.
Conclusion
The SAP Fiori launchpad is more than just a homepage—it’s the foundation for how your users experience SAP applications. By activating the right infrastructure, deploying and organizing catalogs, and upgrading to the latest designs, you ensure that the launchpad delivers on its promise of a role-based, modern, and intuitive UX.
From here, you can continue improving the user experience: customize layouts to match your business processes or roll out branded themes that make the system feel like your own. With a well-structured launchpad in place, your organization will be better positioned to take full advantage of SAP Fiori’s capabilities and support end users with a consistent, efficient, and engaging interface.
Editor’s note: This post has been adapted from sections of the books SAP Fiori Launchpad: Development and Extensibility by Steve Guo; Configuring SAP Fiori Launchpad by Claus Burgaard and Setu Saxena; and SAP Fiori: Implementation and Development by Souvik Roy, Aleksandar Debelic, and Gairik Acharya. Steve is an SAP mentor, developer, and trainer who has been working with SAP for more than 8 years. Claus is a UX and mobility expert with more than 20 years of technical experience at SAP. Setu is a UX architect at SAP Denmark with more than nine years of experience working with SAP. Souvik is a senior application engineer at Google with more than 17 years of experience in various technical areas in SAP. Aleksandar is an SAP technical architect at IBM with more than 20 years of SAP experience. Gairik is a senior technical architect and associate partner at IBM with more than 20 years of IT experience.
This post was originally published 11/2020 and updated 9/2025.



Comments