
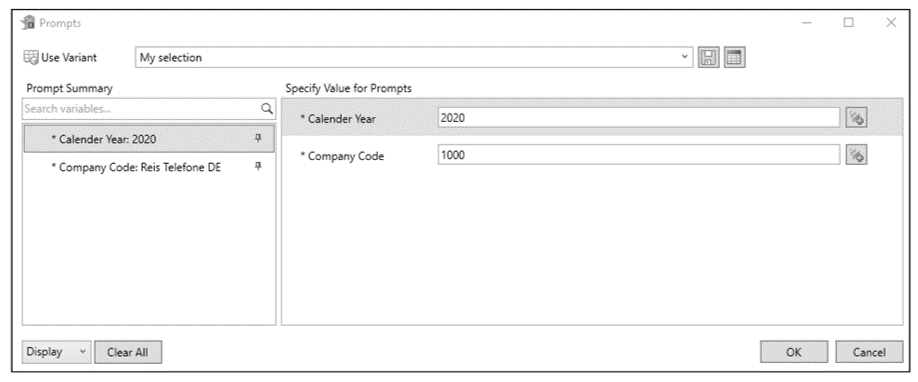
Once you’ve defined the values for a prompt in SAP Analysis for Microsoft Office, you can save these values as a variant, as shown in this figure.
You can save a variant either for a query or for a document (workbook or presentation). The variants of a document can contain values for the prompts of various data sources that are part of this document. Variants can be created as user-specific variants or as global variants. While a user-specific variant is only visible to your user, a global variant can be used by all users.
The next time you open the workbook or query, you can use your user-specific variants and all global variants. You can adjust an existing variant by selecting other values in the prompt and saving the variant again. You can also delete existing variants.
To allow a user to create a variant, authorization object S_RS_PARAM must be maintained for this user on the SAP NetWeaver server.
You can create several variants for the same prompt, which allows you to select different values for the prompt and analyze a dataset from different perspectives. However, only one variant can be active at a time; you cannot combine values from different variants.
Now, let’s explore how variants work, from creating them to using, adjusting, and deleting them.
Creating a User-Specific Variant
You can save your selection as a variant so that you don’t have to repeat the variable entry each time.
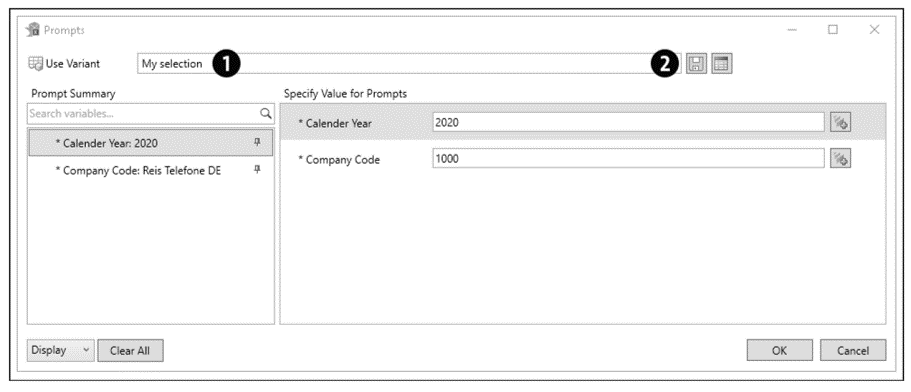
First, you’ll define the values of the command prompt. Then, as shown in the figure below, you’ll enter a name for the variant in the Use Variant field (1) and save the variant by clicking the Save Variant button (2). Now, the variant can be selected from the list.
Creating a Global Variant
In the previous section, you learned how to create a variant. By default, the specified variable selection is saved as a user-specific variant, which means that the variant is only visible for the user that created it.
If you want other users to see and use the variable selection you’ve saved, you must create a global variant. This variant is visible in the entire system.
If you use SAP BusinessObjects Business Intelligence (SAP BusinessObjects BI) as a platform, you must select the User and Global option from the Variants Support dropdown list in the Central Management Console to use global variants. You can find this setting in the Analysis Runtime area.
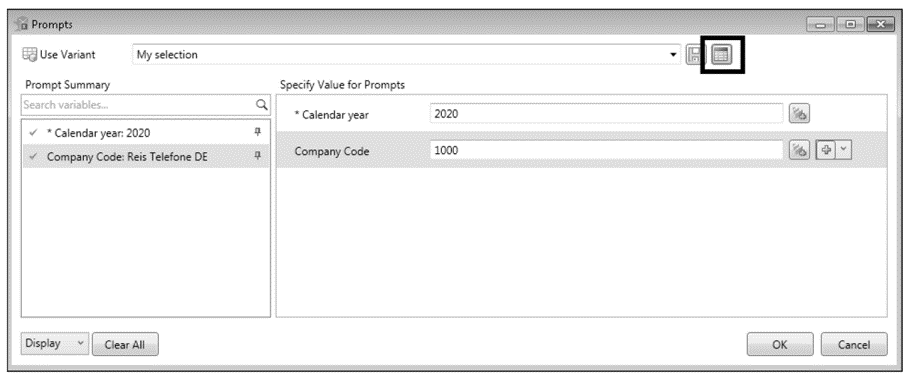
To create a global variant, you must change the type of the user-specific variant. Open the Prompts dialog box and click the Show Variant Settings button, as shown in this figure.
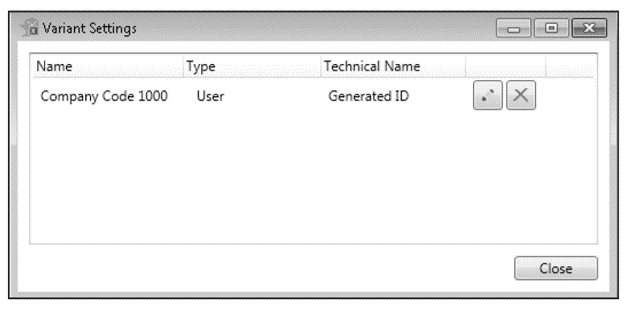
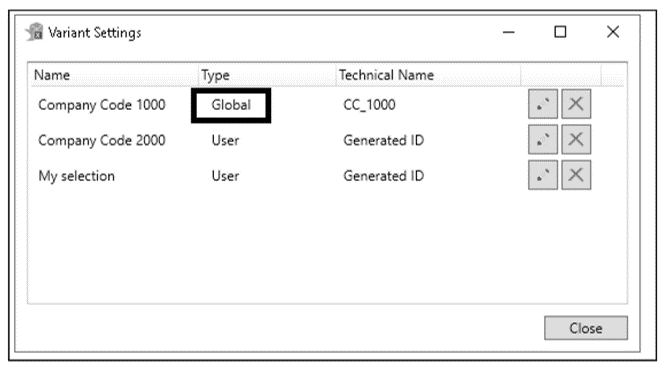
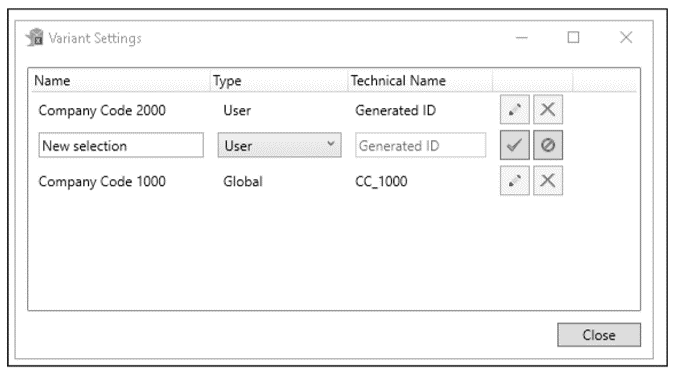
Now, a new window called Variant Settings opens, where the available variants are displayed with their names, types, and technical names. An example is shown in the next figure.
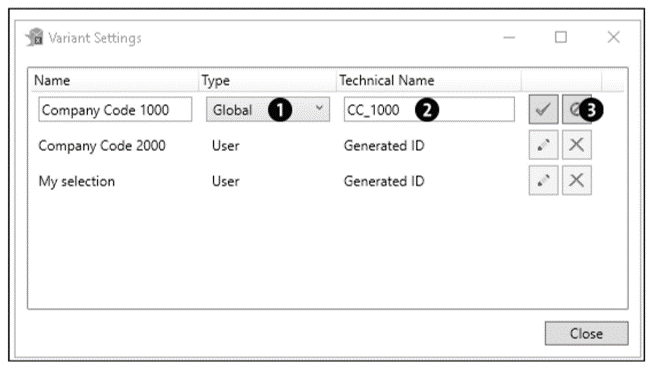
Select the user-specific variant you want to change and click the Change button next to the variant. Then, as shown in the next figure, select Global for the variant from the Type column (1). Then, enter a Technical Name (2). Confirm the variant settings by clicking the Confirm Variant Setting button (3) to apply the changes. If you want to undo these changes, click the Cancel button.
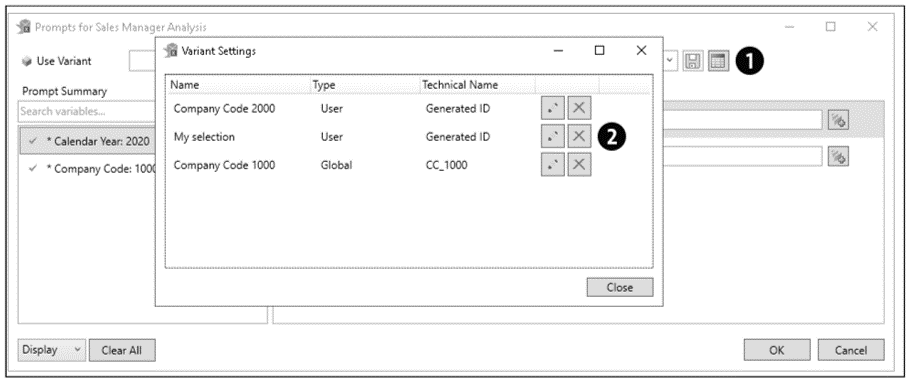
The variant is saved as a global variant, as shown below, and can be used by all users. You can now exit the Variant Settings dialog box by clicking the Close button.
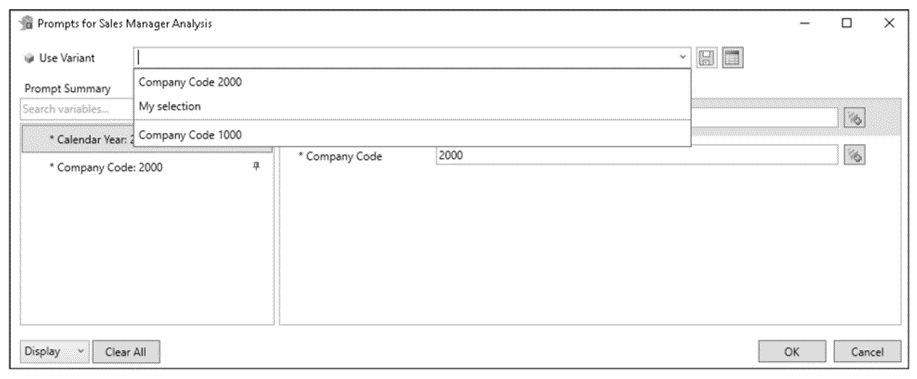
As shown here, the global variant is spatially separated from user-specific variants in the Prompts dialog box.
Modes for Working with Variants
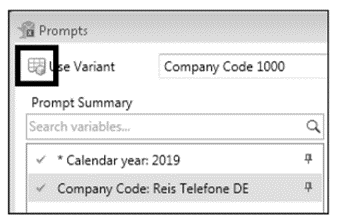
You can create and edit variants in the Prompts dialog box, and two different modes are involved when working with variants. The mode for documents works with document variants, while the mode for data sources works with query variants. An icon in the Prompts dialog box (to the left of the variant) indicates which mode is currently active, as shown in this figure.
The active mode depends on your selection for the workbook property Merge Variables under the Components tab in the Design Panel and how you open the Prompts dialog box. The following sections describe the different modes in more detail.
Working with the Document Mode
The mode for documents is indicated by the icon in the Prompts dialog box. In this mode, you’ll see all variants for the respective workbook or presentation. If you define a new variant, it is stored in the respective document. Some prerequisites apply for working with document variants.
3
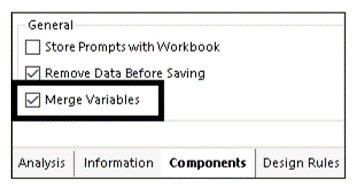
First, the workbook must already be saved on the SAP server. In addition, the workbook setting Merge Variables must be active. To activate this property, switch to the Design Panel (via Design Panel > Display) and select the Components tab. Select the workbook and select the Merge Variables checkbox, as shown in this figure.
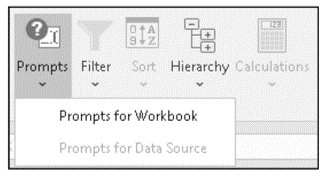
You can then open the dialog box for the prompt in the Data Analysis menu group. In this case, as shown below, the Prompts for Data Source option in the Prompts dropdown list is grayed out.
Working with the Data Source Mode
The mode for data sources is indicated by the icon in the Prompts dialog box. In this mode, you’ll see all variants for the selected query. If you create a new variant, it is always saved in this query. Prerequisites also apply to the query variants, which we’ll introduce next.
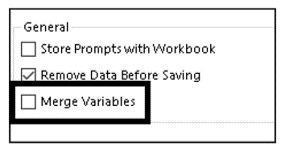
First, the workbook property Merge Variables must not be active, as shown below.
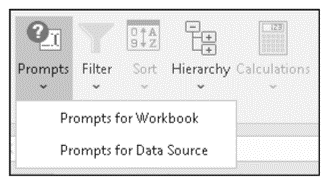
You can then select the query and choose the Prompts for Data Source option from the Prompts dropdown list, as shown below. This option is only available if the Merge Variables workbook property is not active and a query is selected. Otherwise, this option is grayed out, as shown previously.
Using a Variant
To use a saved variant, open the Prompts dialog box. Now, as shown below, you can select the variant in the Use Variant dropdown list (1). The user-specific variants are listed first; the global variants are listed separated by a bar.
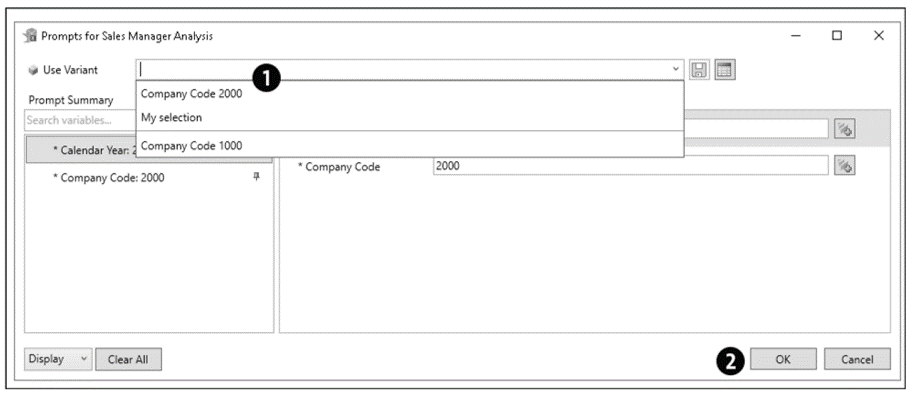
After you’ve selected a variant, all input prompts are filled with corresponding values. Click the OK button (2) to confirm the selection. As a result, the selected variant is applied to the query or the entire workbook, and the crosstab data is displayed accordingly.
Adjusting a Variant
You can change existing variants as needed, including adjusting the values of the prompt or the name of the variant.
To adjust a variant, first open the Prompts dialog box, as shown in the next figure, then select the desired variant from the list (1).
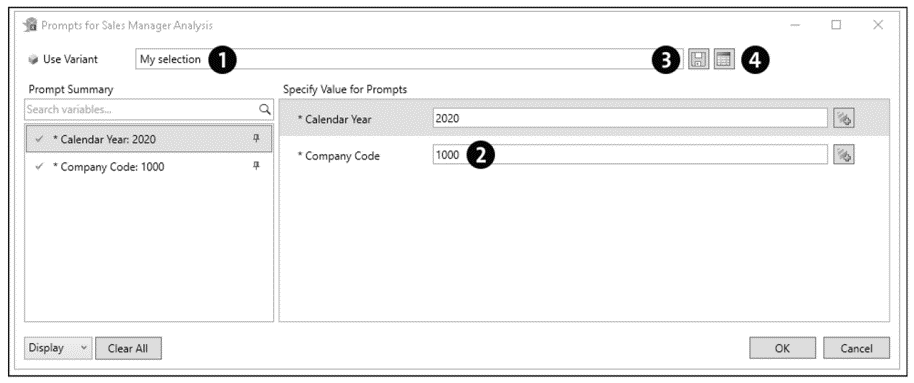
Now, change the values of the prompts for this variant (2) and click on the Save button (3). A prompt appears asking you if you really want to overwrite the variant. Confirm by clicking the OK button. The variant is now saved with the newly defined values of the prompt.
To change the name of the variant, click the Show Variant Settings button (4). The Variant Settings window opens, as shown below. Click the Change button.
You can then adjust the description of the variant in the Name column. Then, click on the Confirm Variant Setting button to apply the change and change the name of the variant. If you do not want to apply the change, click Cancel.
Deleting a Variant
If you no longer want to use a variant, you can delete it by opening the Prompts dialog box, shown in the next figure, and clicking the Show Variant Settings button (1). As shown, the Variant Settings dialog box opens, which lists all available
variants. Click on the Delete Variant Setting button (2) next to the variant you want to delete.
You’ll be asked whether you really want to delete the selected variant; confirm by clicking Yes. The variant is now completely removed from the system. Finally, select Close to exit the Variant Settings dialog box.
Learn SAP Analysis for Microsoft Office in Our Upcoming Rheinwerk Course!
Turn your Excel workbook into a powerful SAP reporting and planning hub! In three expert-led course days, you’ll learn essential skills for working with SAP data directly in Microsoft Excel. Click on the banner below to learn more and order your ticket.

Editor’s note: This post has been adapted from a section of the book SAP Analysis for Microsoft Office—Practical Guide by Denis Reis.


Comments