
The Workflow Builder in SAP provides a graphical view of end-to-end activity integrated steps in one central tool. This will help to create, display, change, and test any workflow.
The Workflow Builder is accessed using Transaction SWDD. You can also use menu path Tools > Business Workflow > Development > Definition Tools > Workflow Builder > Workflow Builder to open Workflow Builder. The figure below shows the Workflow Builder and the different navigation and workflow components needed to build a workflow.
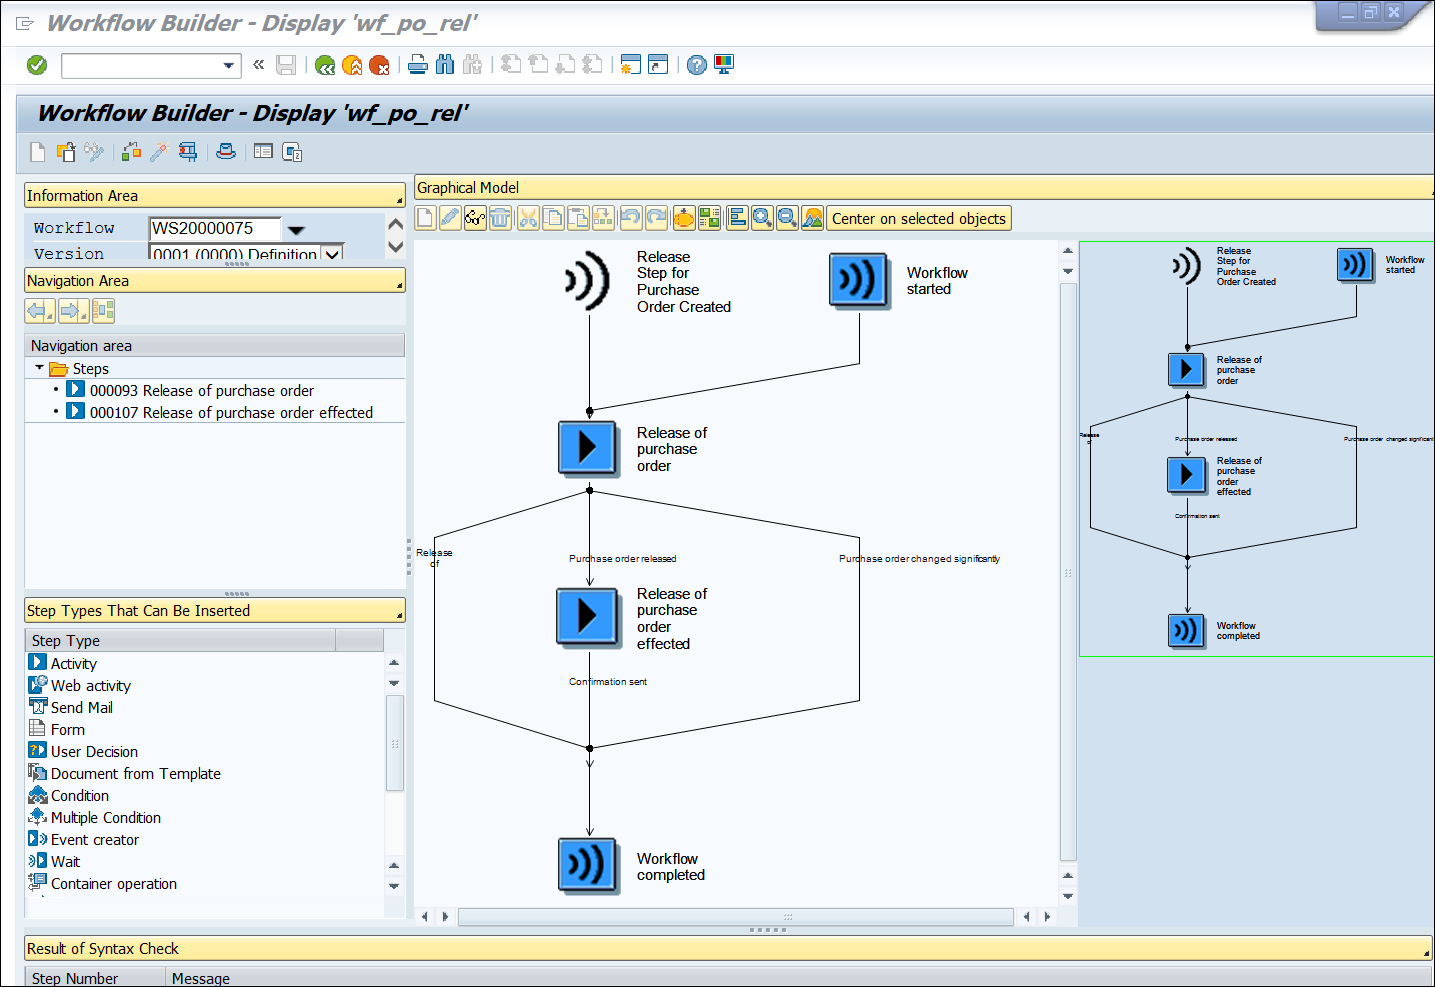
The Workflow Builder has different sections that help you navigate through the flow and also create the components to build the workflow. The following describes and illustrates the different sections of Workflow Builder.
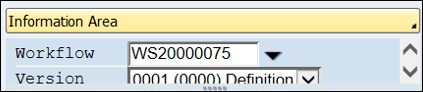
Information Area
This area contains the workflow number and version of the workflow. The current active version is loaded when Workflow Builder is open by default, but you also can select the previous version to view. The workflow follows the execution path as the active workflow when it’s triggered. For example, the system triggered a workflow on November 1, 2023, and the current version of the workflow is 000. The workflow will start the activity flow per the active version (000). Let’s say the developer changed the workflow by adding a few more steps and created another version called 001. So, the new active version will be 001. Any new workflow triggered will follow the 001 process flow steps. But the workflow triggered on November 1, 2023, will follow the 000 version. So, it may be needed to view the earlier version of the workflow for any old active workflow troubleshooting. The next figure shows the Information Area, which is normally found in the top-left corner of the Workflow Builder screen.
4
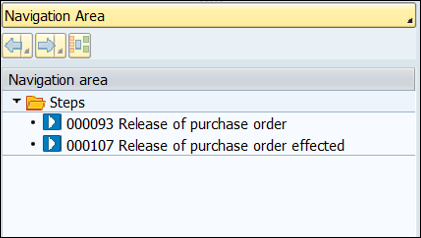
Navigation Area
This section shows all the steps in the workflow. You can go to the details of the steps by clicking Steps in this section. The workflow graphical diagram can be complex, and navigation to a particular step from the workflow graphical diagram can be time-consuming. This area helps with quick navigation. It’s important to provide a meaningful and easily identifiable step name so that navigation to the right step is easy. A number is associated with each step and is available in the technical log of the workflow. This will help to easily connect a workflow log step to the details view of the step in the workflow definition. Below shows the two steps of workflow WS20000075 in our example.
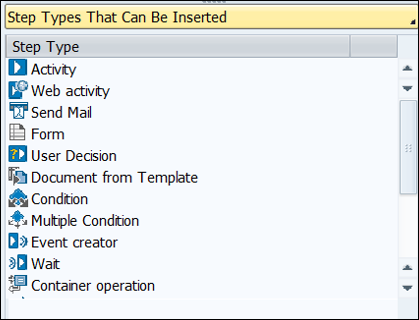
Step Types That Can Be Inserted
Step Type is shown by default when you open Workflow Builder. It shows all the possible step types that can be inserted in the workflow. You can drag and drop any specific step into the location where you want to add the step in the workflow graphical area. You’ll get a plus (+) sign in the workflow graphical area where the step can be added. You can select any existing step in the workflow graphical area and double-click on the new step needed, which will create a new step after the step you selected earlier. The figure below shows the possible step types that can be added in the workflow.
Other information can be displayed in this section besides step type. You can click the button just above this section to get the options of more information that can be displayed in this section. You can switch into the view you want to display in this section depending on your need. Below shows the options that will appear when you click on the gray button just below Navigation Area.

As Figure 4.5 shows, you can choose different components that can be shown in this area. The details of those workflow components are as follows.
Workflow Container
The workflow container stores all the data elements defined within the workflow instance. This is similar to the data variable you define for any development. There are some container elements created automatically when a workflow is created (e.g., business objects), but there are also some custom workflow containers that are also needed to pass the information from multiple steps. Workflow container elements are used to pass information from the main workflow instance to different steps. It’s also used for dynamic content of any description and texts.
My Workflows and Tasks
This list shows all the workflows you’ve created/changed.
Document Templates
There is a step type called document form templates. All the workflow document templates that can be used for the document form template step is shown here.
Workflow Wizard
If you want to create workflows using a wizard, you can try out this section. All possible standard workflow wizards are available here.
Teamworking
If multiple people are working on the same workflow, you can find out who has changed any step. You can find out those steps in the workflow with different search criteria such as last changed by, created by, and so on.
Workflows of this Definition (Outcome)
All the current running in-process workflows for this workflow definition are shown in this section.
Note it!
You can create notes and documents about this workflow in this section.
Message Area
The bottom part of the screen shows the error/warning/information messages during the activation or syntax check of the workflow.
Overview
The rightmost part of the pane shows the entire workflow in one pane. You can zoom within this section, and the zoomed portion will be displayed on the Graphical Model section. You’ll find a green rectangular box highlighting the zoom area. This will be very helpful for zooming into a portion of the workflow when it has lots of tasks and complex and not readable in one frame. Then you can zoom onto the required section and further navigate into details from the Graphical Model view.
Graphical Model
The middle part of the screen shows the graphical workflow, including a zoomed view. This section is used for further detailed navigation into tasks and other activities.
It’s recommended to design and model the workflow activity flow before you start creating the building blocks in the Workflow Builder.
Note: The Workflow Builder graphical view is used to understand the end-to-end workflow process flow. It’s also used to understand current state and historically completed steps during workflow error troubleshooting. If you want to develop a complex workflow with lots of steps, try to develop multiple subworkflows and integrate them with the main workflow to help with readability.
Learn SAP Workflows in Our Upcoming Rheinwerk Course!
SAP Business Workflow isn’t going anywhere—and neither are your classic workflow responsibilities! Whether you’re new to workflow development or sharpening existing skills, this expert-led series covers everything you need to know, from system setup to production administration. Click on the banner below to learn more and order your ticket.

Editor’s note: This post has been adapted from a section of the book Workflow for SAP S/4HANA by Sabyasachi Dutta, Nilay Ghosh, Kousik Goon, Sandip Jana, Arindam Mukherjee, Srinivas Rao, Yogeendar Rao, Yogesh Sane, Naveen Veshala, and Kiran Viswanathan.


Comments