
SAP Continuous Integration and Delivery lets you configure your CI/CD pipeline in the cloud to automatically build, test, and deploy your code with an easy-to-use configuration tool.
It also has a built-in integration with the SAP Cloud Transport Management service to transport the code from one environment to another. This tool is available in your SAP Business Technology Platform (SAP BTP) trial account under Extension Suite, and in the upcoming steps, you’ll subscribe to this service and configure your CI/CD pipeline.
The different stages of the pipeline can be configured in two ways:
- Job Editor: An interactive UI offered as part of SAP Continuous Integration and Delivery in SAP BTP to easily configure the different stages of the pipeline.
- Source Repository: Pipeline configuration will be manually entered in the .yaml file, which is based on SAP’s open-source project “Piper.”
In the following steps, you’ll configure the CI/CD pipeline using the graphical-based Job Editor:
- Open your SAP BTP trial account, go to Service Marketplace, and search for “Continuous Integration and Delivery.”

- Click on the tile to open the service, and click the Create button to subscribe to the service, as shown below.

- Click Create in the popup to finalize.

- Navigate to the Users node under Security to add SAP Continuous Integration and Delivery roles to your user in the SAP BTP account.

- Click the user to navigate to the detail page, click the three-dot button, and choose Assign Role Collection, as shown in the next figure.

- Select the CICD Service Administrator role, and click Assign Role Collection.

Now you have the authorization to access SAP Continuous Integration and Delivery.
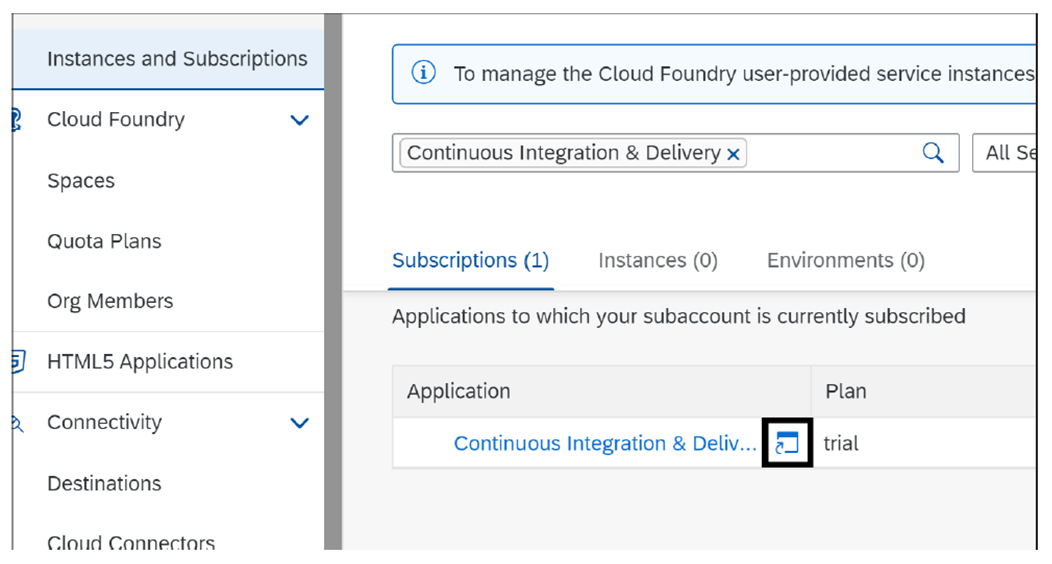
- Navigate to Instances and Subscriptions in your SAP BTP trial account, and open Continuous Integration & Delivery by clicking the highlighted icon.
- You must add your GitHub credentials to connect to your repository from SAP Continuous Integration and Delivery. Open the Credentials tab, and click the plus icon, as shown below. SAP Continuous Integration and Delivery will use these credentials to access your private GitHub repository.

- Enter the GitHub Username and Password (PAT), and then click Create.

- Add another credential for your SAP BTP account to automate the SAP Cloud Application Programming Model application’s deployment to the SAP BTP, Cloud Foundry environment, as shown below. You need to enter your SAP BTP account credentials here.

- Navigate to the Repositories tab, and click the plus button to add your GitHub repository, as shown in the next figure.

- Enter the GitHub repository URL, and select the GitHub credentials you created in the previous steps. Leave the other details as they are, which will generate a webhook that GitHub will use to trigger the CI/CD job. Click Add to create the repository.

- Navigate to the Jobs tab, and click plus button to create a new CI/CD job.
- Make the following configurations in the General Information section, as shown below. When the job is run, the service will fetch the source code from the Git repository capescalationjob from the branch main.
-
- Job Name: Enter a unique Name for your CI/CD Job.
- Repository: Select the GitHub repository you created in the Repository
- Branch: Enter “main” (branch name of your Git repository).
- Pipeline: Select SAP Cloud Application Programming Model.

- In the STAGES section, ensure the Configuration Mode is set to Job Editor, which gives you the option to maintain the CI/CD pipeline using the UI editor from SAP Continuous Integration and Delivery. The other option is Source Repository, where you can maintain this configuration in your source code (SAP Cloud Application Programming Model application) instead of using the UI editor.

- For Build Tool, leave mta as preselected.
- Switch on the Additional Unit Tests, and leave test as the preselected value in the npm Script field. This will run the unit tests when the job is run. If the unit test fails, the job status will be set to Failed, and any further stages in the CI/CD pipeline won’t be executed.

- Ignore the Acceptance and Compliance stage, and switch the Deploy to Cloud Foundry Space to ON in the Release stage. So, when the unit tests are run successfully, the application will be deployed to the Cloud Foundry space in SAP BTP.

- To enter the details, navigate to your SAP BTP trial subaccount, and copy the Org Name, API Endpoint, and Spaces to the Release section in SAP Continuous Integration and Delivery.

- Select the cfdeploy credentials that you created in the earlier steps, which will be used to authenticate the deployment of the application to the SAP BTP, Cloud Foundry environment. Click Create to save the job configuration.

For the Continuous Delivery process, you have the option to switch on the Upload to Cloud Transport Management to deploy the code in multiple environments (e.g., quality or production). For this example, leave this option switched off.
- To manually trigger this job, click the Trigger Build button in the Builds section, as highlighted in this figure.

- Click the build to open the log and wait until the status is successful, as shown in this figure.

- Instead of running the CI/CD job manually every time after you save your source code in Git, you’ll configure GitHub to trigger the CI/CD job automatically using webhooks whenever the source code is updated in the Git repository. Navigate to the capescalationrepo in the Repositories tab, and choose Webhook Data to get the webhook details, as shown in the two figures below.


- Go to your Git repository settings, click the Webhooks node, and choose Add webhook to add the webhook details from the previous step, as shown:

- Copy all the details from the previous step, and click Add webhook, as shown in this figure.

- To test this, let’s go to your source code in your SAP Business Application Studio development space and add a comment in your unit test file for pushing the code to the GitHub repository.

Note: In real-time, you’ll perform actual code changes to enhance or implement new features and push them to the Git repository to trigger the CI/CD process. For testing purposes, you’ll just add a comment to push the changes to the Git repository.
- Commit the changes, and push them to GitHub:
git add .
git commit -m ‘added a comment’
git push
- Open the job in SAP Continuous Integration and Delivery, and you can see a new build triggered, as shown in this figure.

If you want to configure the steps from the source code, choose Source Repository instead of Job Editor in the Configuration Mode field shown earlier.
Then you need to manually add the pipeline in your code by executing cds add pipeline in your project terminal, which will create a folder with the name .pipeline with the file config.yaml. You need to configure the CI/CD pipeline and its stages in this configuration file.
Congratulations! You’ve now successfully configured your SAP Cloud Application Programming Model application’s CI/CD pipeline using SAP Continuous Integration and Delivery in SAP BTP.
Editor’s note: This post has been adapted from a section of the book SAP Extension Suite Certification Guide: Development Associate Exam by Krishna Kishor Kammaje and Mahesh Kumar Palavalli. Krishna is a passionate developer and application architect working at ConvergentIS. He is a recognized SAP Community contributor and was named as an SAP Mentor. Mahesh is a senior developer at SAP Labs in Bangalore. He has more than 9 years of experience working with customers from government and private sectors in the areas of SAP Fiori, SAP Business Technology Platform, and ABAP.
This post was originally published 4/2025.


Comments