
In this blog post, you’ll learn how to extend a CDS data model with UI annotations and generate an SAP Fiori elements application based on it.
The purpose of UI annotations is to define usage patterns for data in the user interface independent of UI technology. SAP Fiori elements interprets the UI annotations and implements them in the user interface. Some UI annotations are used by different SAP Fiori elements floorplans in the process.
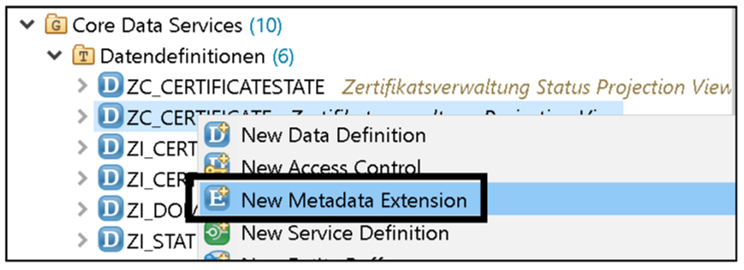
First, you need to create a new metadata extension for the UI annotations:
- Open the context menu for CDS projection view ZC_CERTIFICATE of the certificate management and select New Metadata Extension.
- Name the metadata extension “ZC_CERTIFICATE” and assign a meaningful description to it. You can use the following figure as a guide.9
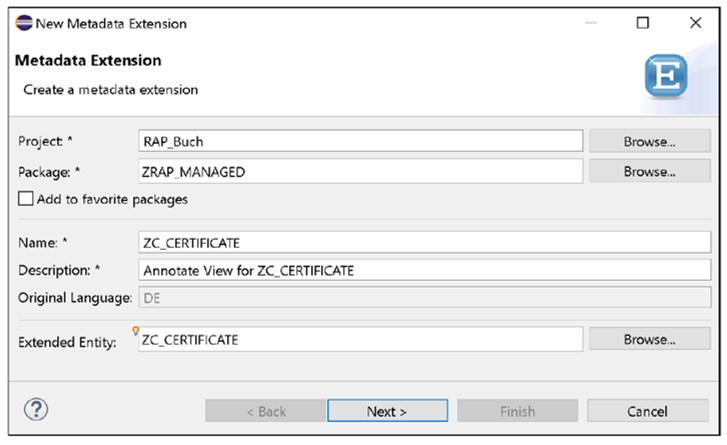
- Use the Annotate View template (see below) and confirm the creation by clicking the Finish button.

You should use the #CORE value for the @Metadata.layer annotation because it’s your own application.
@Metadata.layer: #CORE
Metadata Layers: The metadata is hierarchically structured on several layers, with some layers overshadowing less relevant ones. The following layers exist (with ascending priority):
- #CORE: Use on the ABAP platform or custom application. It can be overridden customer-specifically, if required.
- #LOCALIZATION: Use of an SAP application component
- #INDUSTRY: SAP industry solution
- #PARTNER: SAP partner application
- #CUSTOMER: SAP customer application
Using the annotation @UI.facet you can structure the displayed fields on the object page and group them into areas (facets). First, you need to define a facet for the object page header using the annotation @UI.facet.purpose : #HEADER. Use the @UI.facet.type: #FIELDGROUP_REFERENCE annotation to set the type as a field group. Then assign the facet position 1. Add a meaningful description and the header data qualifier as the ID.
@UI.facet: [
/* Header Data */
{
purpose: #HEADER,
type: #FIELDGROUP_REFERENCE,
importance: #HIGH,
position: 1,
label: 'Technical data',
targetQualifier: 'Header data'
} ]
You should then define additional UI areas to display certificate data, details, and status changes (see next listing). For the status changes, define a table to be output on the object page. You can do this via the #LINEITEM_ REFERENCE annotation value.
{ id: 'Certificate',
purpose: #STANDARD,
type: #IDENTIFICATION_REFERENCE,
label: 'Certificate management',
position: 10 },
{
purpose: #STANDARD,
type: #FIELDGROUP_REFERENCE,
importance: #HIGH,
position: 20,
targetQualifier: 'Detail',
label: 'Detail info'
},
{ id: 'CertificateState',
purpose: #STANDARD,
type: #LINEITEM_REFERENCE,
label: 'Status changes',
position: 30,
targetElement: '_CertificateState'
Hide the key field CertUUID and the technical helper variable LocalLast- ChangedAt in the UI via the annotation @UI.hidden: true. These fields have purely technical meaning, so it isn’t necessary to display them in the user interface.
Use the UI annotations UI.lineItem, UI.identification, UI.fieldGroup, and UI.selectionField in a way that makes sense to show each field as you need it in the application.
Now you can activate your metadata extension. It could look like the one shown below.
@Metadata.layer: #CORE
@UI: {
headerInfo: { typeName: 'Certificate management',
typeNamePlural: 'Zertifikate',
title: { type: #STANDARD, label:
'Certificates', value: 'Material' } },
presentationVariant: [{ sortOrder: [{ by: 'Material',
direction: #DESC }] }] }
annotate view ZC_Certificate with
{
@UI.facet: [
/* Header Data */
{
purpose: #HEADER,
type: #FIELDGROUP_REFERENCE,
importance: #HIGH,
position: 1,
label: 'Technical data',
targetQualifier: 'Header data'
},
{ id: 'Certificate',
purpose: #STANDARD,
type: #IDENTIFICATION_REFERENCE,
label: 'Certificate management',
position: 10 },
{
purpose: #STANDARD,
type: #FIELDGROUP_REFERENCE,
importance: #HIGH,
position: 20,
targetQualifier: 'Detail',
label: 'Detail info'
},
{ id: 'CertificateState',
purpose: #STANDARD,
type: #LINEITEM_REFERENCE,
label: 'Status changes',
position: 30,
targetElement: '_CertificateState'
} ]
@UI.hidden: true
CertUUID;
@UI: { lineItem: [ { position: 10 } ],
identification: [ { position: 10 } ],
selectionField: [ { position: 10 } ] }
Material;
@UI: { lineItem: [ {
position: 20, label : 'material name' } ],
identification: [ { position: 20 } ]
}
MaterialName;
@UI: { lineItem: [ { position: 30 } ],
fieldGroup: [ {
qualifier: 'header data',position: 30 ],
selectionField: [ { position: 30 } ]}
Version;
@UI: { lineItem: [ {
position: 40,
criticality: 'Criticality',
label: 'Status' } ],
fieldGroup: [ {
qualifier: 'Header data',
position: 40,
label: 'Status',
criticality: 'Criticality' } ],
selectionField: [ { position: 40 } ] }
StatusText;
@UI: { lineItem: [ { position: 50 } ],
identification: [ { position: 50 } ] }
CertificateCe;
@UI: { lineItem: [ { position: 60 } ],
identification: [ { position: 60 } ] }
CertificateGs;
@UI: { lineItem: [ { position: 70 } ],
identification: [ { position: 70 } ] }
CertificateFcc;
@UI: { lineItem: [ { position: 80 } ],
identification: [ { position: 80 } ] }
CertificateIso;
@UI: { lineItem: [ { position: 90 } ],
identification: [ { position: 90 } ] }
CertificateTuev;
@UI.fieldGroup: [ { qualifier: 'Detail',position: 10 } ]
MaterialText;
@UI.hidden: true
LocalLastChangedAt;
}
Now you should define a metadata extension with meaningful UI annotations for CDS projection view ZI_CertificateState of the certificate status in the same way. In one of the earlier listings, a user interface area for the certificate status of type #LINEITEM_REFERENCE was created (i.e., a table). Now use the UI.lineItem annotation to populate this area with data. You can see how the certificate status metadata extension might look like. Enable this metadata extension as well.
@Metadata.layer: #CORE
@UI: {
headerInfo: { typeName: 'Status',
typeNamePlural: 'Status',
title: { type: #STANDARD, label: 'Status',
value: 'Status' } } }
annotate view ZC_CertificateState with
{
@UI.facet: [ { id: 'Status',
purpose: #STANDARD,
type: #IDENTIFICATION_REFERENCE
} ]
@UI.hidden: true
StateUUID;
@UI.hidden: true
CertUUID;
@UI.hidden: true
Material;
@UI: { lineItem: [ { position: 10 } ],
identification: [ { position: 10 } ] }
Version;
@UI: { lineItem: [ { position: 20 } ],
identification: [ { position: 20 } ] }
Status;
@UI: { lineItem: [ { position: 30,
label: 'previous status' } ],
identification: [ { position: 30,
label: 'previous status' } ] }
StatusOld;
@UI: { lineItem: [ { position: 40,
label: 'last changed by' } ],
identification: [ { position: 40,
label: 'last changed by' } ] }
LastChangedBy;
@UI: { lineItem: [ { position: } /* 50 */
label: 'last changed' } ],
identification: [ { position: } /* 50 */
label: 'last changed' } ] }
LastChangedAt;
@UI.hidden: true
LocalLastChangedAt;
}
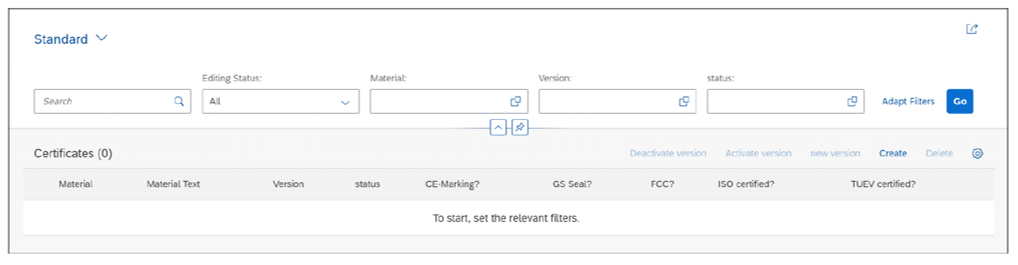
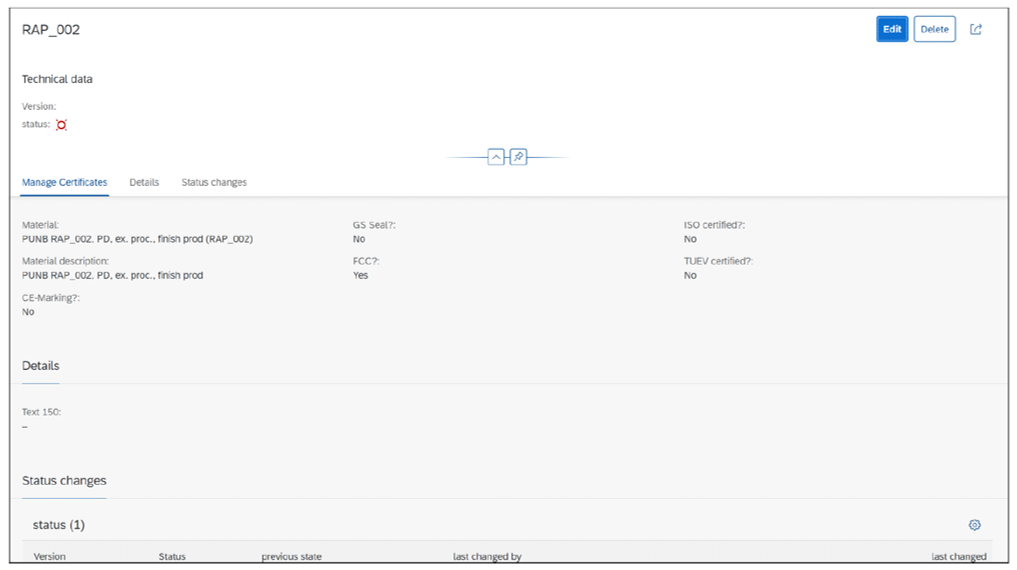
Now you can use the SAP Fiori elements application preview to test the interfaces generated on the basis of the metadata extensions. Depending on the UI annotations you use, the preview should look like the one shown in the figures below.
Learn Full Stack SAP Development in Our Rheinwerk Course!
SAP developers: Take ownership of your projects with full stack development. Grow your skills and master the backend and the frontend. In this course, you’ll learn to use the ABAP RESTful application programming model, core data services, OData, and SAP Fiori elements to develop applications from end to end. Level up today! Get access to course recordings by clicking the banner below.

Editor’s note: This post has been adapted from a section of the book ABAP RESTful Application Programming Model: The Comprehensive Guide by Lutz Baumbusch, Matthias Jäger, and Michael Lensch. Lutz has worked as an SAP developer since 2000 and has been responsible for international SAP projects in various roles and areas. Matthias is a freelance full-stack ABAP developer, architect, and trainer. Michael leads a team of SAP developers at All for One Group SE.
This post was originally published 3/2024 and updated 8/2025.


Comments