
In this blog post, we’ll explain the steps of creating projects, adding source code to a project, testing an application, and finally how to deploy an application using SAP Business Application Studio.
Creating a Project
The very first step of creating an SAP Fiori application using SAP Business Application Studio is to create a project. (A project is kind of a folder to organize your source code.) By default, projects are stored in the /home/user/projects folder.
You can create a project in two ways:
- Using a wizard
- From the terminal
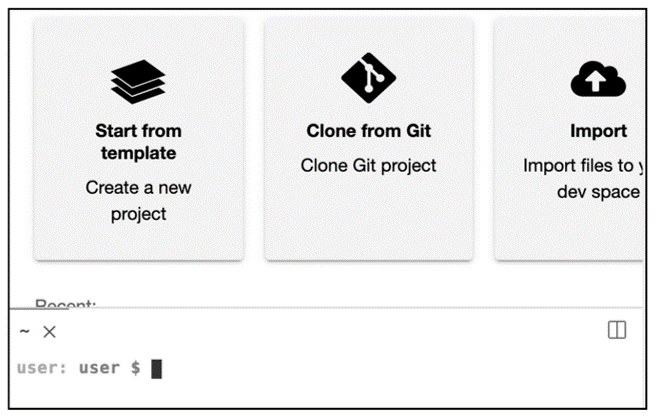
Creating a project using a wizard is simple and can be initiated by using the menu path File > New Project from Template and then selecting the appropriate one from the list of templates. However, for this chapter, we plan to create a project using the terminal. The terminal view can be opened using the menu Terminal > New Terminal, and you should see a new view open that looks like this.
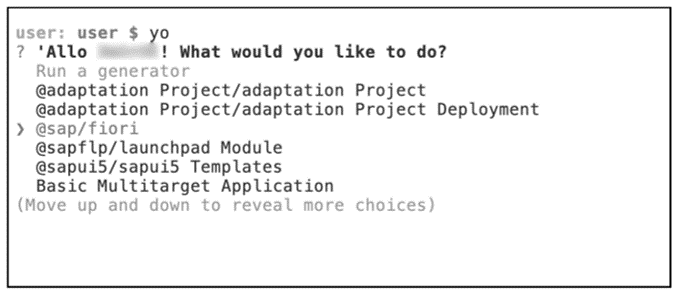
Type “yo” in the command line, then select @sap/fiori, as shown below, and press (Enter).
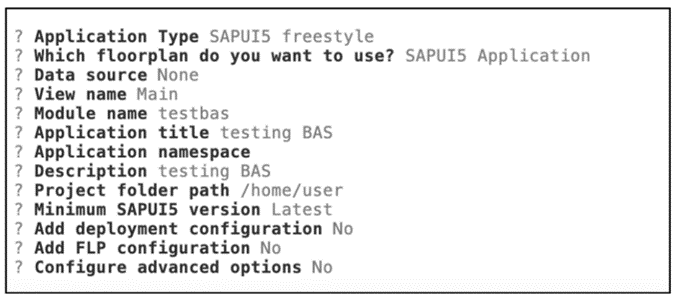
Select SAPUI5 freestyle and SAPUI5 Application as the next steps. Also select None as the data source. The whole set of options to be selected is shown here.
Once you select all the options and press (Enter), the system will start creating the project. You can track the progress through the terminal view, as highlighted in the figure below, and your application will be generated successfully.

7
You can now open your project by accessing the File > Open menu and then selecting your newly created project, as shown below, and clicking Open.
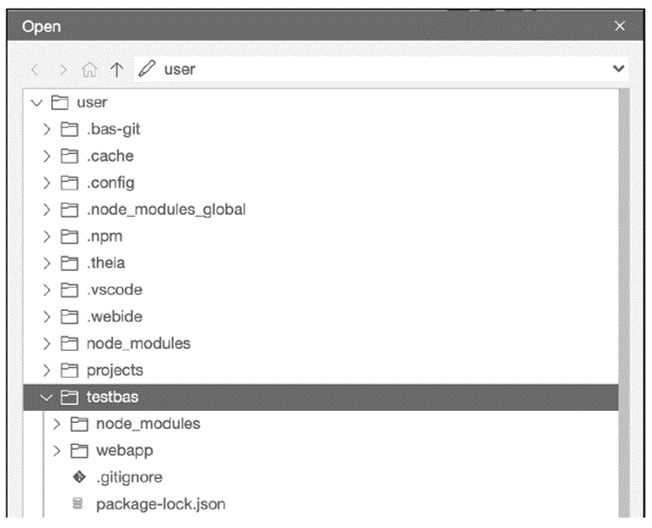
Your newly created project with the created folders and files should now be available on the left side of the SAP Business Application Studio window, as shown in the previous figure. Now it’s time to add some code to the project.
Adding Source Code
As a part of the project, a basic folder structure has been created and some files are automatically created with empty or shell content. In this section, we’ll explore various options to add source codes. But before going there, let’s explore various important views available in SAP Business Application Studio and how you can use them throughout your development process:
- The project explorer is the view available on the left side of the editor, as shown in earlier. This is where you can organize your source code.
- The terminal can be accessed at any time via the Terminal > New Terminal menu option. You’ll see the importance of the terminal view for SAP Fiori development activities later.
- The command palette provides various shortcuts and options to perform most common operations, such as creating a specific type of project, connecting to a Cloud Foundry space, and so on. The command pallet can be accessed either using the View > Find Command menu or by pressing (Ctrl)+(Shift)+(P).
- The outline view displays a tree of the currently active editor. This view is useful for understanding the structure of a file or for navigating to a specific element in a file. You can click an element in the outline view to open that element in the Editor To open the outline view in SAP Business Application Studio, select View > Outline from the menu bar. The outline view opens on the right side of the IDE.
- The problems view displays different coding errors and warnings and is primarily useful for troubleshooting.
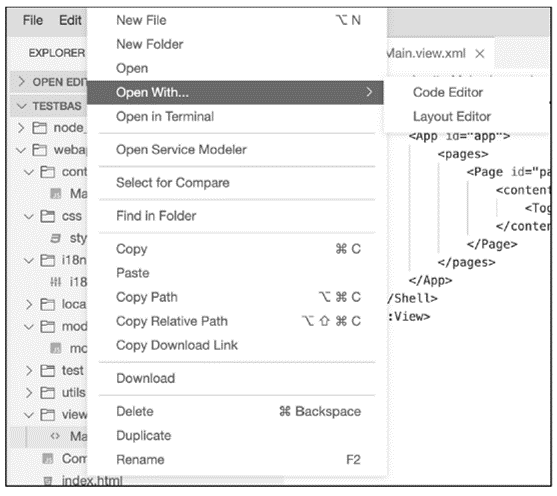
That covers the different views you’ll be using to support your development activities. Now, let’s put some code into your empty project. One of the key features of SAP Business Application Studio is that you can add frontend code using a layout editor. If you’ve previously worked with the SAP Web IDE layout editor, this should be familiar to you, with some added options. For this section, we’ll be using layout editor to add some source code for the frontend. When the project was created, the system created a view with the name you provided. Select Layout Editor from the context menu of that view, as shown here.
The layout editor will open in the middle of the screen, as shown below, and you can now add your screen elements.
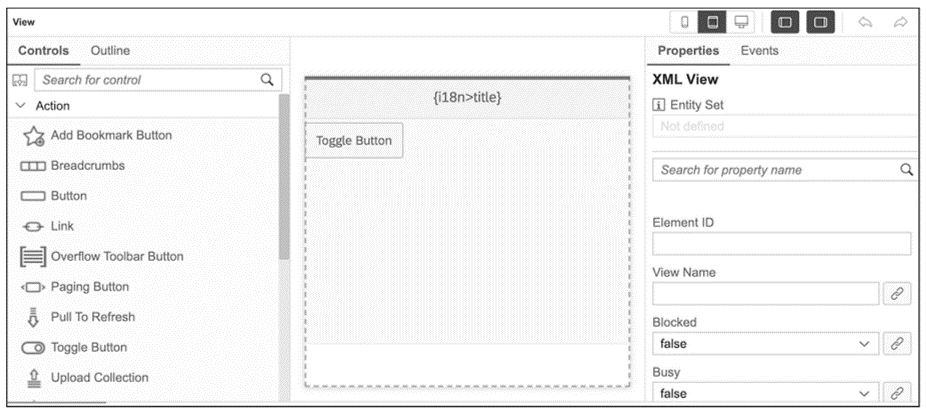
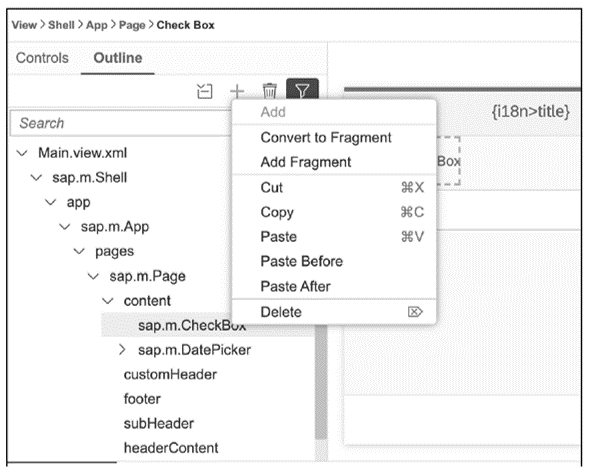
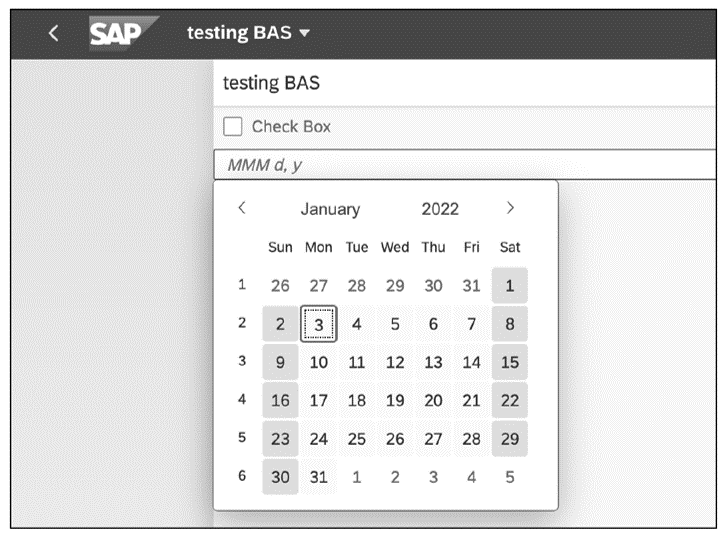
As shown, the layout editor contains three primary sections: control, design, and properties. The control section provides various SAPUI5 controls for your screen layout. You can drag one or more controls to the design section and can edit their properties or events in the properties section. We’ll show you simple options for creating a basic frontend application, so we’ll add only a couple of items: a checkbox and a date picker. Note that the editor will autosave your work. Also, you can navigate to the Outline tab to edit your screen, as shown in below For example, you can add a fragment, copy and paste to create new elements, and so on.
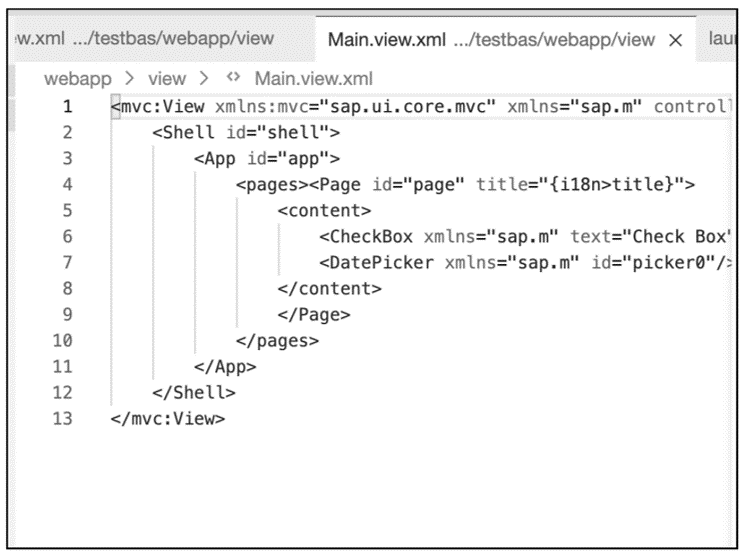
You can always check your source code in the code editor, as shown in the next figure. The editor can be opened by double-clicking the view name or from the context menu, like opening the layout editor.
So, now you have a basic understanding of how to add source code using the layout editor. Note that you can always add code manually using the source code editor, such as for adding controller logic, complex elements not available in the layout editor, and so on. Let’s assume that the code is complete and move on to testing it.
Testing the Application
Once you complete your coding, you need to run and test your code. Before you can test your application, you need to create the run configuration. The following steps should be executed in sequence:
- From the left-hand menu, select Run Configuration (a triangle-like icon).
- Select Create Configuration.
- Select the desired project, as shown here.

- Select the desired SAPUI5 version or select the latest one.
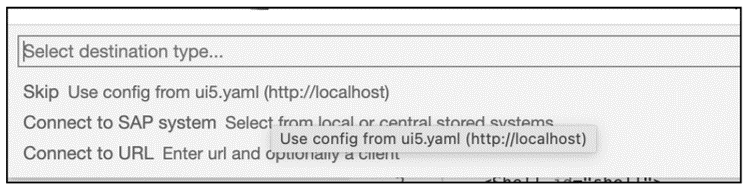
- Select the destination if your app needs to be connected to a backend service. For this example, you don’t need a backend service, so you can select Skip, as shown below.
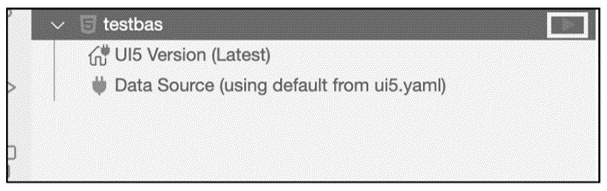
- Your run configuration will now show up on the left side of the screen, as shown in the next figure. Click the Run Module button to the far right of the configuration name, as shown here.
- Your app should now open in a separate browser tab, as shown below. You’re now ready to perform testing.
You should now have a basic understanding of testing the application. With the simple app now ready, let’s deploy it. You may think, “Where do I deploy it to?” This is a very valid question, one that we’ll answer now.
Deployment Options
SAP provides two deployment options for your SAP Fiori application:
- Deployment to an ABAP system, such as SAP S/4HANA.
- Deployment to the Cloud Foundry environment. This is how we’ll now deploy the app.
Deploy your app to the Cloud Foundry environment using the following steps:
- Navigate to the terminal view and make sure you’re in your app folder, as shown below.

- Execute the command npx fiori add deploy-config and select Cloud Foundry as your destination, as shown in this figure.

- Select the destination None for now as there is no backend connection yet.
- Select Yes to add the application to the managed application router.
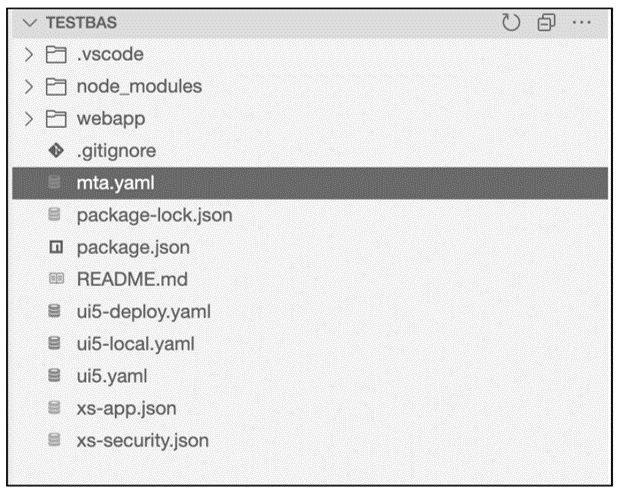
- This should create a deployment configuration as an mta.yaml file available in the explorer view, as shown below.7
- Now login to the Cloud Foundry environment by using the View > Find Command menu option and then selecting CF: Login to Cloud Foundry. This should allow you to enter your desired Cloud Foundry subaccount and space using your login credentials.
- Open the terminal view and navigate to the root folder of the project, where the mta.yaml file has been created. This is generally the project folder—here, TESTBAS, as shown earlier.
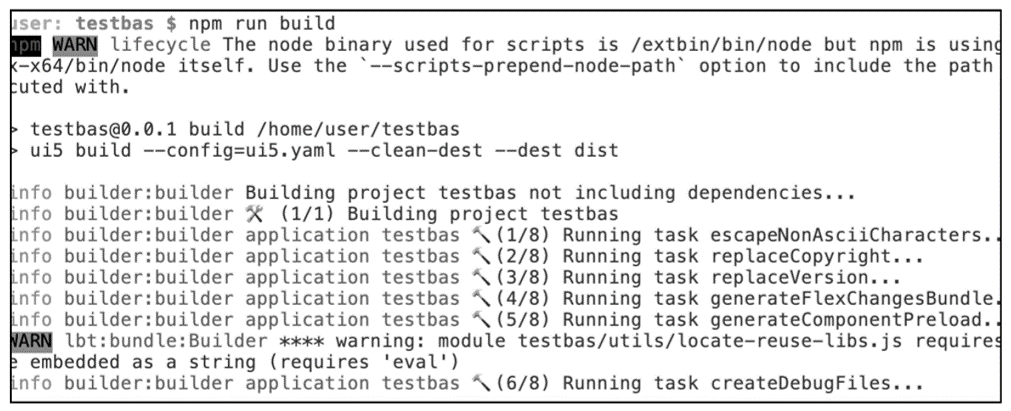
- Enter the command npm run build to trigger the build process, as shown in the figure below. Confirm that you get a success message for the build process. At the end of the build process, the system should create an MTAR archive file for deployment under the new mta_archives folder. If you don’t find the MTAR file created, you can rightclick mta.yaml and select Build MTA Project to create the MTAR file.
- Now deploy the application using the command npm run deploy. This should trigger the deployment process to the Cloud Foundry environment.
- Once deployment is successful, you can navigate to your Cloud Foundry subaccount for checking the deployed application.
- The deployed application can only be viewed if you’ve activated one of the following services, so be sure to create an instance of at least one of these services before you try to view your deployed application:
-
- SAP Launchpad service
- SAP Portal
- SAP Work Zone
- SAP Work Zone for HR
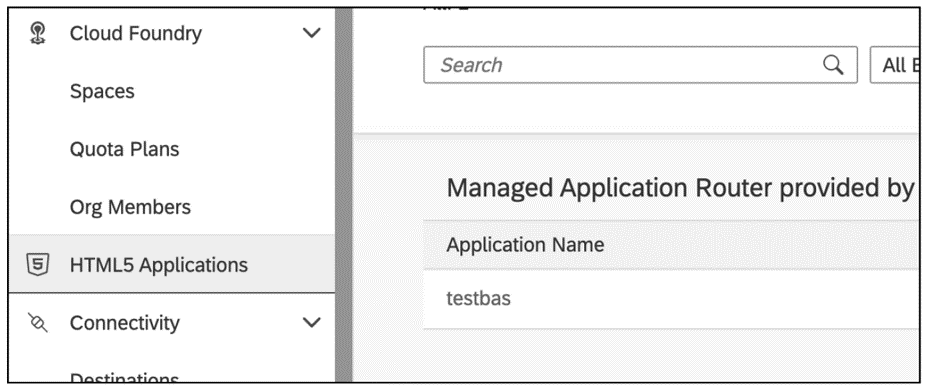
- Your application should now be available in your Cloud Foundry subaccount and available under HTML5 Applications, as shown in this figure.
Congratulations! You’ve now successfully created your simple SAPUI5 application using SAP Business Application Studio and deployed the same in the Cloud Foundry environment. As you’ve seen, some of the features of SAP Business Application Studio are similar to those in SAP Web IDE.
Although the SAP BTP trial no longer provides SAP Web IDE, many people still use SAP Web IDE productively. Eventually, however, all SAP users must migrate to SAP Business Application Studio as SAP Web IDE has been made obsolete by SAP. Learn how to take a project in SAP Web IDE to SAP Business Application Studio in this post.
Editor’s note: This post has been adapted from a section of the book SAP Fiori: Implementation and Development by Souvik Roy, Aleksandar Debelic, and Gairik Acharya.


Comments