In this blog post, learn how to generate batches of documents and print them in the SAP Business One solution.
Generating Documents with the Document Generation Wizard
The Document Generation Wizard in SAP Business One allows you to create a number of documents in batches, instead of one by one.
This is similar to doing a mass copy/paste from one type of marketing document to another.
This tool can be very useful when you need to generate a high volume of documents. You’ll also have various options when running the wizard as to the selection criteria of the base and target documents, as well as options on how to consolidate multiple base documents into one target document.
Bear in mind that the Document Generation Wizard converts one type of sales document to another. The wizard can’t create documents without a base document; for this, you’d use recurring transactions.
The most typical example using this tool is the automated generation of A/R invoices based on open deliveries in the system. In our example, an A/R invoicing clerk wants to automatically create A/R invoices from the previous day’s delivery. Customers should only receive one invoice for the previous day’s deliveries, even if they received multiple deliveries in the same day.
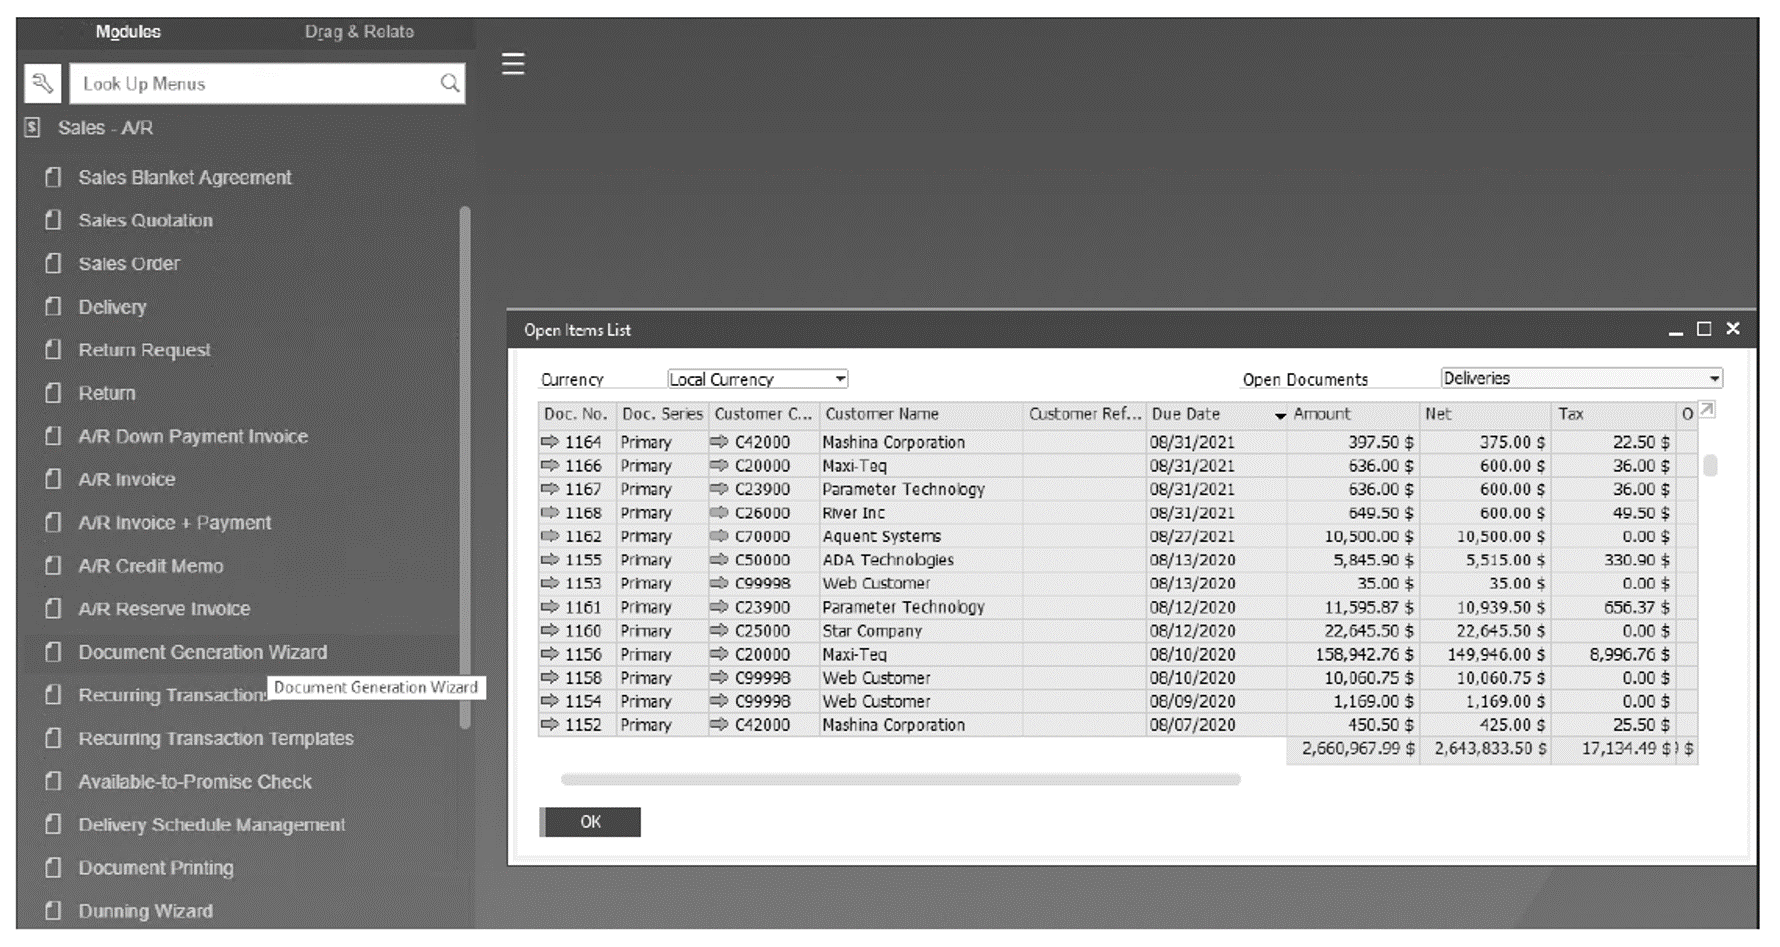
You’ll find the Document Generation Wizard in the Sales (A/R) menu just under the sales documents, as shown below. Click Document Generation Wizard to run the wizard, and after reading the initial message, click Next to get to Step 1. Note that the figure below shows four open deliveries from 08/31/2021 (at the very top of the list) that we’ll use to create target documents in our example.
After the wizard is up and running, follow these steps:
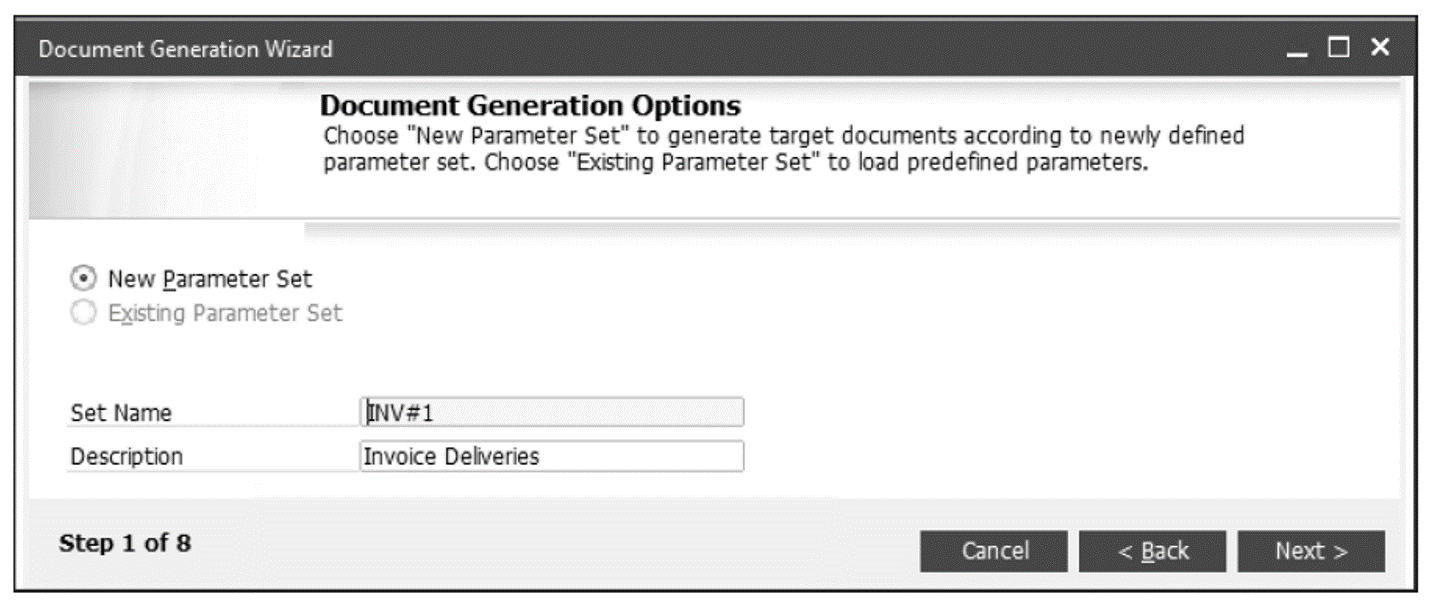
- In the Document Generation Options window shown in the next figure, you can define a new parameter set for an automated document creation run. In other words, you can save their settings for the automated run and use them again in the future. Saving these parameters is useful in our scenario where our A/R invoicing clerk wants to generate A/R invoices every day based on the previous day’s deliveries. In this window, give your parameter set a short name and a long description. (The option to save the parameter set comes later in the process.) The next time the wizard is launched, you’ll get the option to load an existing parameter set. Click Next to move to the next step.
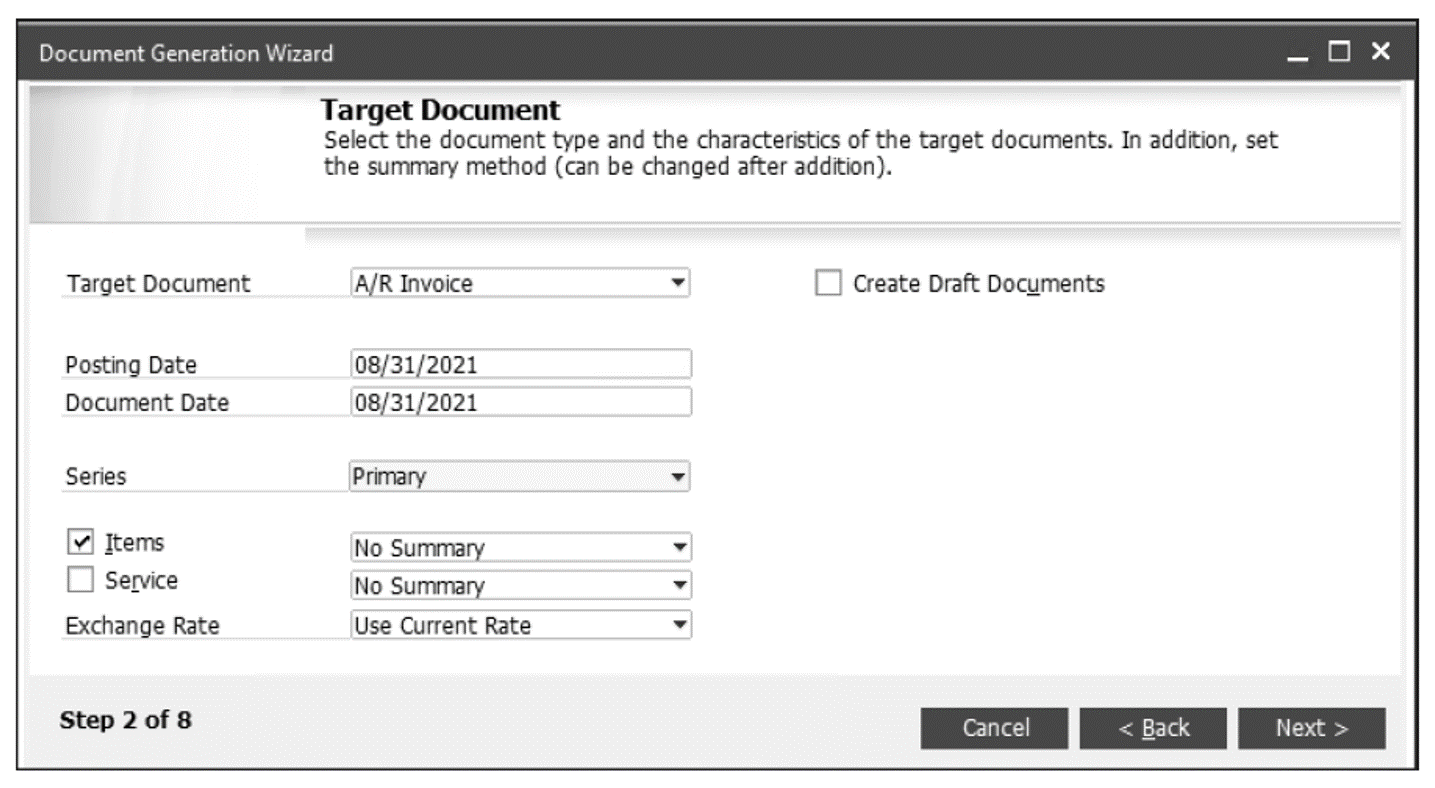
- In the Target Document window shown next, specify what type of target documents you’d like to create as part of the automated document creation run. In our example, we would like to create invoices, but you can also create sales orders, deliveries, or returns. You can also specify other attributes of the document such as the posting date, document date, number series, type (item based or service based), and exchange rate options. Notice also that you have the option to create the target documents as drafts, which can be useful if the resulting target documents need to be reviewed. Click Next to move to the next step.
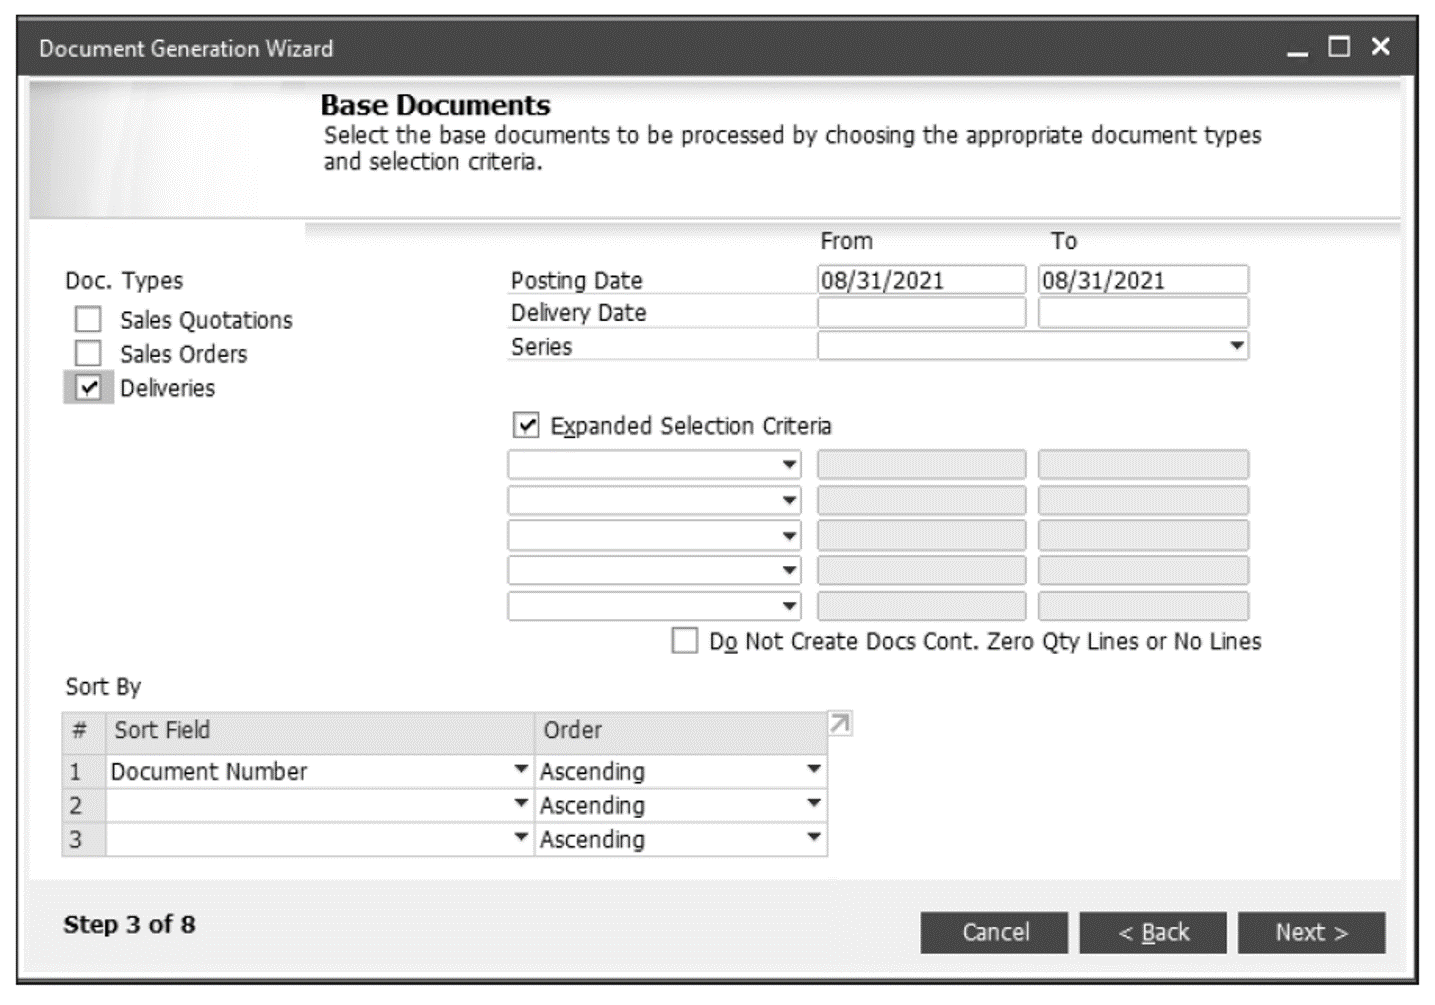
- In Step 3 of the Document Generation Wizard, you’ll define the selection criteria for which base documents will be included in the automated document creation run. In the Types area on the left side of the below figure, choose one of three document types: Sales Quotations, Sales Orders, or Deliveries. Next, select a range of posting dates, delivery dates, or a numbering series. Beyond these criteria, you may also select a set of expanded selection criteria (five additional criteria in total). The expanded selection criteria include many standard SAP Business One fields but can also accommodate custom data fields. In the Sort By area, you can specify in what order the base documents are turned into target documents based on a filter set of three different criteria. The Do Not Create Docs. Cont. Zero Qty. Lines or No Lines checkbox suppresses the creation of new documents that would contain zero quantity lines or no lines at all. Click Next to move to the next step.
- Choose specific options for which base documents should be consolidated into one target document from the Consolidation window shown here.
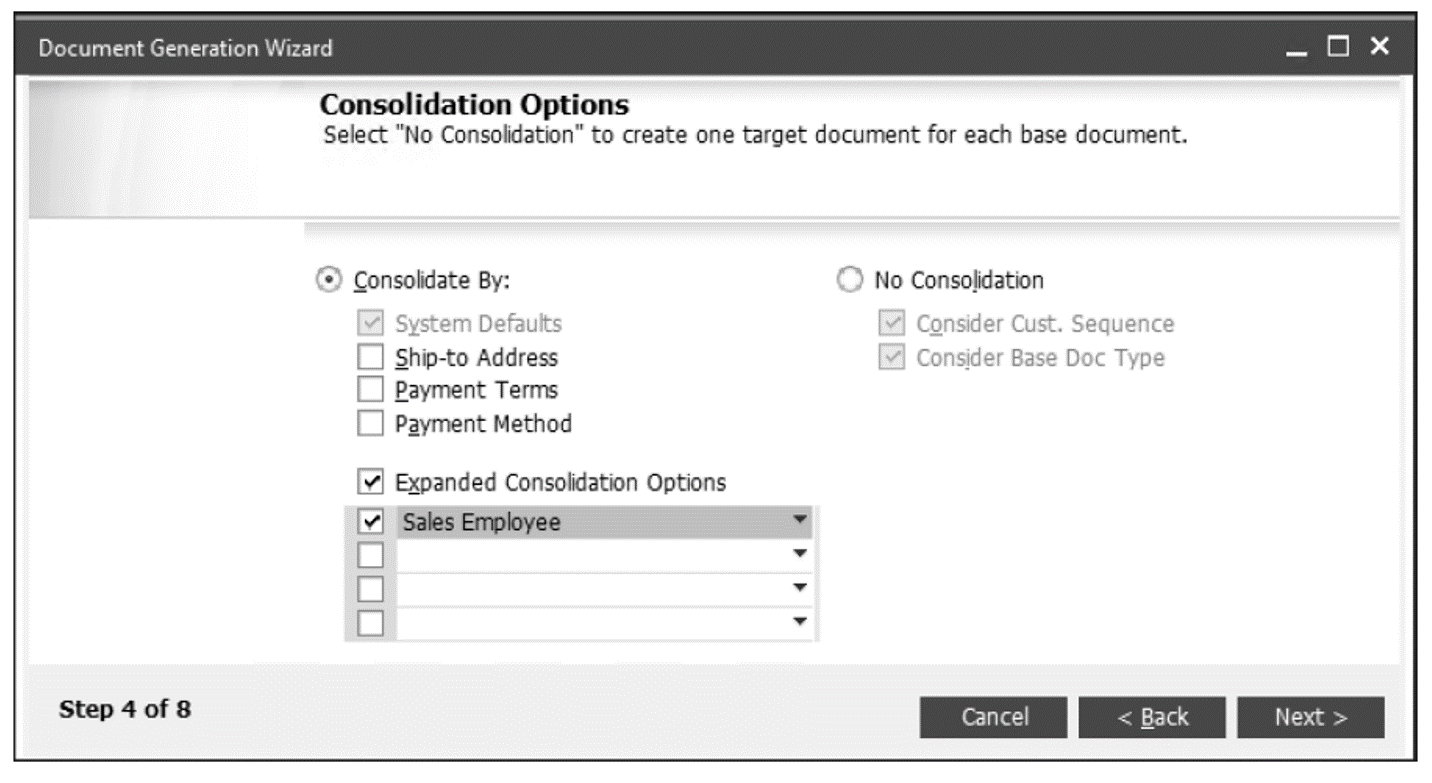
In this window, you have two consolidation options, shown as radio buttons:
- No Consolidation: Choose this option if the customer wants to see one invoice for each delivery.
- Consolidate By: In the consolidation model, the system always defaults to consolidating base documents of the same business partner. (Consolidating across different business partners would not make sense.) Beyond this basic system default, you can choose to consolidate on the basis of System Defaults, Ship-To Address, Payment Terms, or Payment Method by checking those boxes and other expanded criteria. As before, you can configure user-defined fields to serve as the basis of consolidation. Click Next to move to the next step.
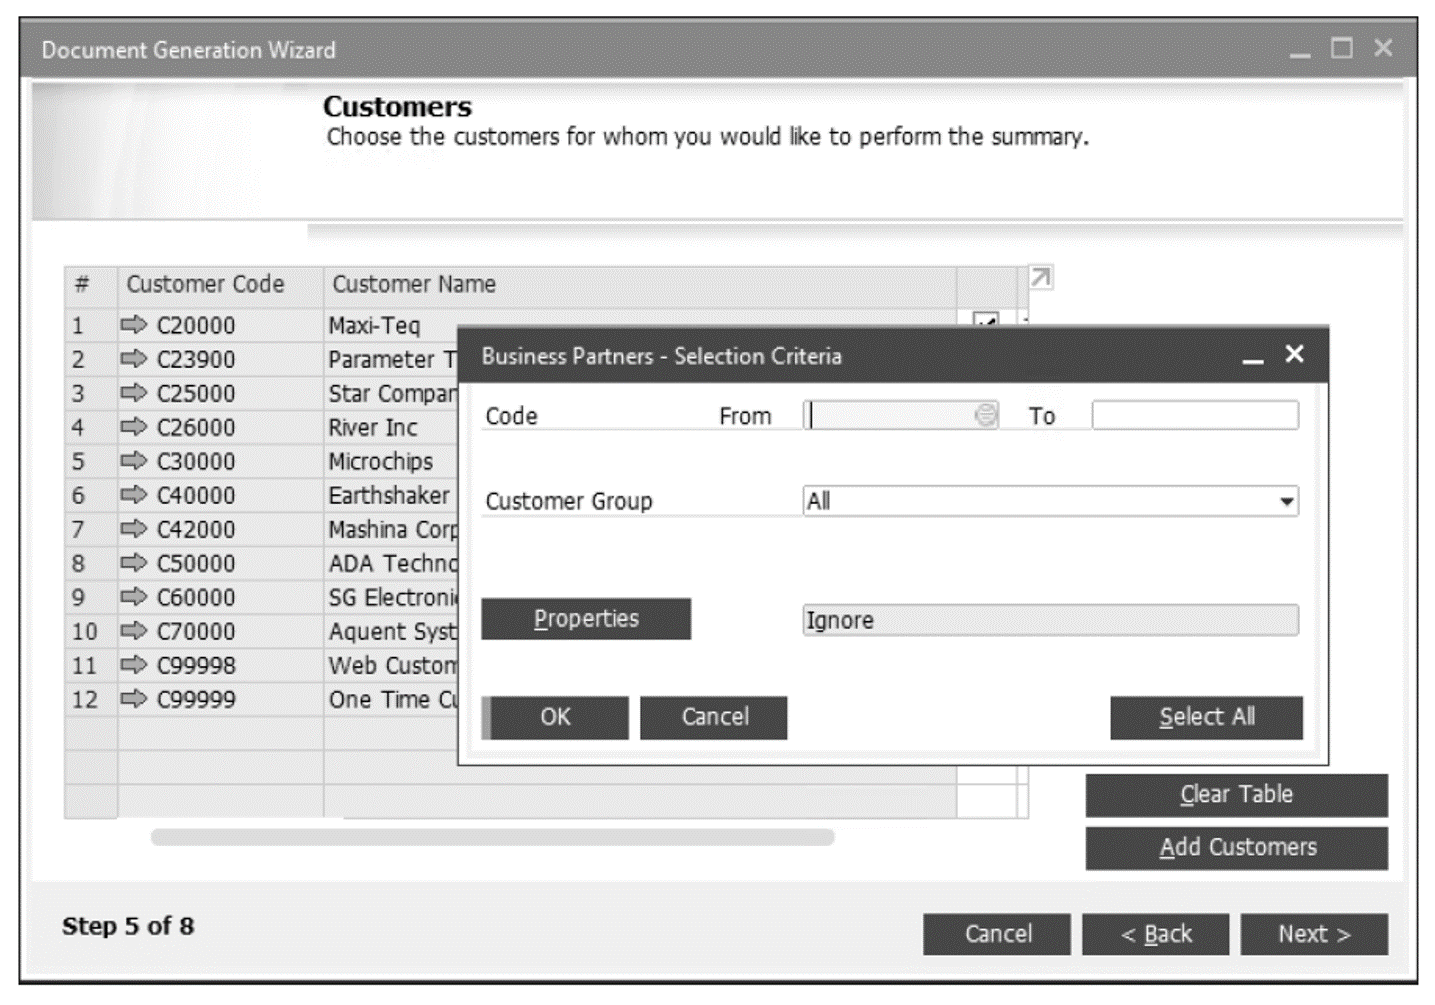
- In Step 5 of the Document Generation Wizard, you’ll select a certain range or grouping of customers on which to automatically generate documents. In our example, we simply clicked on the Add Customers button near the bottom-right part of the window shown below; by not specifying any customer selection criteria, all customers were added.
- In the Messages and Alerts screen shown in the next figure, you’ll define what the system should do if data is missing or if document-based alerts come up when generating target documents from base documents.
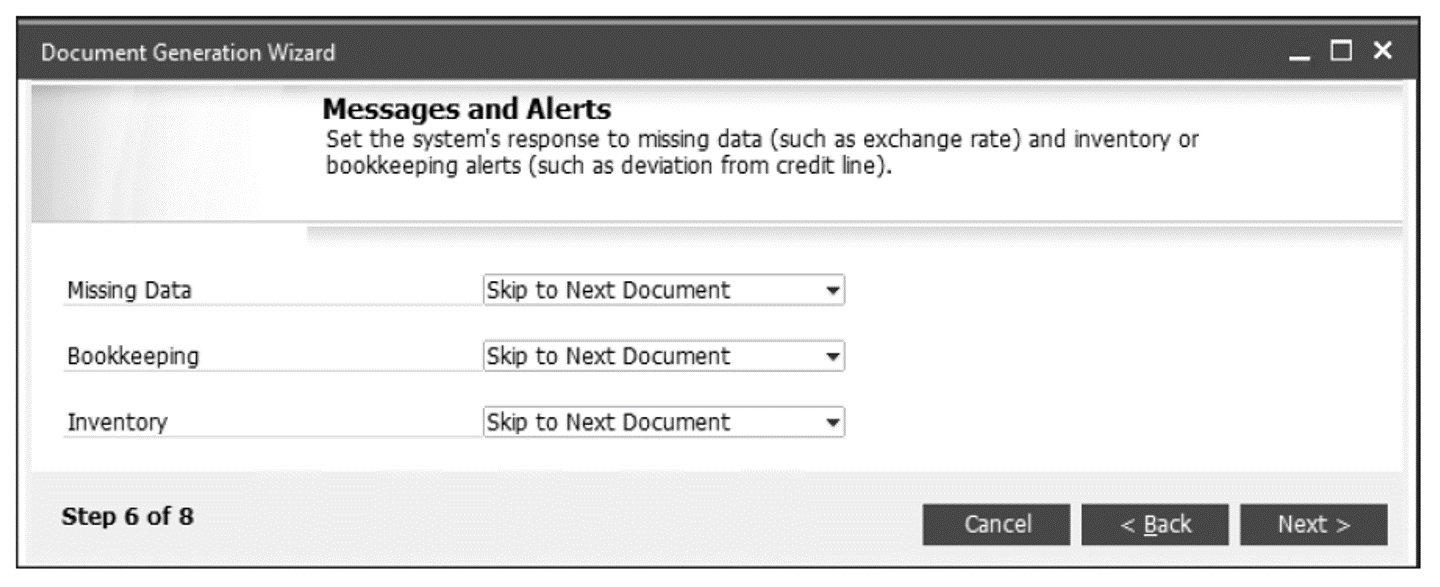
A typical example of an alert would be if the system doesn’t have a current exchange rate on which to base documents for customers that have different currencies. However, alerts can also be triggered by deviations from credit limits or insufficient inventory.
Using the Missing Data, Bookkeeping, and Inventory dropdown lists, specify what action should be taken if these exceptions occur: Skip to Next Customer, Skip to Next Document, or Ask for User Confirmation.
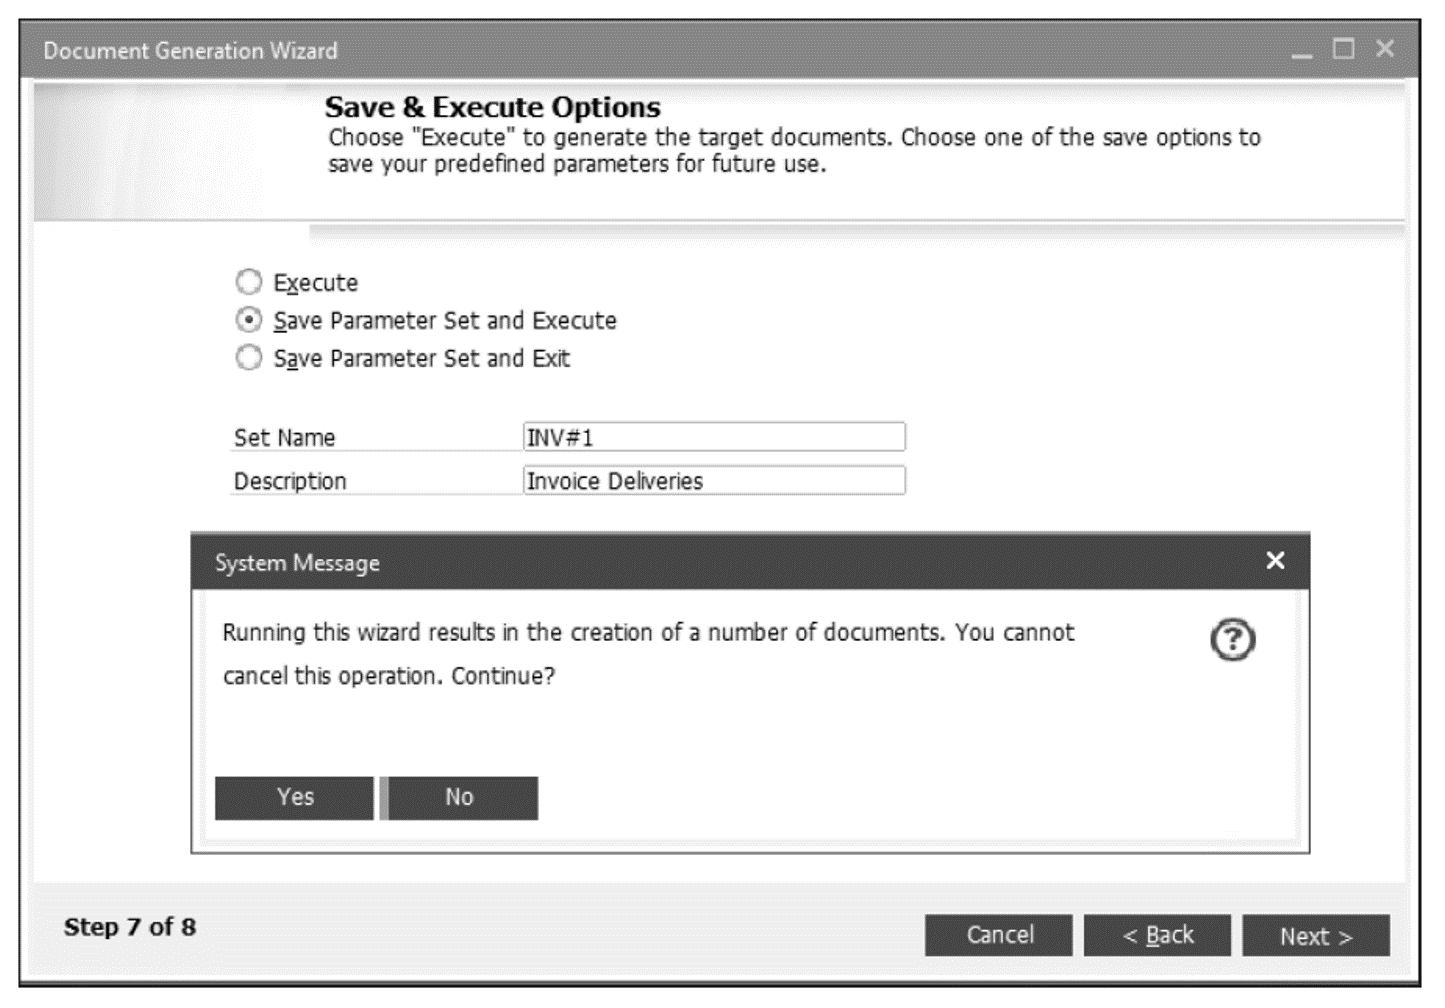
- Before you can run the automated creation process, you have the option to save and/or execute the document generation run that has been specified. Below shows the Save & Execute Options screen of the Document Generation Wizard, where you’ll elect whether to execute only, save your parameter set and then execute, or save the parameter set and exit rather than executing. If you choose to execute the parameter set, a message will pop up warning you that moving ahead will likely result in creating documents on the system. Click Yes to execute the parameter set.
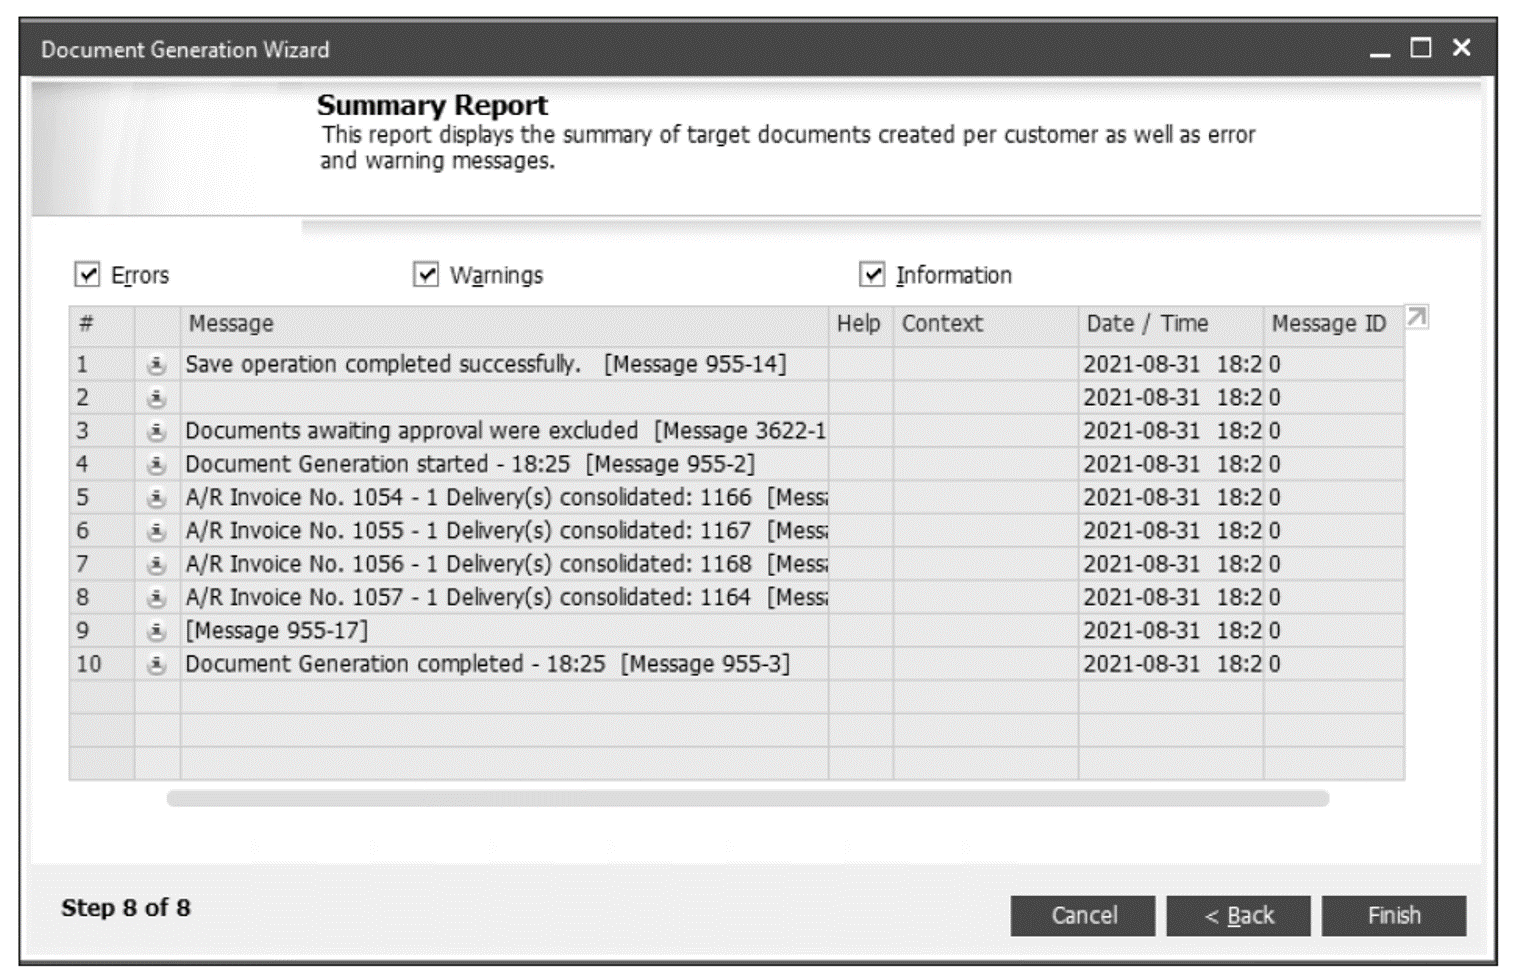
- The last step of the wizard is to review the Summary Report screen to learn whether the automated document run was successful and what documents were created as a result. This Summary Report, shown in the final figure, will also log any errors that were encountered during the run. In our example scenario, two target documents were created from three base documents, and no errors occurred. The new A/R invoices are now added to the system and can be found through the new document numbers provided in the Summary Report
Printing Documents in SAP Business One
The Document Printing screen allows you to print several different documents, including sales, purchasing, inventory, production, financial, and banking documents.
In the Banking module of SAP Business One, you can use Document Printing for the following documents:
- Incoming payments
- Deposits
- Outgoing payments
- Checks for payments
We’ll focus on using this feature to print checks for payments, but you can apply the same technique to other documents. Document printing can be accessed by choosing Banking > Document Printing.
The first step of the process is to enter selection criteria for the documents or checks for payment to print, as shown in the figure and table below.


When you’re done, click on the OK button to print the checks, or click on the Cancel button to cancel printing and close the screen.
The second step of the process is to review and confirm which checks for payment you want to print from the Print Checks for Payment To Be Printed screen shown in the figure below; the corresponding fields are described in the table.


When you’re done, either select the Print button to print the selected checks, or select the Cancel button to cancel the print and return to the Print Checks Selection Criteria screen.
Editor’s note: This post has been adapted from a section of the book SAP Business One: Business User Guide by Carl Britton Lewis, Juanita Karan, and Keith Taylor.


Comments