
The essence of stock transfer posting is that two organizational units are affected by the material posting so that an issuing and a receiving organizational unit are involved.
The issuing organizational unit is the place where the goods are taken from, and the receiving organizational unit is where the goods are received. Generally, transfer postings might occur between two storage locations in the same plant. This blog post explores in-plant stock transfer with SAP S/4HANA.
The Stock Transfer – In-Plant app (F1061) opens after you click the Stock Transfer – In- Plant tile. Select your Material and Plant, as shown in this figure:

After you select the material, a micro chart showing the material master information for three major stock types appears, as shown in the next figure:
- Unrestricted-Use Stock
- Blocked Stock
- Stock in Quality Inspection
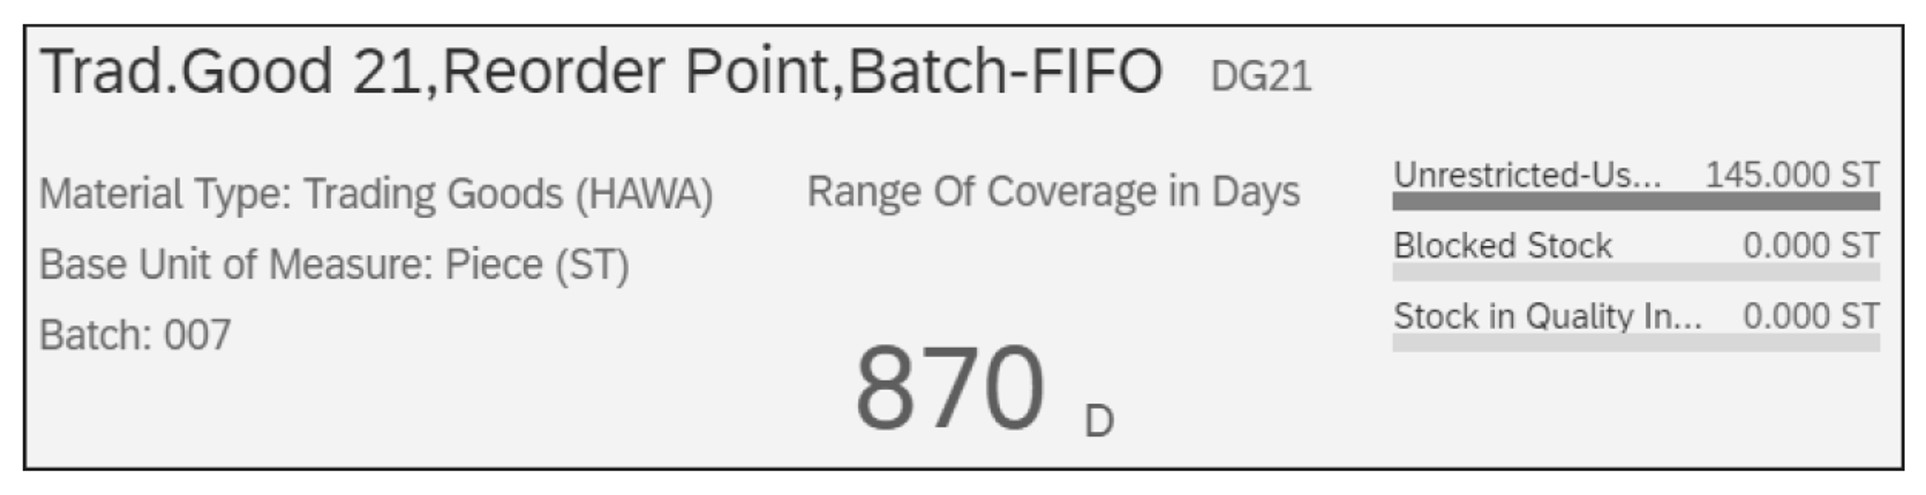
A calculation of an important inventory key performance indicator (KPI) is included in the header by calculating the range of coverage on the fly when the material is selected. In the given example, the range of coverage is calculated with 870 days. This feature is an example of embedded analytics, which are part of transactional applications, and outlines one major benefit of SAP S/4HANA and SAP Fiori apps.
The transfer posting within the same plant is based on a touch-enabled usability concept by providing buttons for selecting the source and target storage location. This enables the app to be easily used on mobile devices.
After you enter the Material and Plant, the results table is shown (see below) and contains all storage locations and their stock information for the selected plant and material combination. In addition, an overall sum of each stock type is shown at the end of each column.
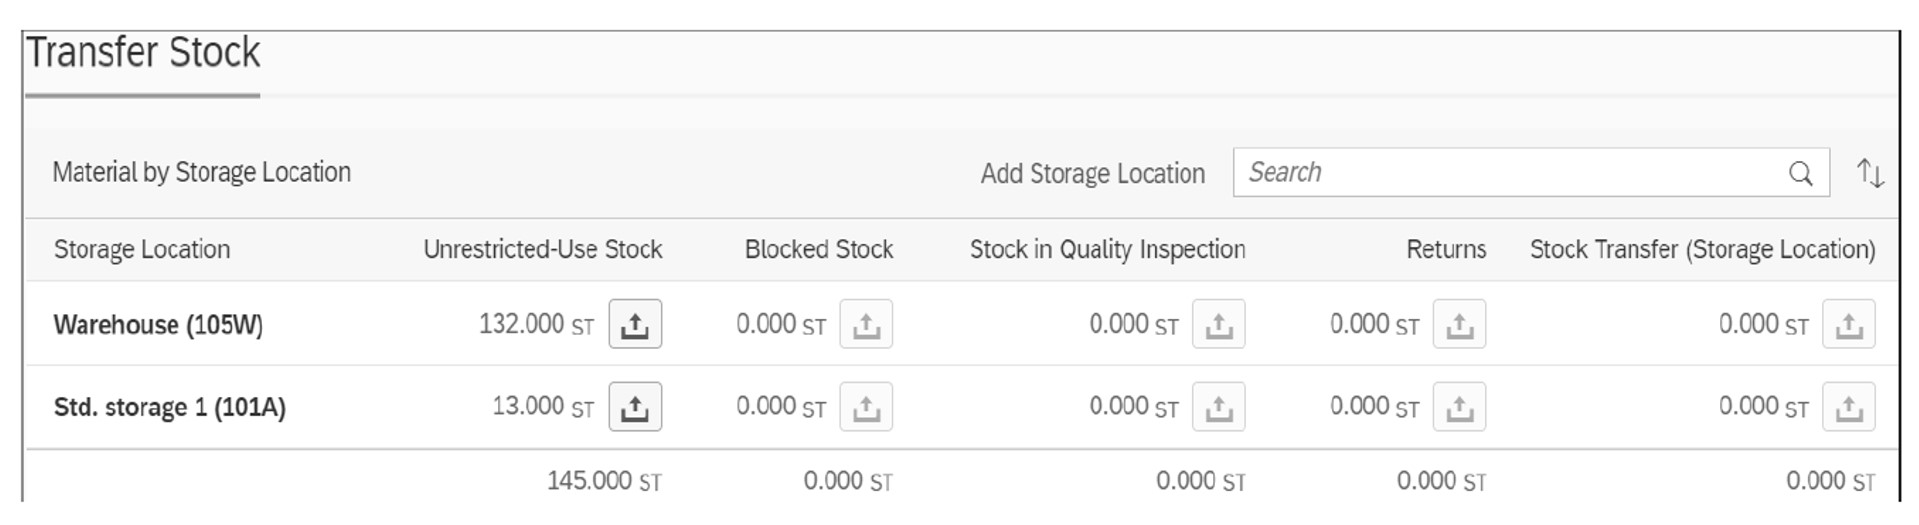
The columns for the stock types are based on the configuration in table T200A. If a stock type is maintained in table T200A, the related column is displayed accordingly.
A result line for a storage location is shown when the material master record for the material is already maintained for the storage location. If the material master record isn’t maintained accordingly yet, the application offers an Add Storage Location feature to select storage locations that aren’t assigned to the material in the material master record as of now. Click Add Storage Location (top of table) to access the Select Storage Location screen shown below, and select the appropriate checkbox.

With the first material movement into this storage location, the material master record is updated automatically. As a prerequisite, you must set the Create Storage Location Automatically option in Customizing. In this setting, you can define whether this feature should be enabled on the plant and/or storage location level.
This setting is available in SAP S/4HANA as an IMG activity and in SAP S/4HANA Cloud as Self-Service Configuration UI (SSCUI).
Now let’s discuss how a transfer posting is performed. As described, the results table contains buttons for selecting the sending storage location. You just have to click the related button as outlined in the figure below. After the selection is made, the button is marked as active and the allow transfer posting target buttons are kept active so that you can select the target location by just selecting the second button.
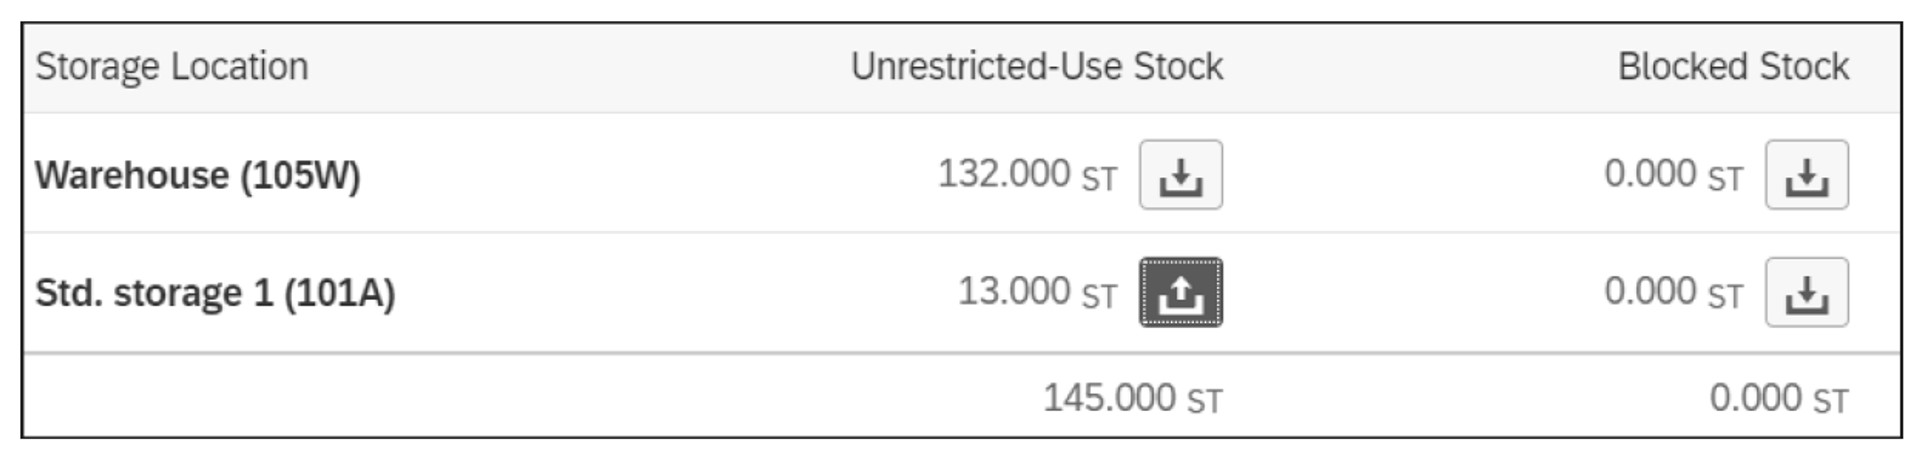
The selection of the button implicitly includes the selection of a certain movement type because the button is located in a specific column for a certain stock type (in the Unrestricted-Use Stock column, in our example).
6
After the target storage location is selected (second button clicked), a popup appears containing the input fields for required information for the material movement, as shown below. Enter your Quantity and date information (Document Date and Posting Date) in the mandatory fields.
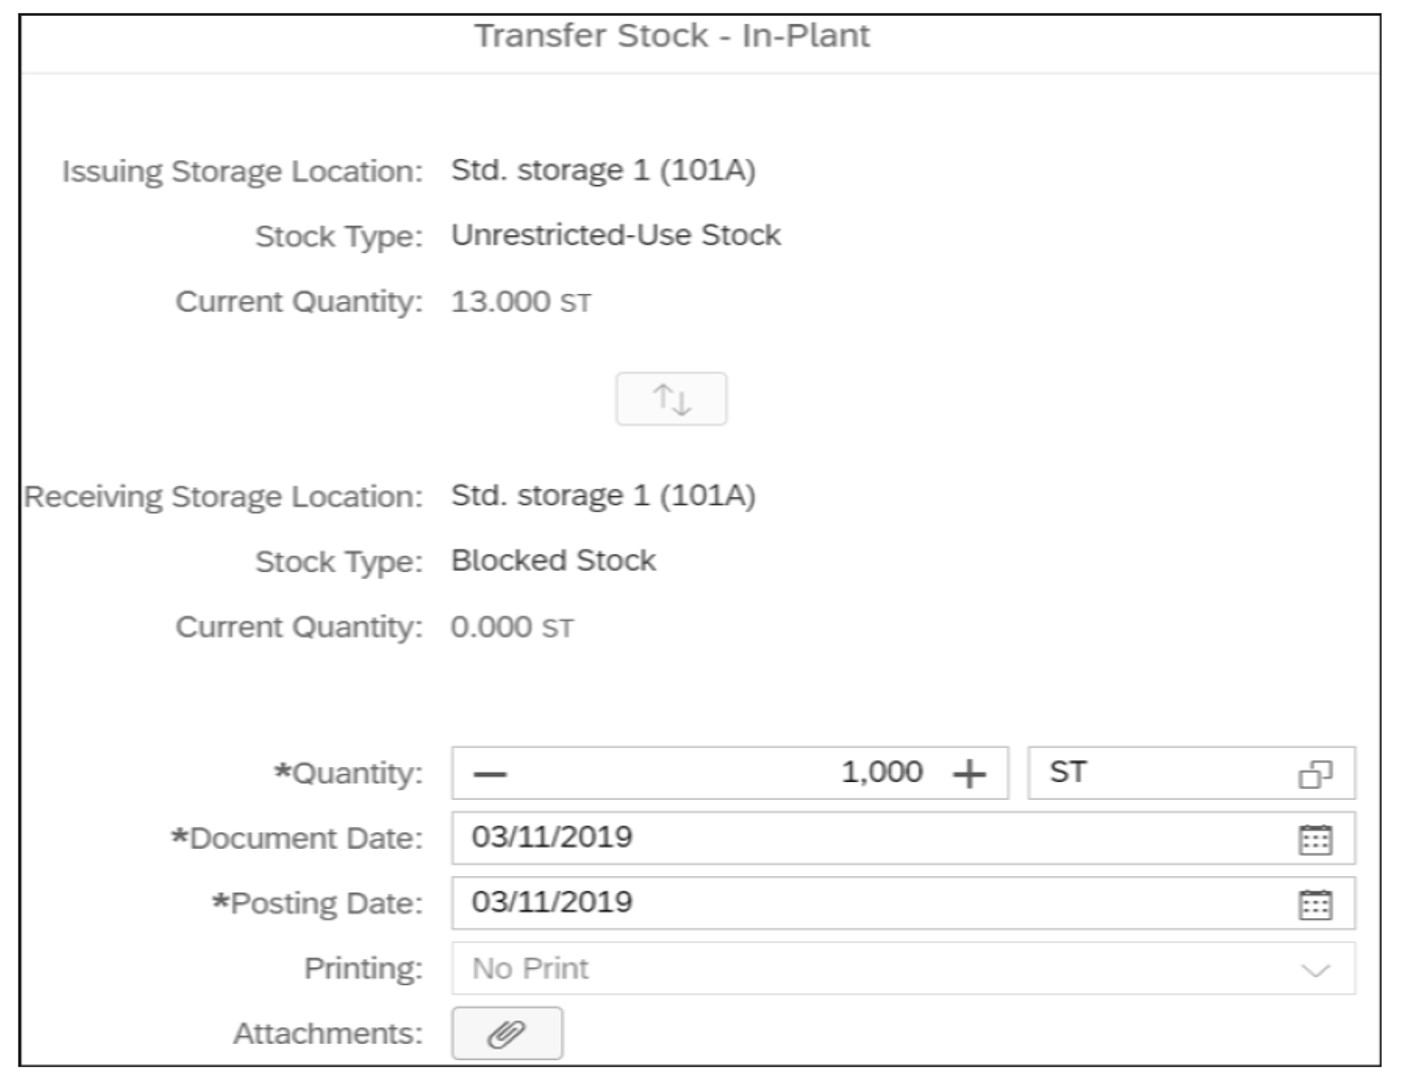
If you choose the wrong direction for the storage locations, you can just exchange the target and source storage location by using the exchange button (the two arrows) in the middle of the popup screen.
This app supports special stock types such as E (orders on hand), K (vendor consignment), and Q (project stock). The selection of the special stock happens implicitly when a source storage location is chosen via the popup, which only appears when the stock contains special stock, as shown here:
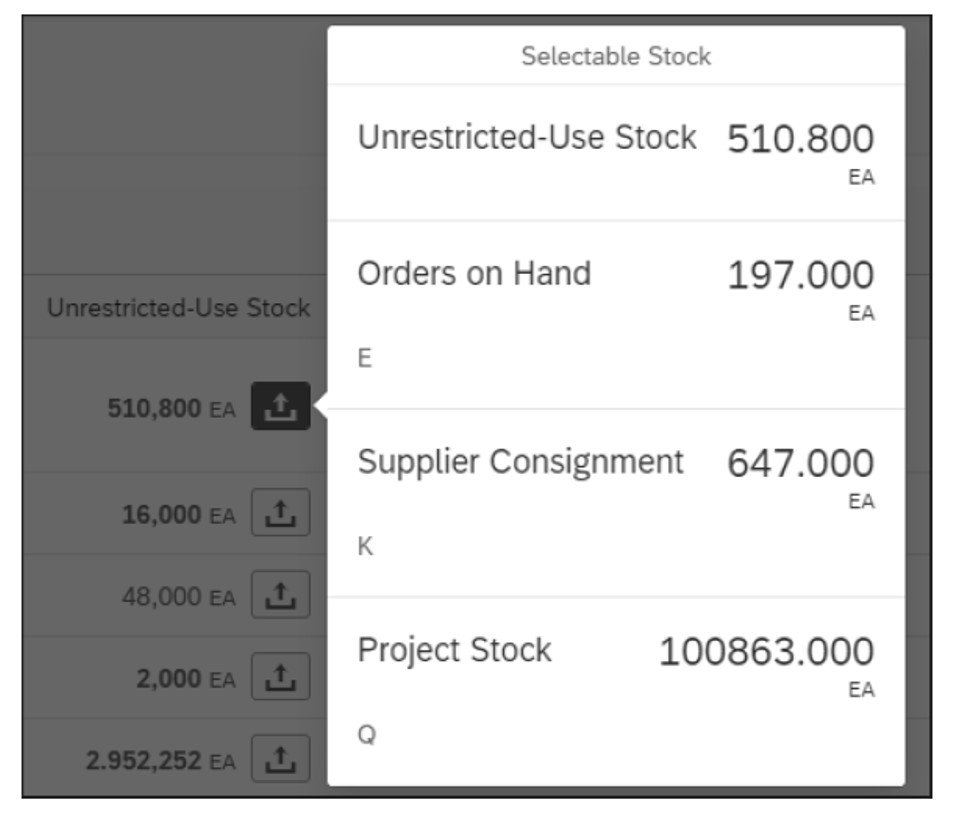
Special transfer postings in the same storage location but between the same special stock indicators are also possible: from E to E or from Q to Q. The related information for the special stock type, such as a sales order item for special stock type E, can be entered in the posting popup. The related fields are displayed based on the chosen special stock.
Now that you know how to transfer stock within a plant, you’re set to focus on more advanced stock transfer with SAP S/4HANA's logistics lines of business.
Editor’s note: This post has been adapted from a section of the book Inventory Management with SAP S/4HANA by Bernd Roedel and Johannes Esser.


Comments