
The Cost and Revenue work center provides guidance on creating and executing overhead distribution and absorption runs, uploading a plan for financial reporting, and setting up revenue recognition in SAP Business ByDesign.
Planning
Planning in SAP Business ByDesign provides functionality to upload plans or budgets to provide visibility into financial reporting. Multiple plan versions can be uploaded and viewed in reporting.
Open the Cost and Revenue work center and then select the Planning task. Click New and then click Plan Version from Excel and select the type of plan you want to upload. The New Balance Sheet Plan or New Balance Sheet Plan – Multi Company option is used to upload your balance sheet, and the New Expense and Income Statement Plan or New Expense and Income Statement Plan – Multi Company can be used to upload an P&L plan. Highlight the desired plan and click Download. Click the file link to access the template for use with the SAP Business ByDesign Add-in for Microsoft Excel.
Once your budget or plan has been created, open the Microsoft Excel template and log on to SAP Business ByDesign through the add in. You’ll need the URL of your tenant and your user name and password for SAP Business ByDesign.
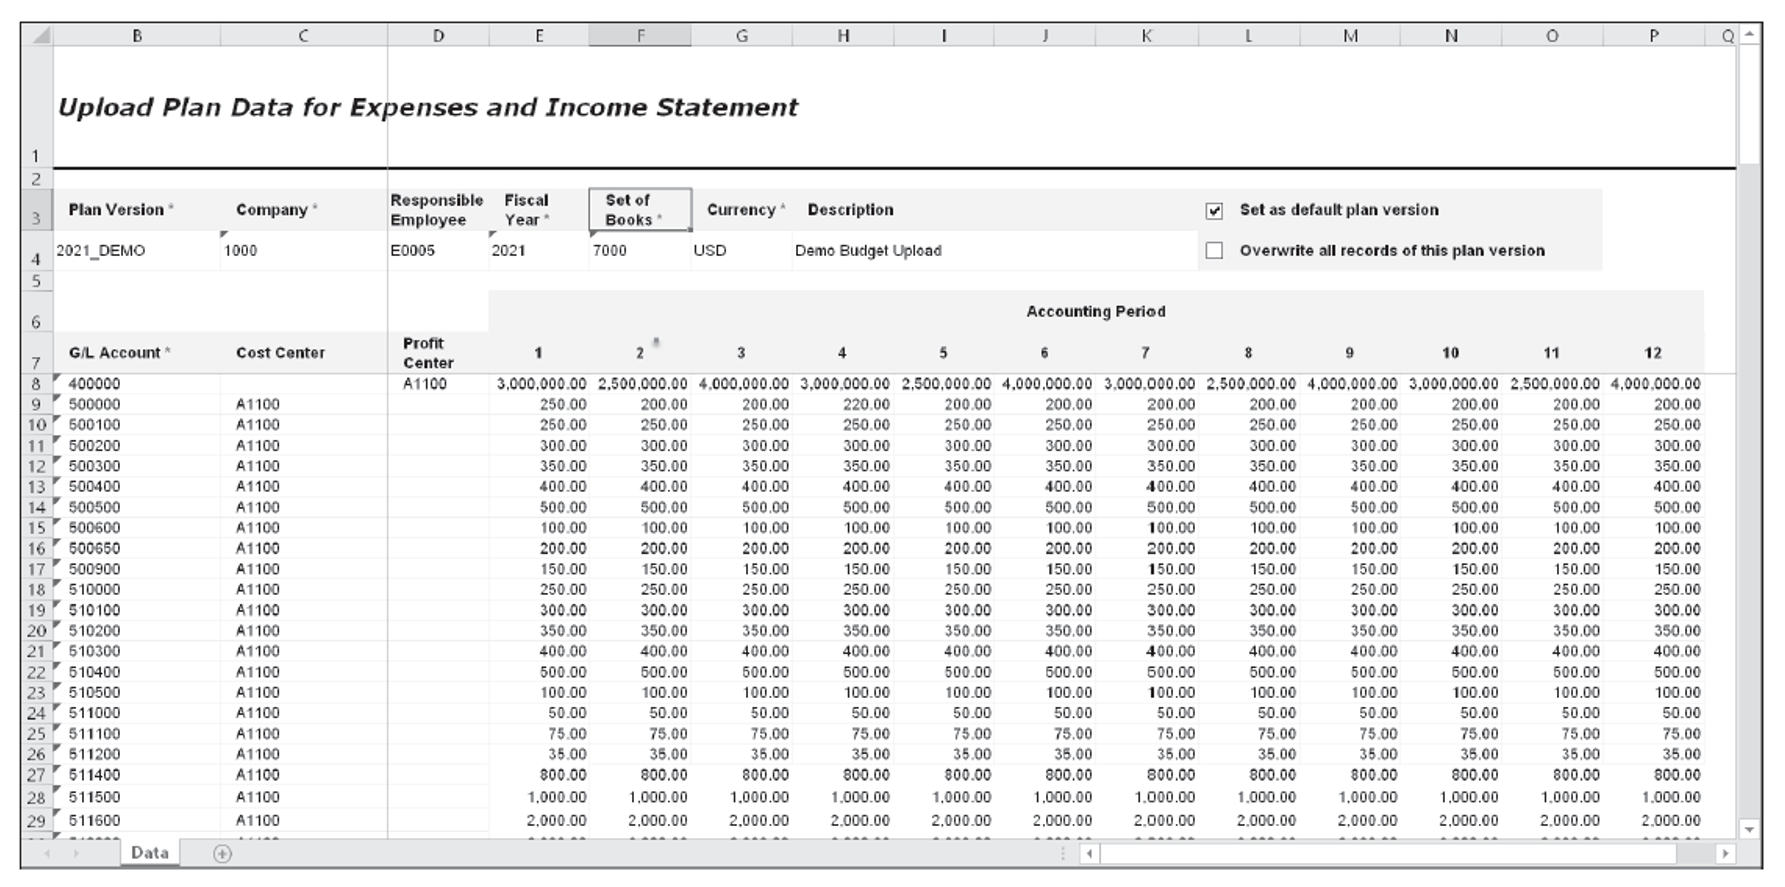
Enter the plan version in all capital letters, with no spaces or special characters in the Plan Version field. Then, maintain the Company ID, Responsible Employee, Fiscal Year, Set of Books, Currency and Description fields on the header of the Upload Plan Data for Expenses and Income Statement. You can define the plan as the default plan by selecting the Set as Default Plan Version checkbox. Select the Overwrite all records of this plan version checkbox to overwrite all data in the plan, or leave this checkbox deselected to only change items that are defined in the item detail.
The item detail needed in the Upload Plan Data for Expense and Income Statement task includes the G/L Account, Cost Center (required for expense accounts), Profit Center (required for revenue and variance accounts), and values by Accounting Period. An example of the Upload Plan Data for Expense and Income Statement task is shown in this figure.
Note: The Upload Plan Data for Balance Sheet task functions in the same manner as the Upload Plan Data for Expenses and Income Statement task; however, the item data includes the G/L Account, Profit Center, Opening Balance, and Accounting Period fields.
Open the Cost and Revenue work center and access the Planning activity. In the overview screen, you’ll see all plans that have been uploaded, including their fiscal year, set of books, company, and created-by information and whether the plan is the default plan. You’ll can reset defaults, edit a plan (pencil icon), and delete a plan (trashcan icon).
Highlight a plan and click Edit to modify or review the plan. In addition to the data already described, the General tab can contain notes and attachments. The Plan Data tab provides a report that reflects the details of the uploaded plan by general ledger account and period. Click the gear icon and then click Analyze to access the Financial Plan Details report. Edit the Selection and the View to customize the report to your needs. The Changes tab provides insight into who has modified the plan and when.
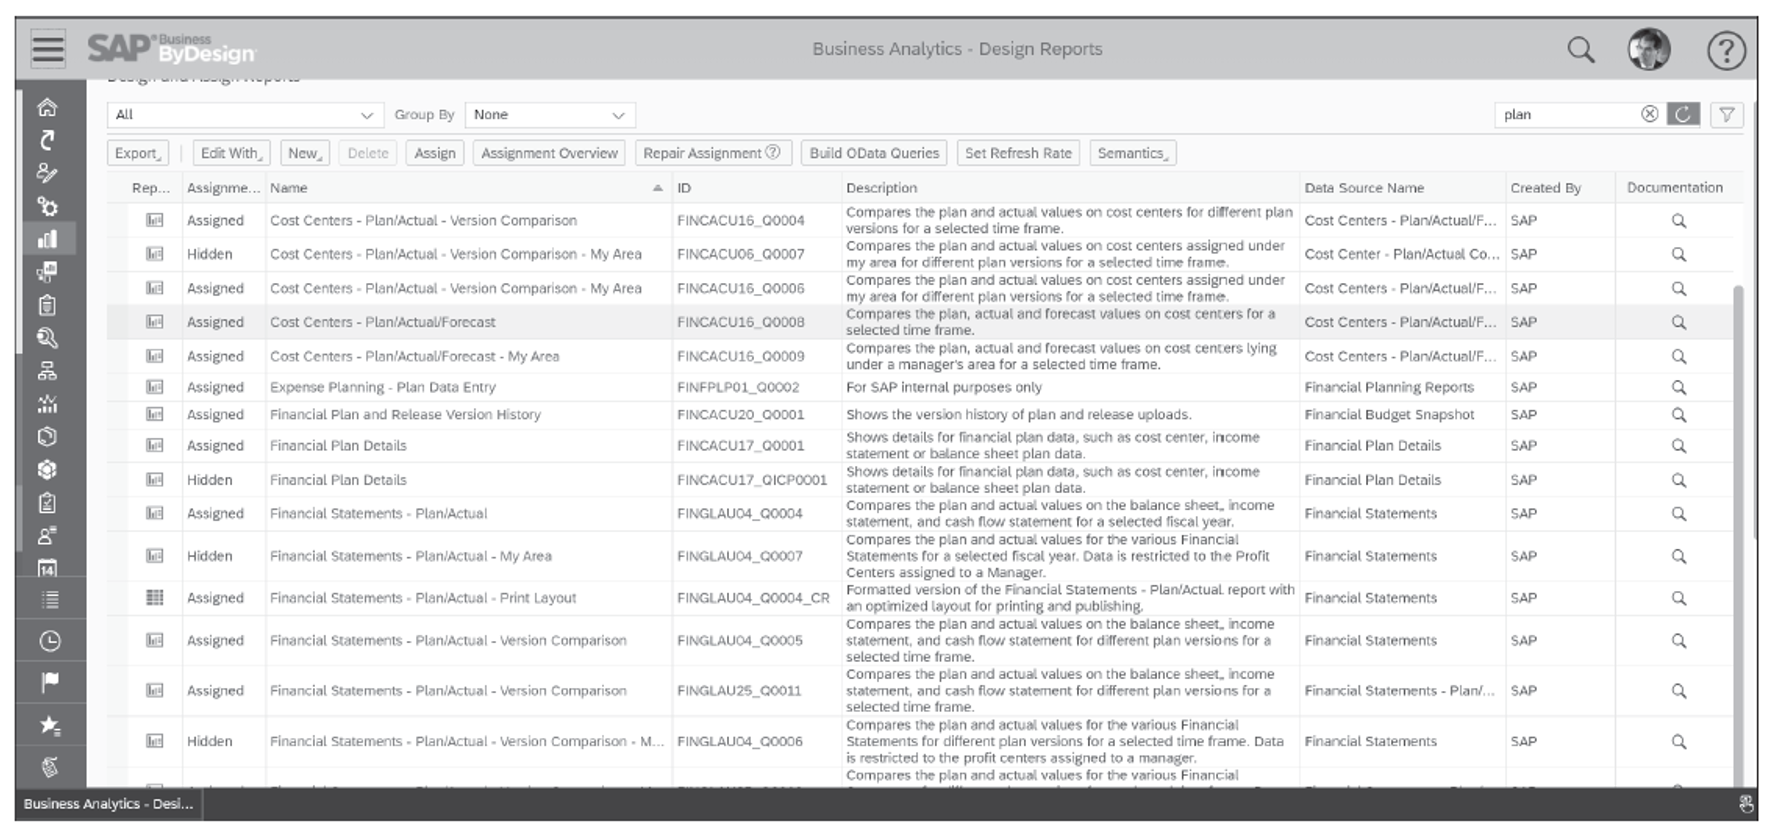
Once the plan has been uploaded, it is available in assorted reports. A partial listing of the available reports is shown below.
Overhead Distribution
SAP Business ByDesign’s overhead distribution functionality distributes costs from support cost centers to primary cost centers or projects. Support cost centers accumulate overhead costs, and these costs are allocated to projects or primary cost centers on a periodic basis.
Define a distribution rule by opening the Cost and Revenue work center and click on Distribution Rules. Click New and then select between the Distribution Rule for Cost Centers or Distribution Rule for Projects options. This choice defines whether the costs will distribute to a cost center or a project.
In step 1 (Enter Basic Data), define the Distribution Factors as Fixed or Based on Costs. The Fixed option means distribution will distribute costs based on the defined percentage while the Based on Cost option allocates the costs pro rata based on the cost in the receiving cost centers. In the Determination of Distribution Amount field, you define the percentage of the costs you wish to distribute and which cost you wish to distribute. All costs can be distributed, or you can define the specific general account or group of general accounts to distribute to the receiving cost centers. The Receivers section defines the Receiver Type and how the cost centers or projects will be selected (i.e., by Organizational Unit or Manually).
In step 2 (Select Receivers), you’ll select the receiving cost centers or projects and define the Valid On Date field. Define the Distribution Factors in step 3 (Enter Distribution Factors). Step 4 (Enter Distribution Rule Attributes) is where you’ll define the Distribution Rule ID and the Distribution Rule Description. In the Account Determination section, choose the Account Determination to use for the debits and credits of the senders and receivers.
Step 5 (Assign Additional Senders) allows the selection of additional sending projects. Step 6 (Review) provides an overview of the parameters defined for the run. If you need to make changes, click Previous to return to the step where edits are needed. If no changes are required, click Finish.
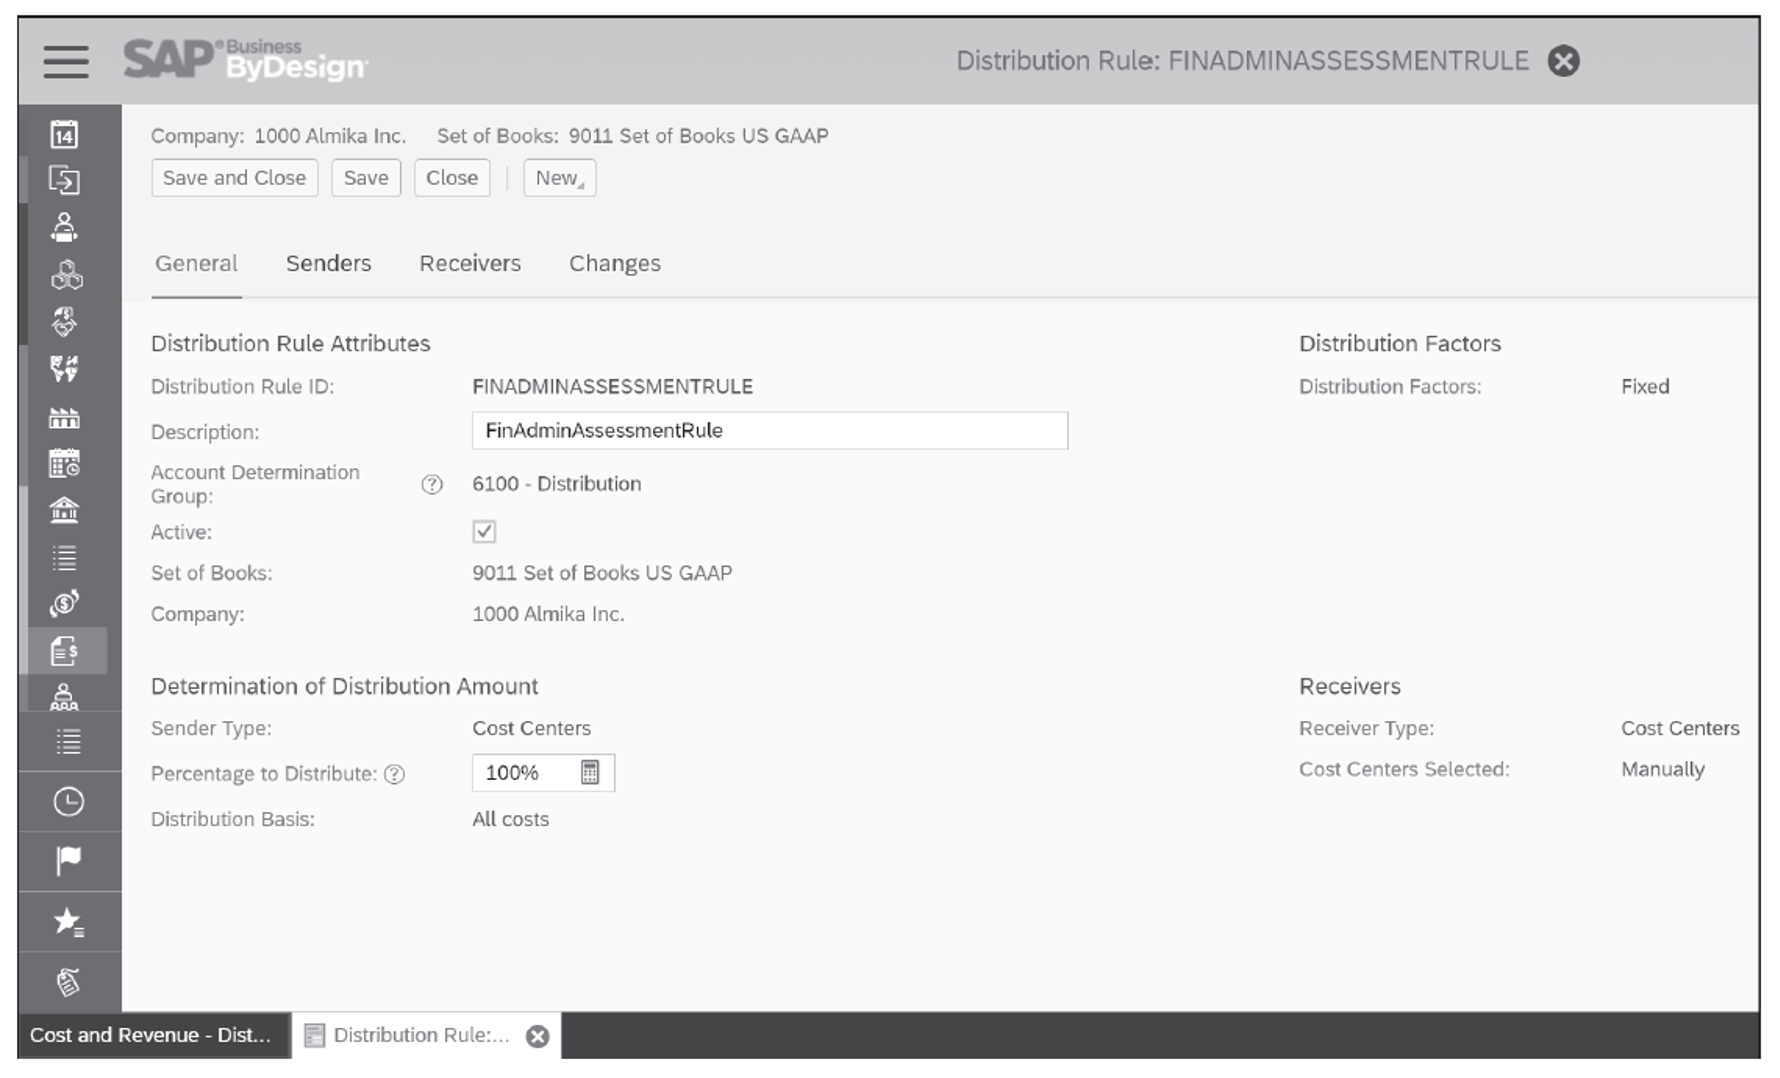
In the example shown in the next figure, note that the Distribution Factors is Fixed. Also note that, in the Determination of Distribution Amount section, the Sender type is Cost Centers, the Percentage to Distribute is 100%, and the Distribution Basis is All Costs. The receivers are cost centers, and the cost centers are selected manually.
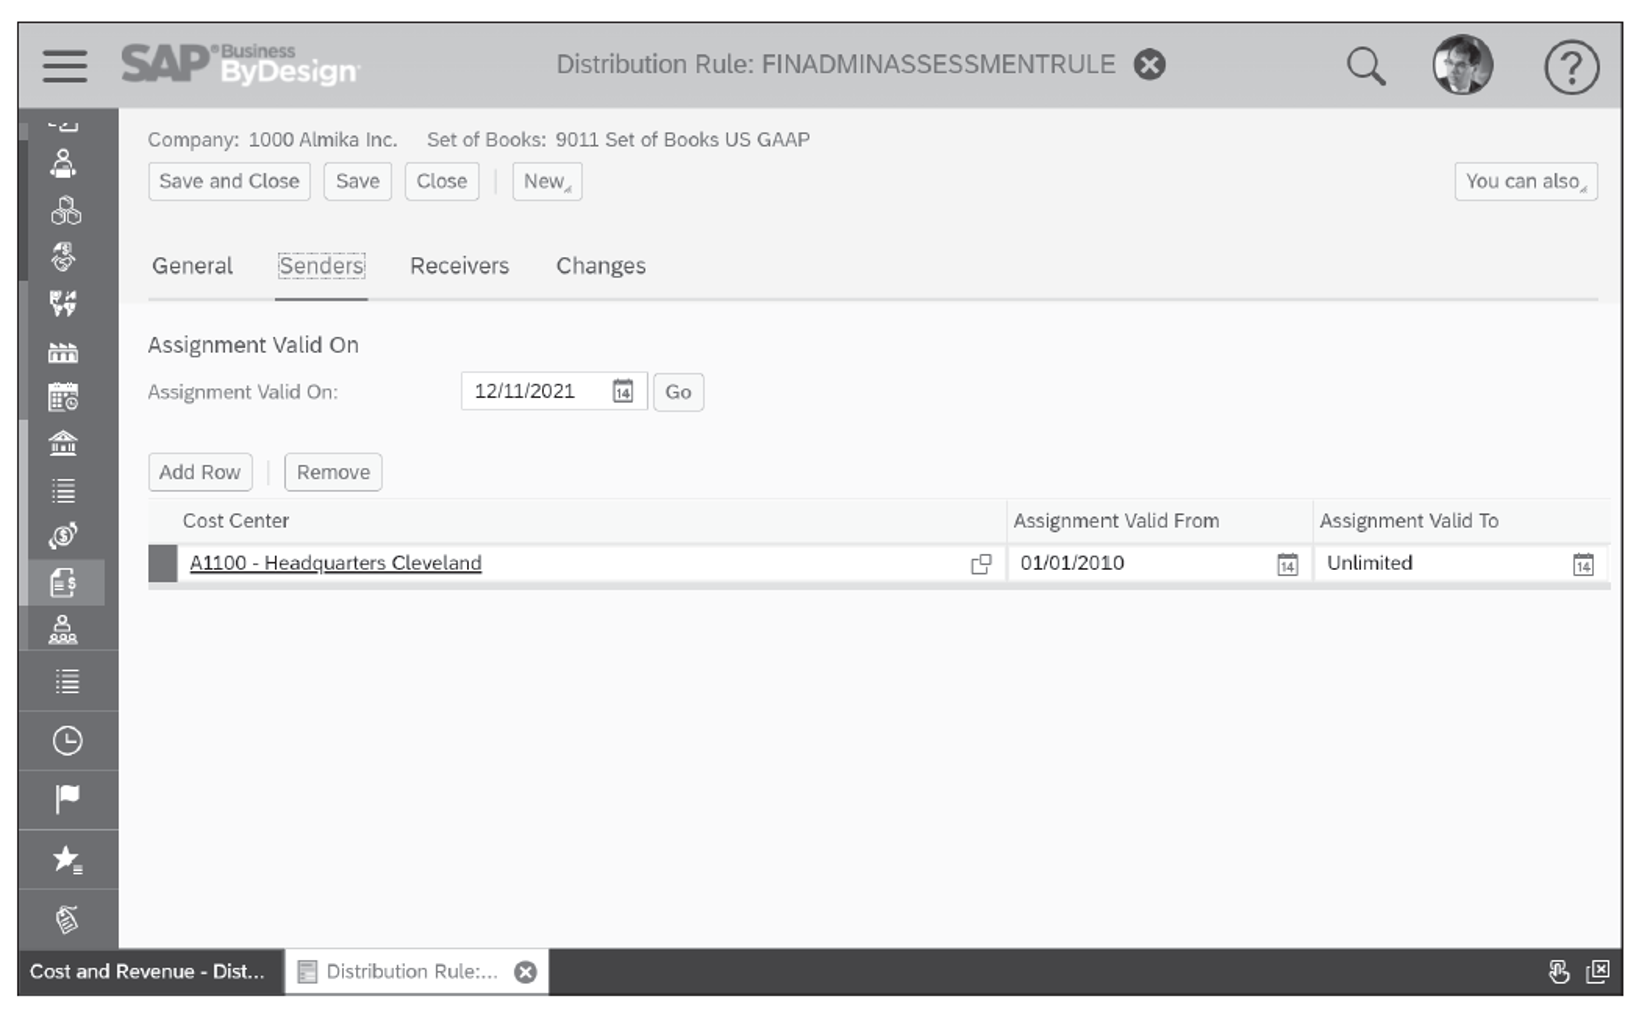
Under the Senders tab, shown below, you can view the sending cost center(s) and their validity dates.
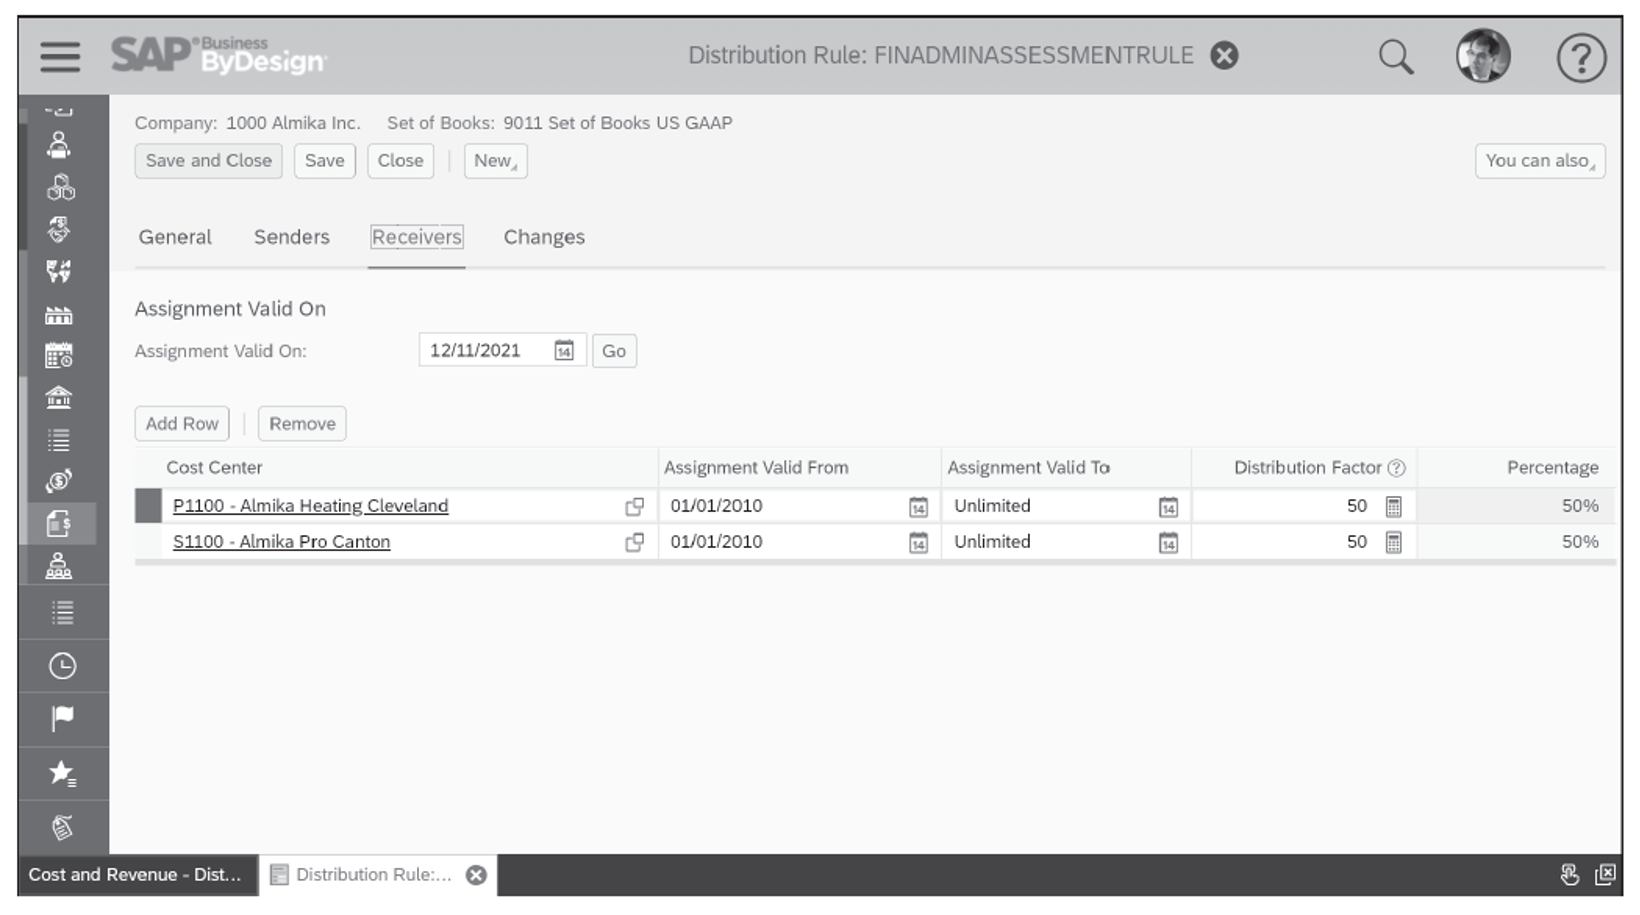
The Receivers tab, shown in in the following figure, reflects the cost center or project that will be receiving costs and the factor for the distributions.
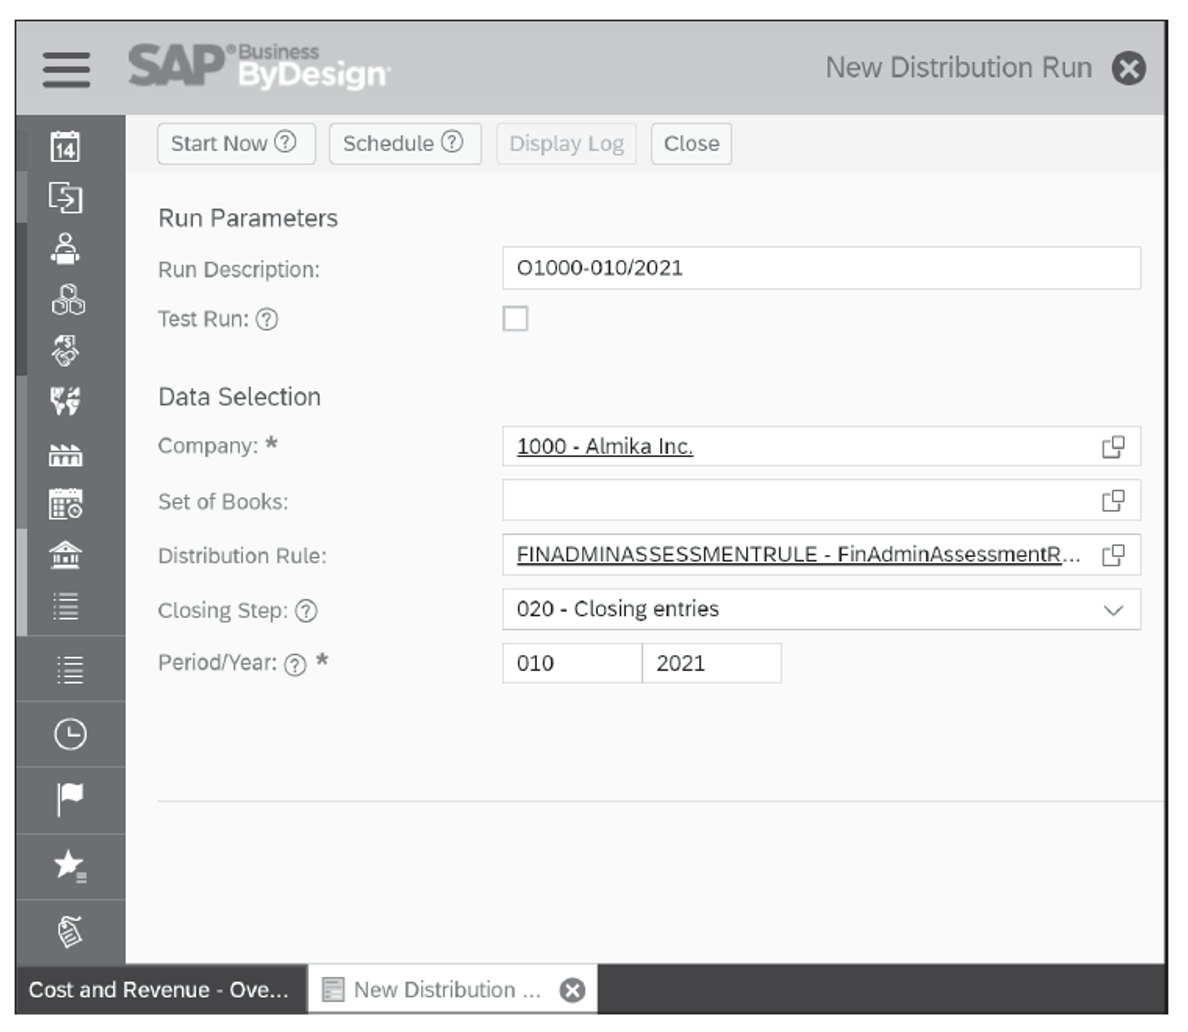
Execute a period-end overhead distribution run by opening the Cost and Revenue work center and selecting the Overhead Distribution task. Below shows an example of a new distribution run, defined through the Run Description, Test Run, Company, Set of Books, Distribution Rule (created earlier), Closing Step, and Period/Year fields.
9
Click Start Now or Schedule to run the overhead distribution run later or on a recurring basis. Once the run has executed, click Display Log, highlight the set of set of books, and click View to see the results. As with most runs in SAP Business ByDesign, the Data Selection tab reflects the parameters of the run, and the Messages tab shows any error or informational messages. The Postings tab provides a listing of the transactions that posted. The figure below shows the postings generated from overhead distribution run, under the Postings tab.

The Processed Successfully tab provides details on items processed without errors. Further details on the items are available under Processed with Errors and Not Processed tabs. Click New then click Overhead Rule. A guided activity will walk you through creating a new overhead rule.
Overhead Absorption
Overhead absorption runs apply overhead to the direct costs of production orders, cost collecting projects, and direct cost projects.
Once overhead distribution runs have been executed to move costs from support cost centers to primary cost centers, you cannot execute overhead absorption runs to move overhead costs to the direct costs for direct cost projects, cost colleting projects, production, and service orders.
Overhead rates are calculated outside of SAP Business ByDesign and then defined in the overhead rate that is used for the overhead absorption runs. Overhead rates are usually defined for an extended period. Open the Cost and Revenue work center and click on Edit Overhead Rates located under Common Tasks to create or edit overhead rates.
Create a new overhead rate by opening the Cost and Revenue work center and clicking on Common Tasks – Edit Overhead Rates. Then, click New and select Overhead Rate. Step 1 (Enter Basic Data) of the guided activity requires you define an overhead rate ID and add a description for the rate or select the Company, Set of Books, and Overhead Type from the dropdown list. Once the data is defined, click Next.
Step 2 (Specify Calculation) defines the calculation base when you select the general ledger account from the dropdown list. Maintain the Percentage and Valid from Date fields. Click Next.
Step 3 (Specify Crediting) requires the selection of the account determination and the cost center for the credit. Once complete, click Next.
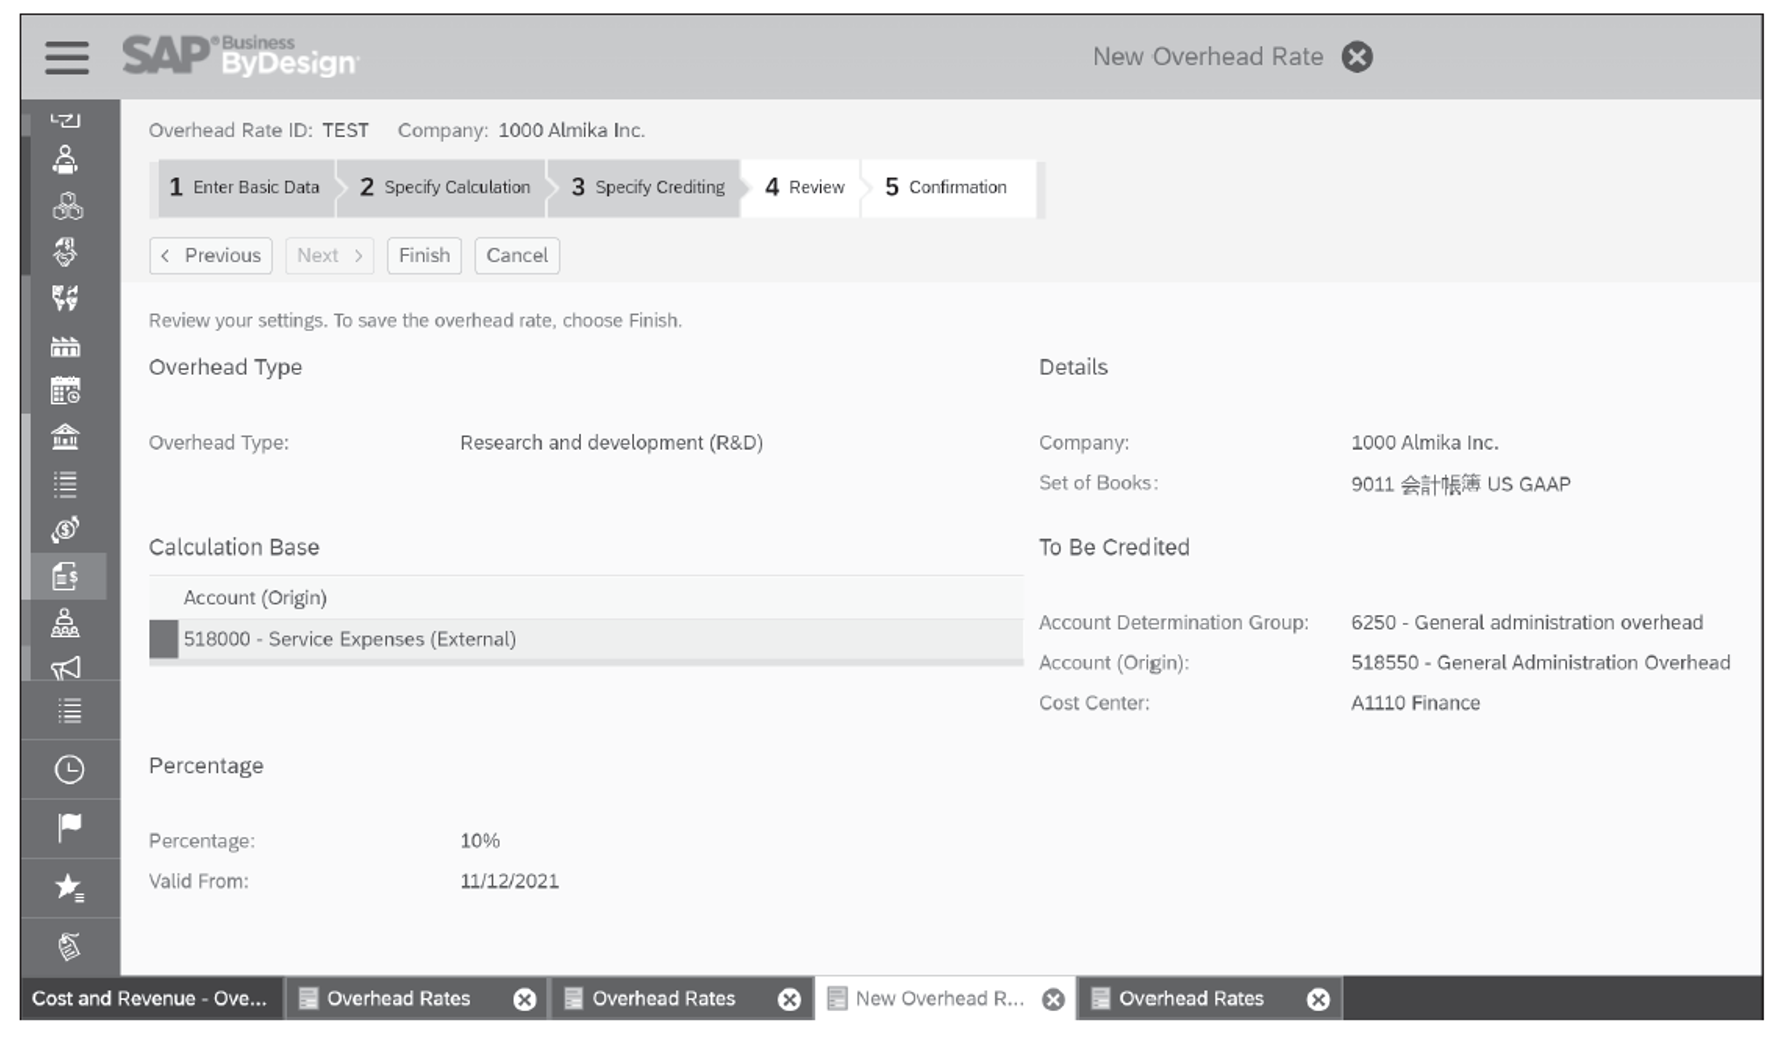
Finally, as shown below, step 4 (Review) provides an overview of the parameters you’ve defined for the new overhead rate. Review these settings, and if edits are required, click Previous until you arrive at the screen that requires editing. When your review or edit is complete, click Next.
Once the overhead rate is defined create an overhead rule by opening the Cost and Revenue work center and selecting the Overhead Rules task. Then, click New and then select Overhead Rule.
Step 1 (Enter Basic Data) requires you to define an overhead rule ID, enter a description for the run, or select the company from the dropdown list. Once the data is defined, click Next.
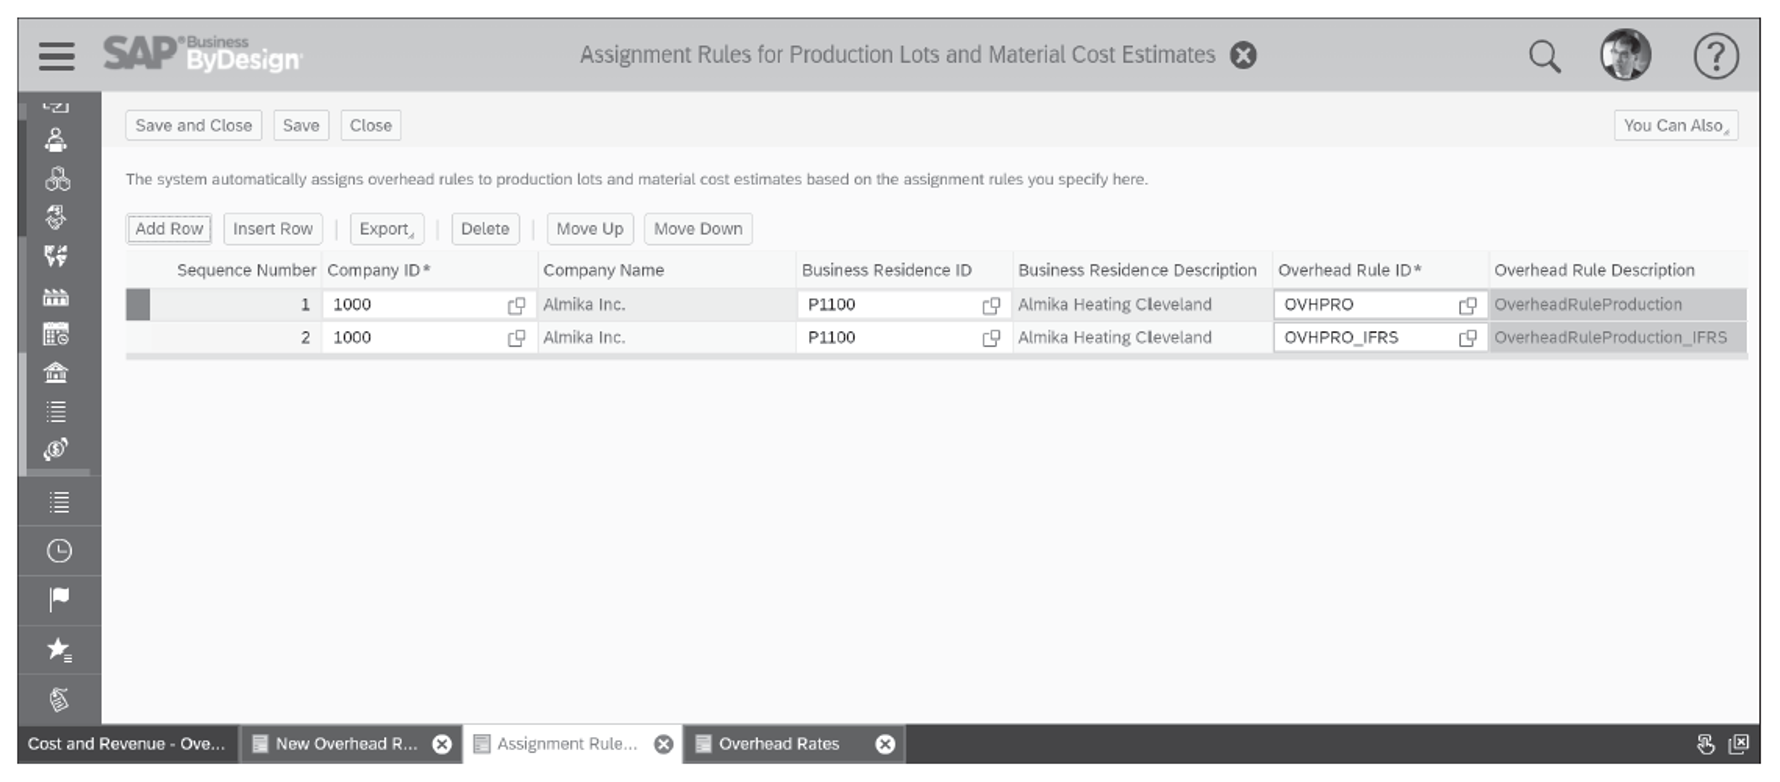
Step 2 (Specify Assignment Rules) is where you’ll define assignment rules to production lots and material cost estimates, projects, and service orders. The new overhead rule is automatically assigned. Click Show All Assignment Rules to check the consistency of these assignments, as shown below. Review the chosen assignment rule and make changes if required; then, click Save and Close.
In step 3 (Select Overhead Rates) you’ll move the rates to be used from the Available Overhead Rates section to the Overhead Rates to Be Calculated section by highlighting the relevant the available overhead rule and clicking the right > icon to move the selection, as shown here.
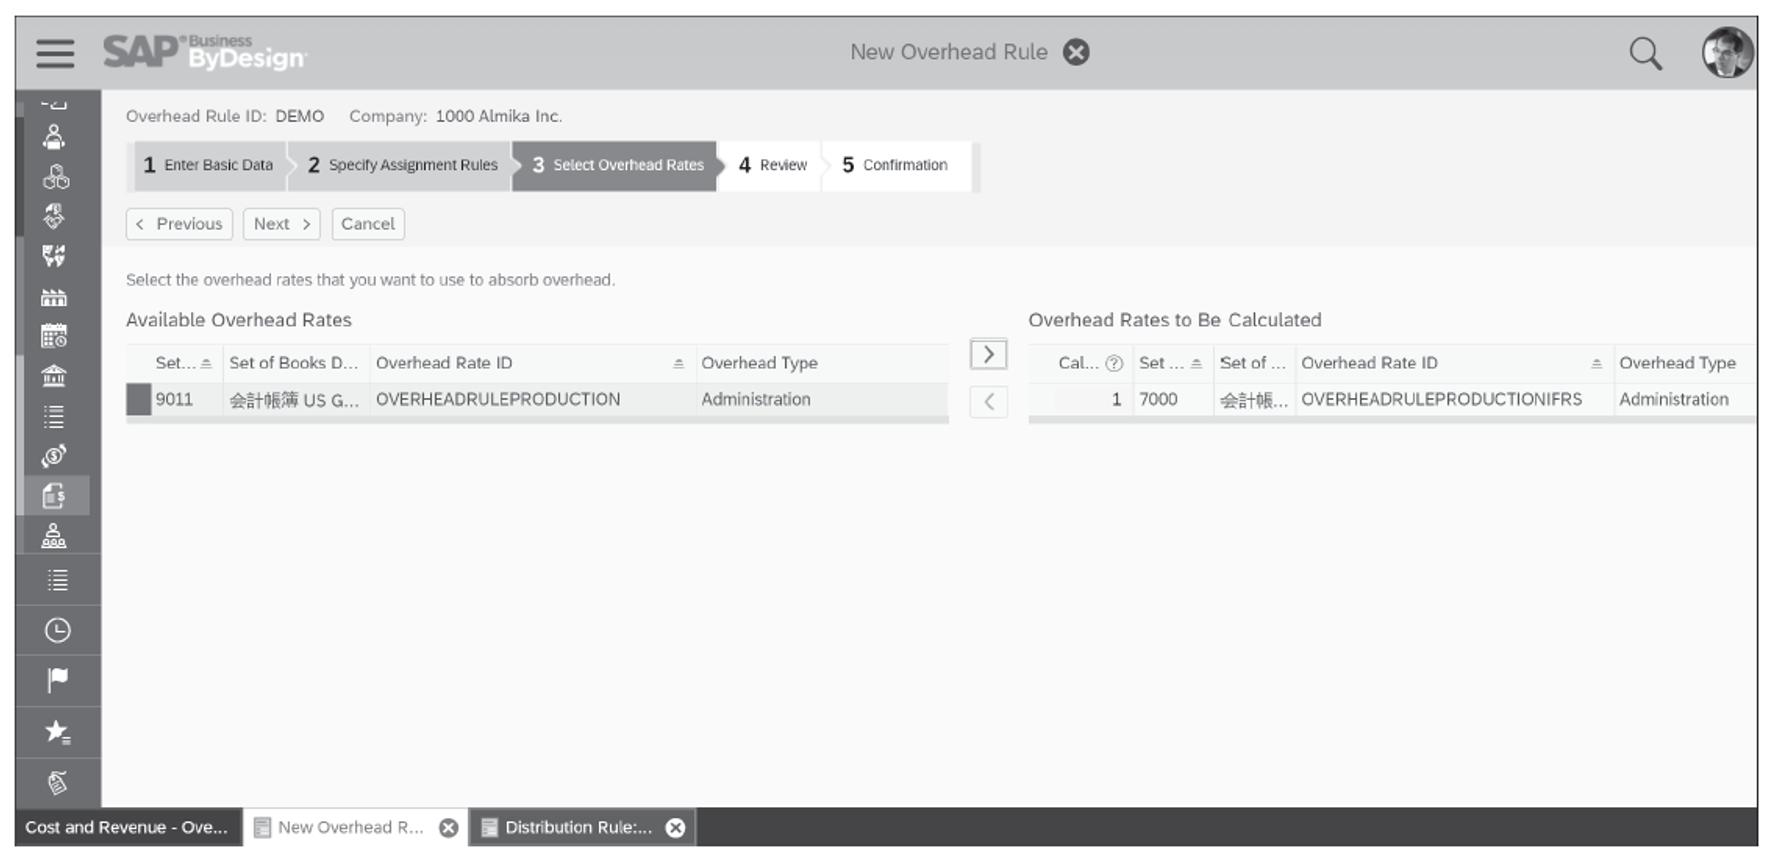
Once the available overhead rates have been selected, click Next.
In step 4 (Review), check the parameters you’ve defined in the run. If the parameters need to be edited, click Previous until you arrive at the screen that requires edits. Once edits and reviews are complete, click Finish.
The overhead rate and overhead distribution rules have now been defined, and you can execute an Overhead distribution run at period-end. Overhead distribution runs are specific to service orders, overhead cost projects, or direct cost projects.
Select the type of overhead distribution run you wish to execute by opening the Cost and Revenue work center and then selecting the desired run in the Period Task section. Enter a run description for the new absorption run for direct cost projects and select the Test Run checkbox for a test run. In the Data Selection area, choose the Company, Set of Books, Project, Closing Step and the Period/Year. Click Start Now or, to schedule the run for a later time, click Schedule.
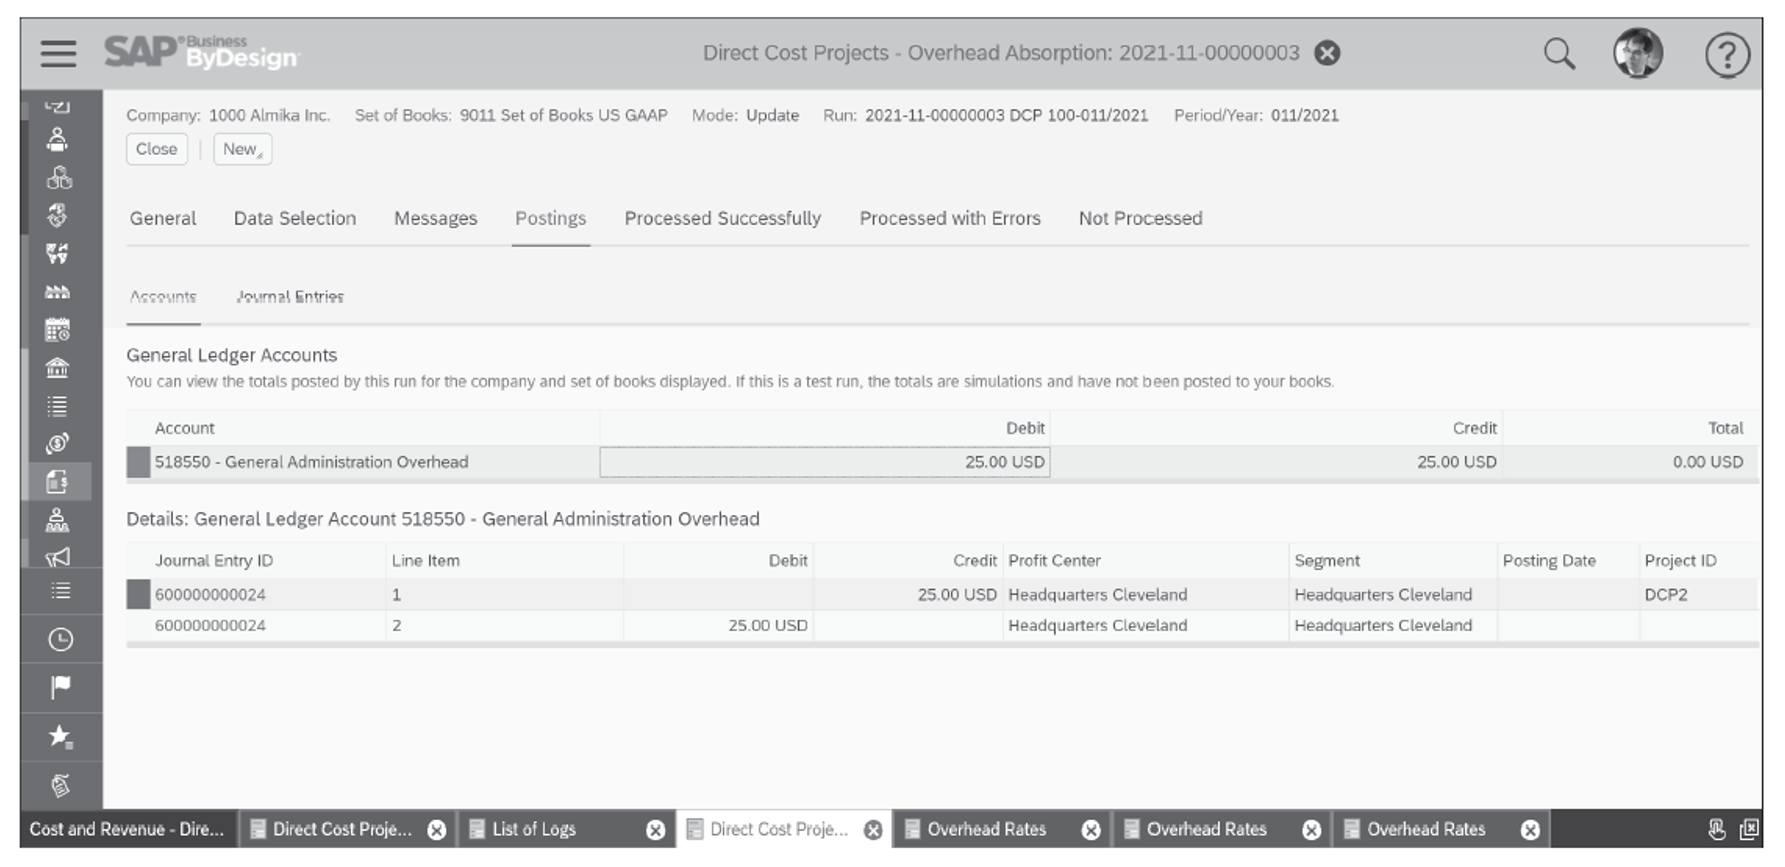
When the run is complete, click Display Log and highlight the set of books you wish to view. As with most runs in SAP Business ByDesign, the Data Selection tab reflects the parameters of the run, and the Messages tab shows any error or informational messages. The Postings tab provides a listing of the transactions that have posted. Below shows the postings from the Postings tab of an overhead allocation run.
Revenue Recognition
SAP Business ByDesign provides multiple types of revenue recognition, including at the point of invoice, using cost-to-cost percentage of completion (POC), cost-to-cost project POC, completed contracts, and the point of delivery. A revenue recognition run processes sales documents and recognizes their revenue based on the defined revenue recognition method assigned.
Revenue recognition is set for specific sales documents in business configuration, but the revenue recognition method can be reassigned for a sales order in the sales document items, for projects and contracts in the Cost and Revenue work center Sales Documents Items activity.
Execute a revenue recognition run by opening the Cost and Revenue work center and clicking Revenue Recognition. You can copy an existing revenue recognition run or click New and then Revenue Recognition run to create a new run.
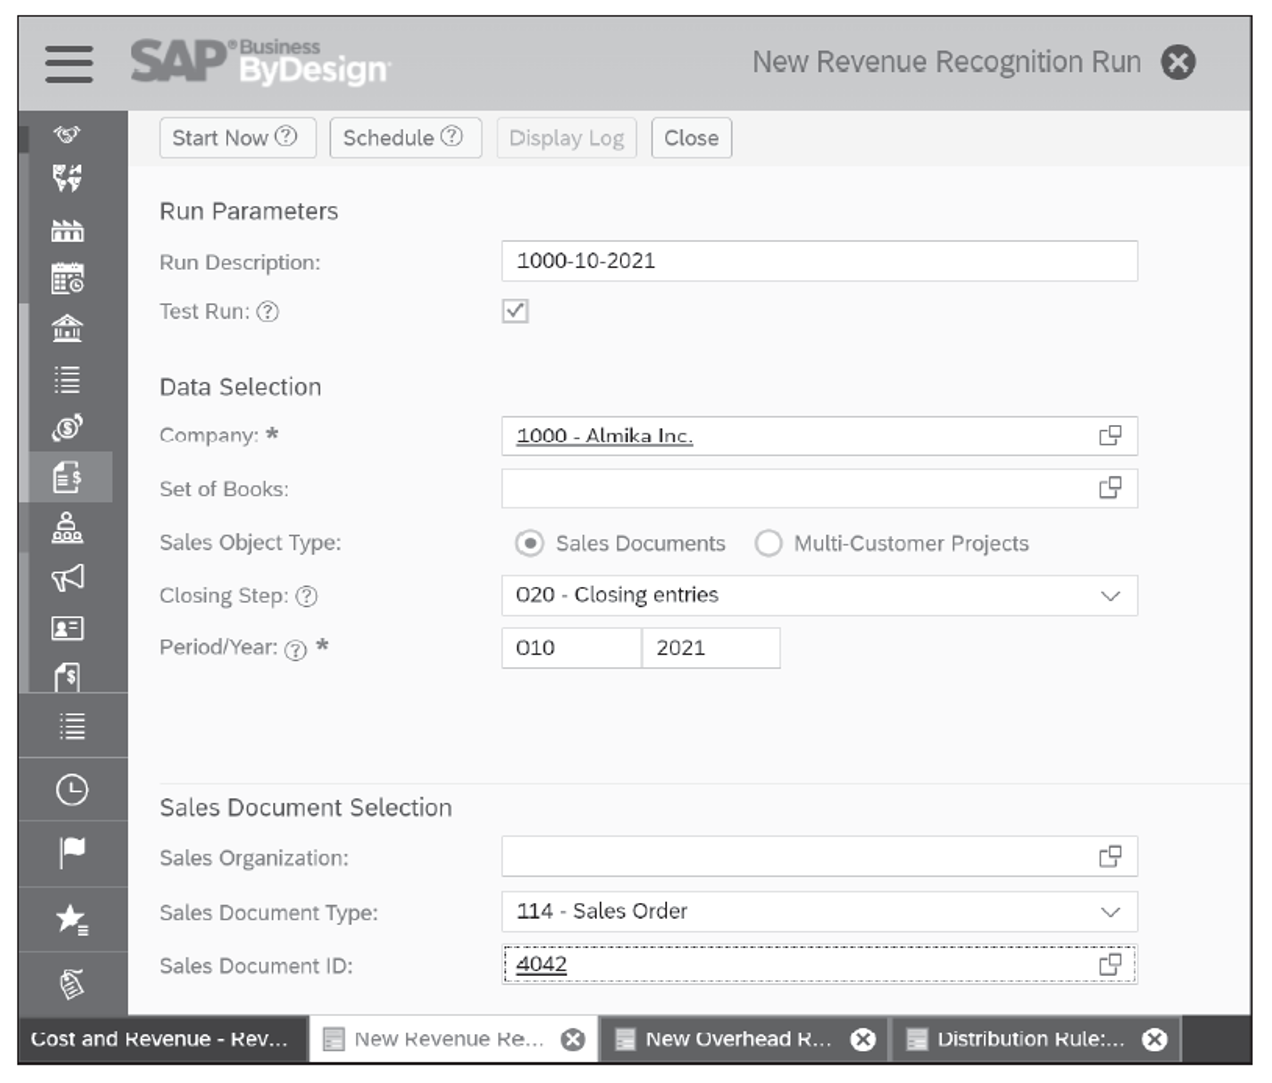
In the Run Parameters section, maintain the Run Description field and select the Test Run checkbox to preview the run before posting. Define the company, set of books, sales object type, closing step of the general ledger, and the period/year in the Data Selection section. In the Sales Document Selection section, select the Sales Document Type and the Sales Document ID from the dropdown menus, and the Sales Organization field will populate automatically. An example of a revenue recognition run is shown below.
Execute the run by either clicking Start Now or clicking Schedule and scheduling the run for a future date or create a recurring pattern.
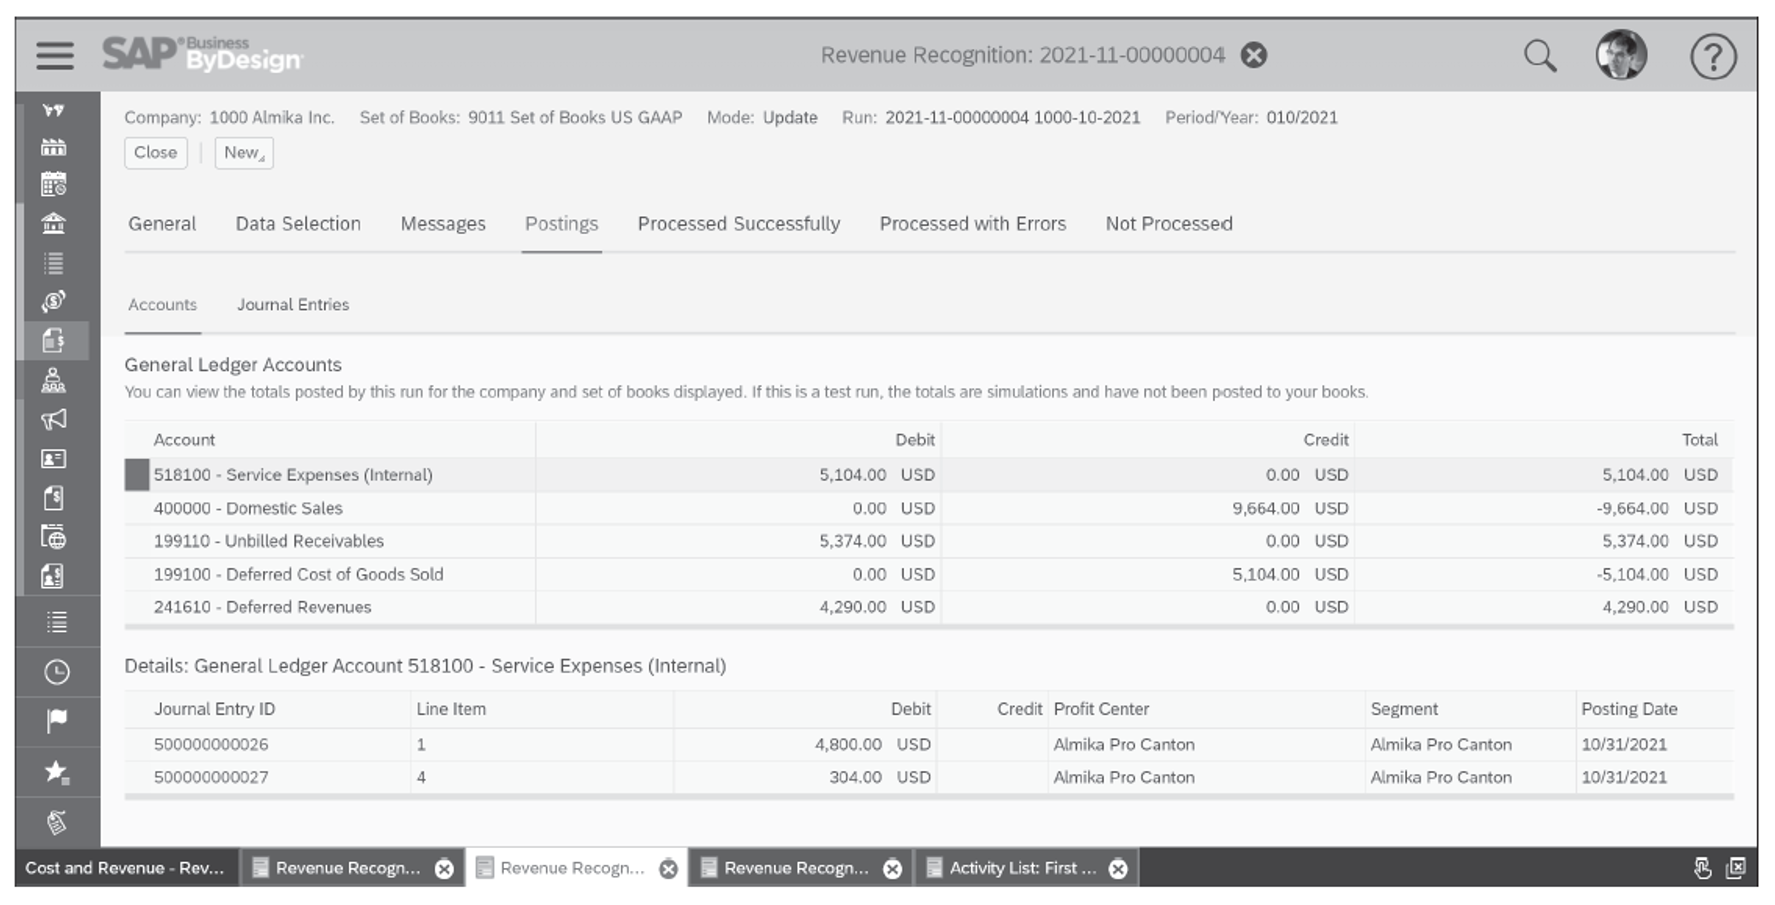
Once the run is complete, click Display Log to view the results of the run. The Data Selection tab displays the parameters chosen for the run. The Messages tab provides insight into any errors or information messages generated in the run. Account postings can be found in the Postings tab, which reflects the debit and credit postings from the run and the associated account. The screen shown in the final figure reflects the results of the Revenue Recognition Run shown earlier.
The Processed Successfully tab provides details on sales documents processed without errors. More details on the sales documents can be found in the Processed with Errors and Not Processed tabs.
Editor’s note: This post has been adapted from a section of the book SAP Business ByDesign: Business User Guide by Caroline Atkinson, Andrew Howell, Thomas Kramer, and Laura Widner.


Comments