For orders that have been delivered or completed, an SAP system can calculate and determine its variance. This is a look at the delta between the actual costs spent on fulfilling the order and the costs estimated by planners.
For this purpose, the system uses a number of default variance categories, which categorize variances into those on the output side and those on the input side.
When the orders are settled, the system posts a price difference in financial accounting and corrects the change in stock account. This posting doesn’t affect the net income. In traditional SAP systems, the system uses the account that is defined in the SAP ERP MM account determination of account grouping PRD-PRF to post variances in financial accounting. With SAP S/4HANA Finance you are able to split those variances up into variance categories on separate general ledger (GL) accounts.
The variance split is configured according to the variance categories for margin analysis. Before we start explaining the individual steps needed to configure the variance split, we need to create a GL account for each variance category with cost element category 1 – primary costs/cost-reducing revenues. Afterwards, we create the splitting profile for variance split.
Configure Variance Split
To configure the variance calculation split, go to Financial Accounting > General Ledger Accounting > Periodic Processing > Integration > Materials Management > Define Accounts for Splitting Price Differences in Configuration.
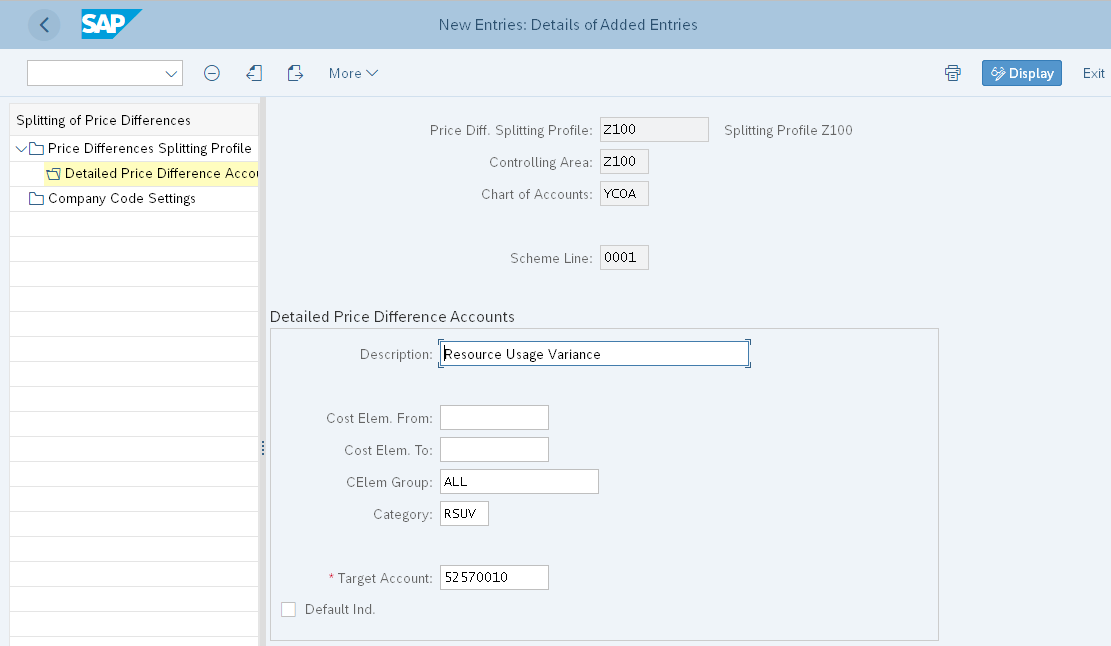
Using the New Entries button, or F5, we create the Splitting Profile Z100 and will assign it to the Controlling Area Z100 (see below). The chart of accounts will be derived automatically from the controlling area. After we maintain a name for the splitting profile (Splitting Profile Z100) we mark the splitting profile by selecting the checkbox at the beginning of the line and navigating to the folder “Detailed Price Difference Accounts” on the left-hand side of the screen.

With the New Entries button, or F5, we can assign one GL account to each variance category. We maintain the following data:
- Description: the description describes the price difference. We recommend using the name of the variance category; in our example this is “Resource Usage Variance.”
- Cost Elem. From: You can maintain a single cost element, or a cost element interval, as the source cost elements for the variance calculation. You cannot enter a 0 here; it has to be a cost element that is actually existing in the controlling area the price splitting profile is assigned to.
- Cost Elem. To: In the cost element to field you can add a cost element if you want to maintain an interval.
- CElem Group: In our example we maintained the cost element group ALL as the source cost element.
- Category: The category determines the variance category that is split with the target account we maintain in the next field. With F4 (Help) you can display all existing variance categories in your controlling area.
- Target Account: The target account is the GL account that the variance category will be posted to when the production order is settled.
- Default: For one variance category, you have to select the “Default Ind.” checkbox. If there are any rounding differences or cost that the system cannot split into one of the variance categories, the system will post the delta to the GL account where the default indicator is set to ensure the variance posting is balanced.
You can maintain another price difference account with the Next Entry button or F8.

Once you maintain the price difference accounts for every variance category, you can see the overview of all price difference accounts assigned to the splitting profile by going back with F3. Next, save your data with the Save button or CTRL+S. Then we can assign the splitting profile to the company code by navigating to the folder “Company Code Settings” on the left-hand side of the screen.

With the New Entries button, or F5, we assign the Splitting Profile Z100 to Company Code Z100 with a valid from date of 01.01.2020. Then we save our data with the Save button or CTRL+S. You can also use the splitting of price differences in variance categories without margin analysis, but your company code needs to have a controlling area assigned.

Testing Your Settings
Now we can execute the variance calculation for an order to test our configuration. In the below example we’ll execute the variance calculation for a single-process order.
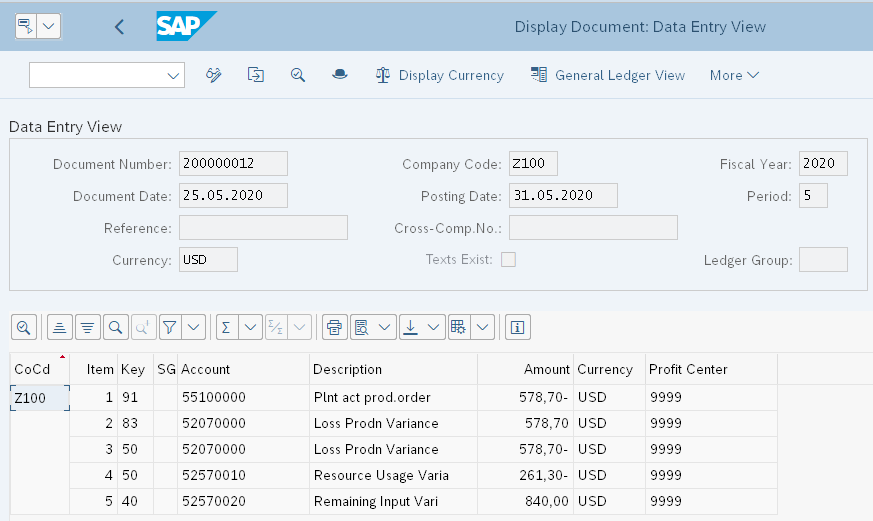
The processed order has a total input variance of $578.70 USD divided into the different variance categories. The system assigned $-261.30 to resource usage variance and $840.00 to remaining input variance. You’ll need to execute the variance calculation in an update run before you can settle the variances to margin analysis. The execution of the variance calculation does not create any postings in either financial accounting or margin analysis. Postings are created with the order settlement.

Orders are settled on a monthly basis. In our example, we settled the process order for which we calculated the variances with transaction KO88.
The settlement has two receivers, one of which is the material (MAT) and the other is the profitability segment (PSG) of costing-based CO-PA. You can review the accounting documents with the Accounting Documents button.

The accounting document for the variance split is displayed below. The system split the total variance based on the variance categories in the GL accounts we assigned in the splitting profile.

Conclusion
In this post you learned how to configure the variance split that helps you with the analysis of the price differences in the P&L statement.
This post was originally published 1/2021.


Comments