In this blog post, we’ll walk through extracting data from SAP S/4HANA using generic DataSources and transferring that data to SAP BW/4HANA.
Replicate the DataSource
Follow these steps to begin replication of the DataSource:
- Replicate the DataSource based on the application component (see figure below). To do so, log onto the SAP BW/4HANA system, right-click the source system, and select Replicate to start the job for DataSource replication.

- The screen will list all the DataSources that can be replicated, with the option to select and deselect DataSources. Choose the DataSource that you need to replicate, click Select Displayed Datasources, and then choose Next, as shown.

- Before starting the replication process, first check the header table for the SAP BW DataSource, which is RSDS. Enter the name of the DataSource—for this example, “ZRKGENDS1”—in the DataSource You’ll see that table RSDS doesn’t have that specific field, as shown in the figure below. Zero entries met the selection criteria.

- Meanwhile, the replication job should have finished. When the replication is successful with the activation and the DataSource is saved in SAP BW/4HANA (next figure), you can open the DataSource and activate it using the icon if it isn’t active.

- After the completion of the replication job, check table RSDS again. The DataSource is now available in in M and A versions, as shown below.

- To validate the DataSource replication, you need to search for the DataSource name in Eclipse and then open it. You can see that Adapter is set to Extraction from SAP System by Operational Data Provisioning and the ODP Context is based on DataSource/Extractors. you can see the operational data provider with the name of the DataSource, ZRKGENDS1 (see the next figure).

Data Modeling for Generic DataSources in SAP BW/4HANA
With the DataSource available, you can create the SAP BW data model using these steps:
- Start with the creation of an aDSO with reference to the DataSource, as shown in the next figure. In this example, to start, right-click the RKPBGEN InfoArea and choose to create an aDSO. You’ll see the aDSO creation wizard. Name the aDSO “ZADGEN” and provide the description. You can see that the aDSO is based on the DataSource, so choose Browse in the DataSource field and select ZRKGENDS1 as the DataSource template. Once you choose the DataSource, the source system will be assigned by default. In this example, the source system is S4SCLNT100, which is the SAP S/4HANA system.

Once the aDSO is created, activate it using the icon. Create a transformation for the aDSO with the source as DataSource ZRKGENDS1 and activate it. Create the DTP for the aDSO from the transformation; you can see that the transformation is based on the same generic DataSource (ZRKGENDS1). Activate the transformation and DTP as shown.

The final dataflow that can be seen from the aDSO level is shown in the next figure. The source system is S4SCLNT100, and it sends data to the ZRKGENDS1 DataSource. The ZADGEN aDSO fetches data using this DataSource. You can see the transformation and DTP in the dataflow between the DataSource and aDSO.

- Now execute the DTP using . You can see the request status in the web cockpit. Once you choose Manage Request, you can see the entries in the inbound table.

- From the Manage Request area, you can activate the aDSO request. To do so, select the Activate After the activation is completed, you can see the data in the active table, as shown.

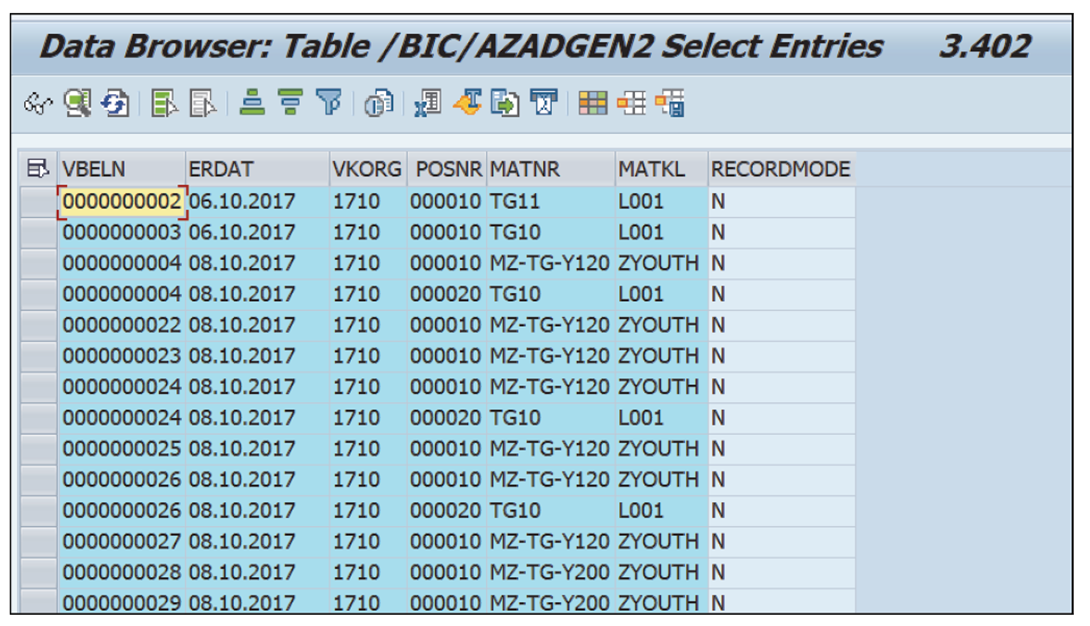
- You can also check the active table for the aDSO based on the generic DataSource; as you know, the active table will end with 2. (See next figure.) In this example, the active table is /BIC/AZADGEN2 and it has 3,402 entries.

- You can remove 200 from the Maximum No. of Hits field and click Execute or press (F8) to see the total contents of the active table, as shown in the next figure. The total number of records in the table (3,402) is shown in the upper-right corner.

Checking the ODQ
After the DTP is successful, you can see the status of the extraction job in the source system. Log onto SAP S/4HANA and execute Transaction ODQMON for the ODP-based delta queue. You’ll see that the queue (ZRKGENDS1) for the generic DataSource is created in the queue view. If you need to see the queue name that was created, set Request Select to All: this will ensure that the full request is also selected and the respective queues are displayed.

From the queue view, you can get to the subscription view and then the request view. Finally, in the units view, you’ll see the total number of rows is 3,402, matching the total number of records extracted using this DataSource. When you double-click that row, you can see the actual records that were sent to SAP BW/4HANA, and you’ll see that Storage is now set to ODQDATA_F for a full upload.

The contents of table ODQDATA_F can be viewed as shown in the final figure. You can see this table in Transaction SE16.

Editor’s note: This post has been adapted from a section of the book Operational Data Provisioning with SAP BW/4HANA by Renjith Kumar Palaniswamy.

%20Source%20System%20for%20SAP%20S4HANA%20and%20SAP%20ERP.png?height=600&name=How%20to%20Create%20an%20Operational%20Data%20Provisioning%20(ODP)%20Source%20System%20for%20SAP%20S4HANA%20and%20SAP%20ERP.png)

Comments