For SAP projects that do not have a dedicated data team involved, it is the responsibility of consultants to handle the data load and data modification. How should they address this problem?
This blog post will introduce the Legacy System Migration Workbench (LSMW). This is a strong tool for functional and technical consultants to have in their armor. LSMW is primarily used for mass data conversion, data modification (such as changing email addresses en masse, which will be the focus of this post), and data upload and can be used in data conversions from non-SAP to SAP systems as well as SAP to SAP systems. As long as the data that needs to be converted can be downloaded in a file format accepted by LSMW, you should be good to go.
Configuration
To configure LSMW, go to transaction code LSMW. You can use an existing project or create a new one. While the project is the high-level category, you can create subprojects beneath it. For example, an SAP SD project can have subprojects like O2C, Billing, AR, etc. Beneath the subproject level is the object, a unique name given to data which corresponds to business objects.
To create a new LSMW, type in a unique name for the project, subproject, and object(s) and hit Shift + F1 or click the “create” button. The system will prompt you to enter descriptions for each type. Once everything is done and you’ve hit the final green checkmark, the screen should look something like this.

Next, press F8 or click on the “execute” button. The next page, shown below, will show 14 different steps which make up an LSMW. Each step is important and should not be skipped. If you accidentally skip a step, chances are the LSMW won’t yield the expected results.
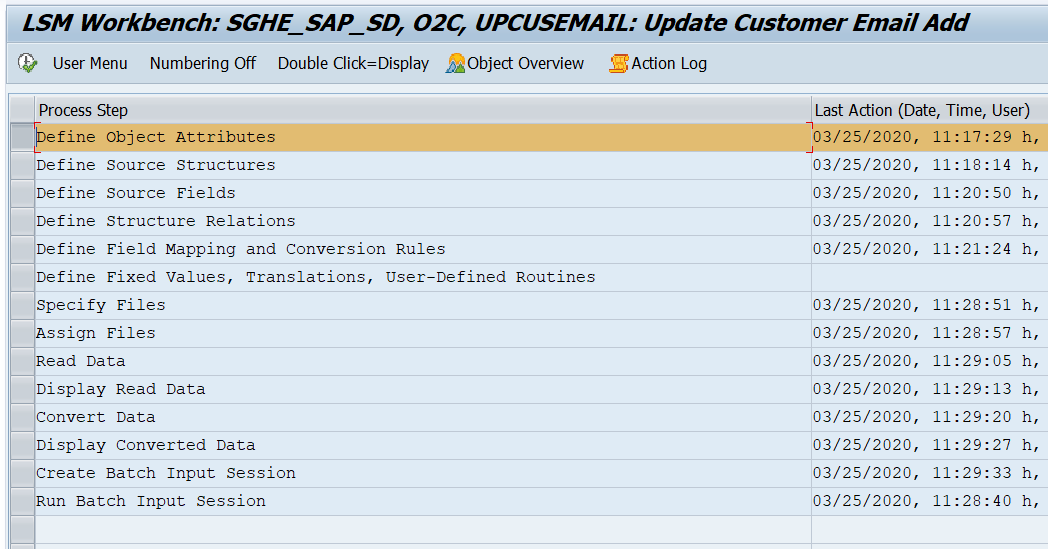
Let’s look at all 14 steps in detail. After completing each of these steps, you’ll have an LSMW recording which can be used to mass-update customer master email addresses in SAP. (Pro-tip: click “numbering off” to visualize step numbers.)
Step 1: Define Object Attributes
This is the key step of an LSMW where you select the type of method to use for data upload. In this step, you have four options to work with based on your requirements and level of engagement from your technical team. Let’s touch upon all the options with detailed instructions.
Standard Batch/Direct Input
SAP provides standard batch input (also known as programs) for some of the most common transactions and is considered better in terms of performance.
Batch Input Recording
If the first way doesn’t provide you an option for the transaction you need to execute for mass update, you can do your own recording using this step to create a custom batch input.
Business Object Method
Commonly known as the Business Application Programming Interface (BAPI), this option is the most powerful choice, with a wide range of standard BAPI’s available for pretty much every functional module and functional transaction. However, this option may need some ABAP support.
Intermediate Document
Also known as IDoc, this option is handy if you are looking to process external data using LSMW with input coming as IDocs. You will need to engage with your development team to further explore this option.
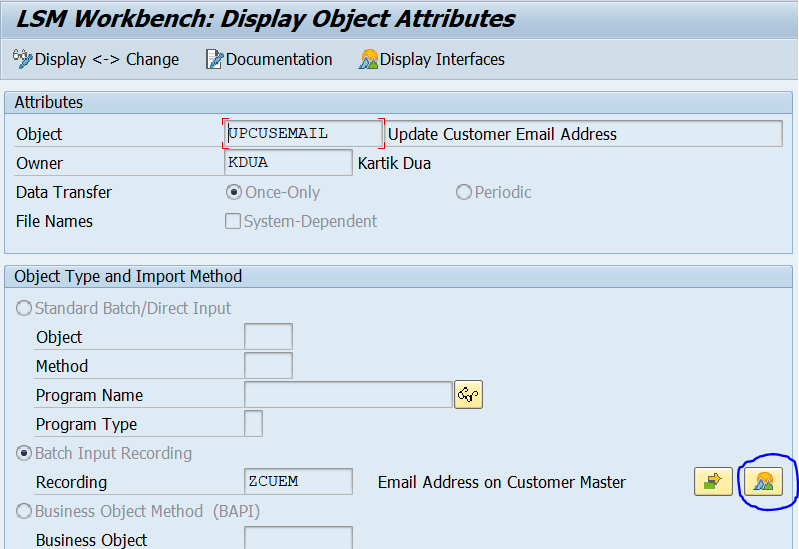
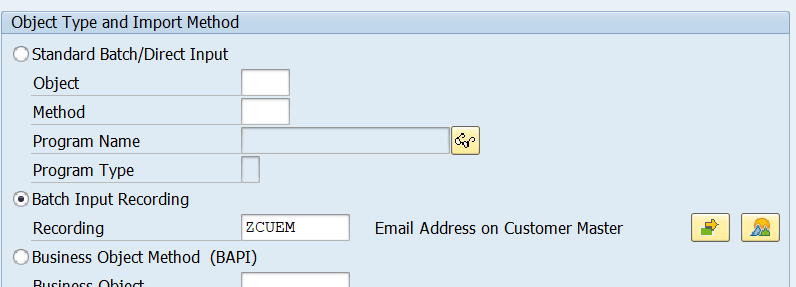
Once you’ve chosen your option from the last screenshot, select the Define Object Attributes step, and click on either “execute” or hit Control +F8. Select the radio button for Batch Input Processing. Then click on the Recording Overview button.
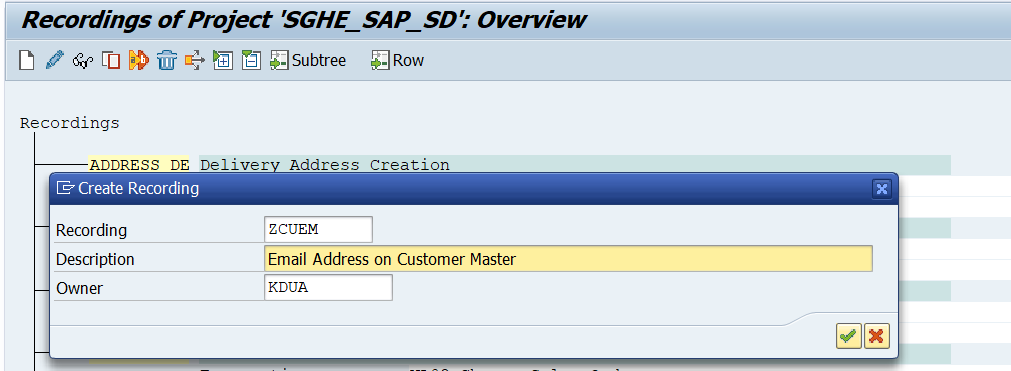
Click Create New Recording or hit Control +F1. Enter a recording name and description, and hit the green checkmark.
The next page will prompt you to enter a transaction code. Please follow all prompts based on what you want to achieve in your recording. For this post, we are focusing on updating the email address on the customer master, so we will start with T-code XD002.

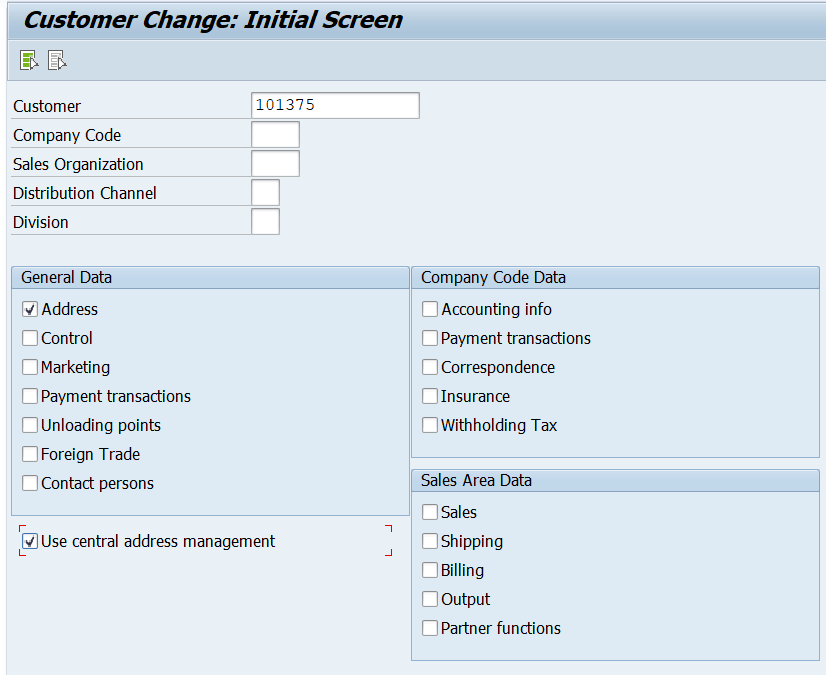
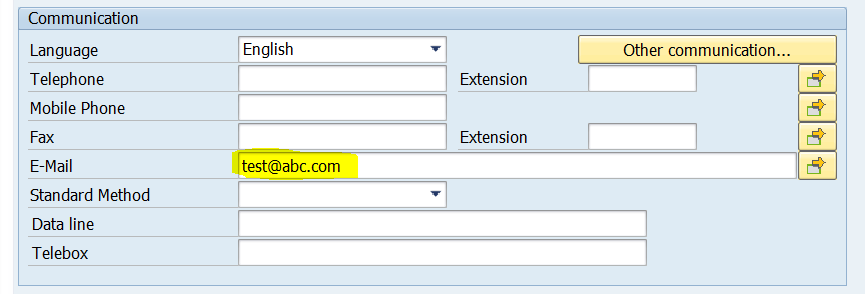
Enter test@abc.com, and hit Save or Control + S.
This will take you to a create a recording page where you will see various fields matching those on the customer master. After deleting the screen fields that are not relevant and selecting default all, you will be left with something like this:
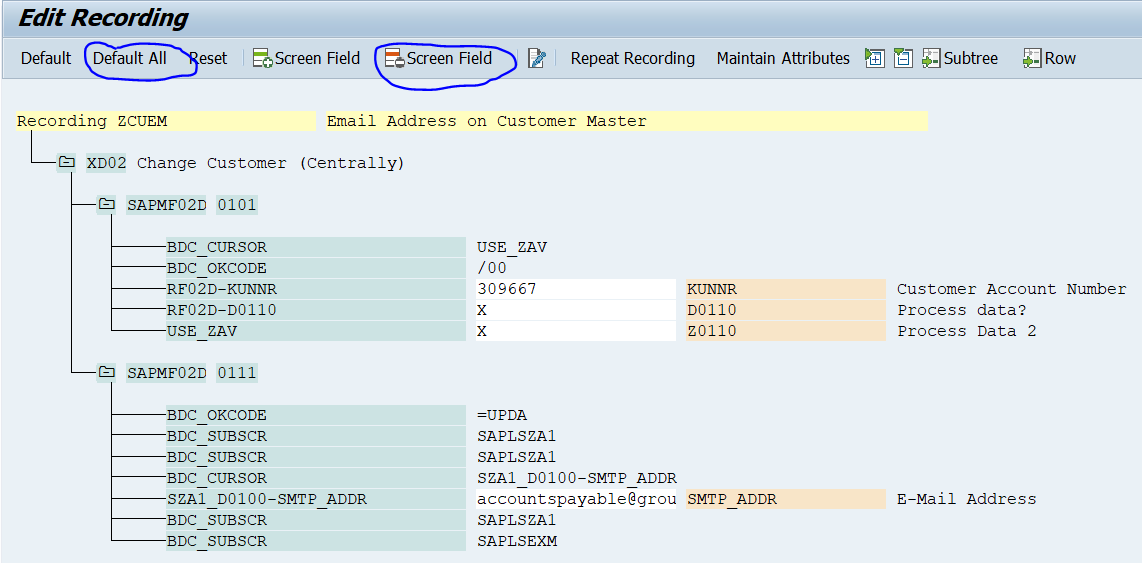
Save the recording and add the recording name to the import method as shown in this figure.
Step 1.2: Define Object Attributes – Standard Batch/Direct Input
As an alternative step, from the home screen, select Define Object Attributes and click on “execute” or hit Control + F8. Click Display <-> Change to toggle change mode.
Standard batch/direct input is the default selection on this screen; if not, select the radio button next to it.
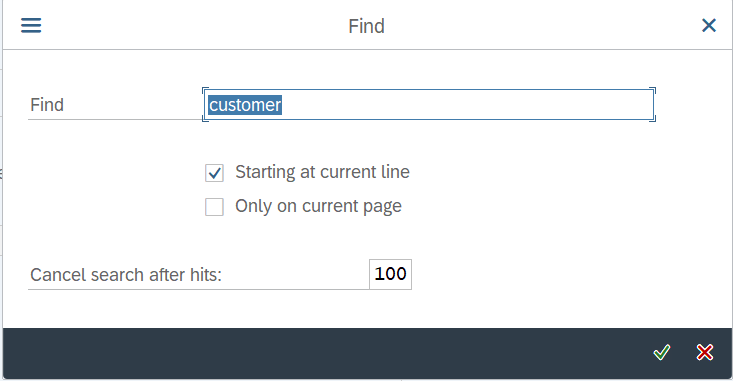
The first thing to select is an object. SAP provides about 200 standard objects that can be updated using this option. Press F4 or use the drop-down icon to get the list of objects. Once you get the list, you can search by using F9 and the description related to the object (for example, customer).

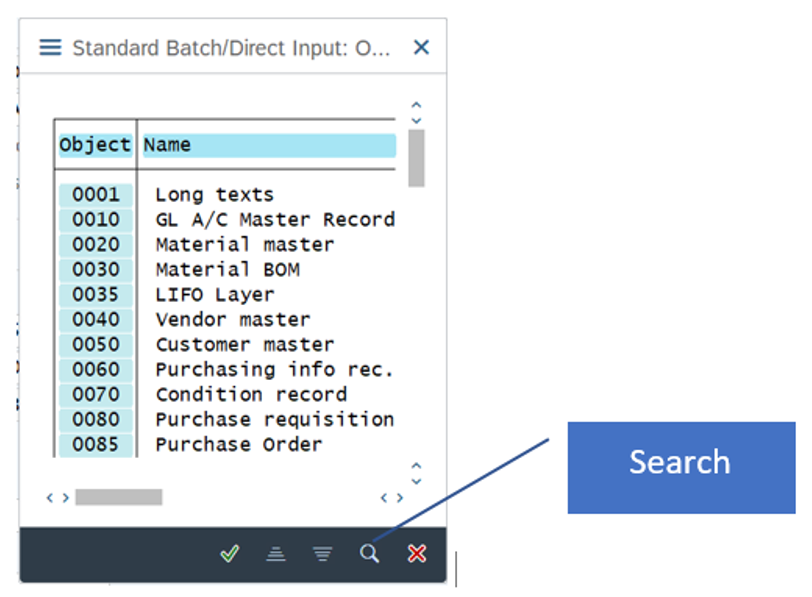
After selecting the object, you’ll select a method. Based on the object, there could be multiple methods available to choose from based on your requirements. In our example, we have update (0000) and extension (0002). Once selected, the method will autofill the program name applicable to the combination of object and method. For this post, we are using customer update (email address as an example), and it has a program name RFBIDE00 with program type B. This is what it looks like:

Save the step and go back (using F3) to the main screen to complete the next steps.
Step 2: Define Source Structure
As the name suggests, this is the place where we create a new source structure. It is a simple, unique name given to the source structure under our project.
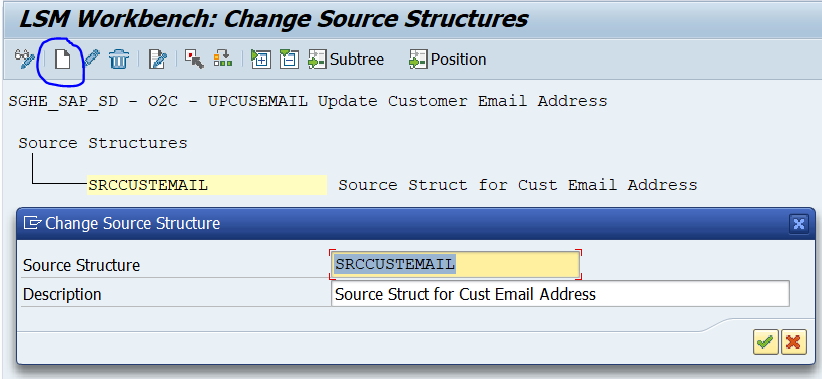
Step 3: Define Source Fields
After defining the source structure, you’ll define the source fields. You should create all the fields from your recording page (Step 1.1) one at a time. (Pro-tip: take a screenshot of your recording page and open it side by side while completing this step.) You can use the technical name for the field name and field label (the same as on the recording page), field length, and field type. It can be anything depending on the field you are adding. In the example below, we used the number 25 for the customer account and the letter C for the field type. As a best practice, select the checkbox for selection parameter for “Import/Convert Data.”
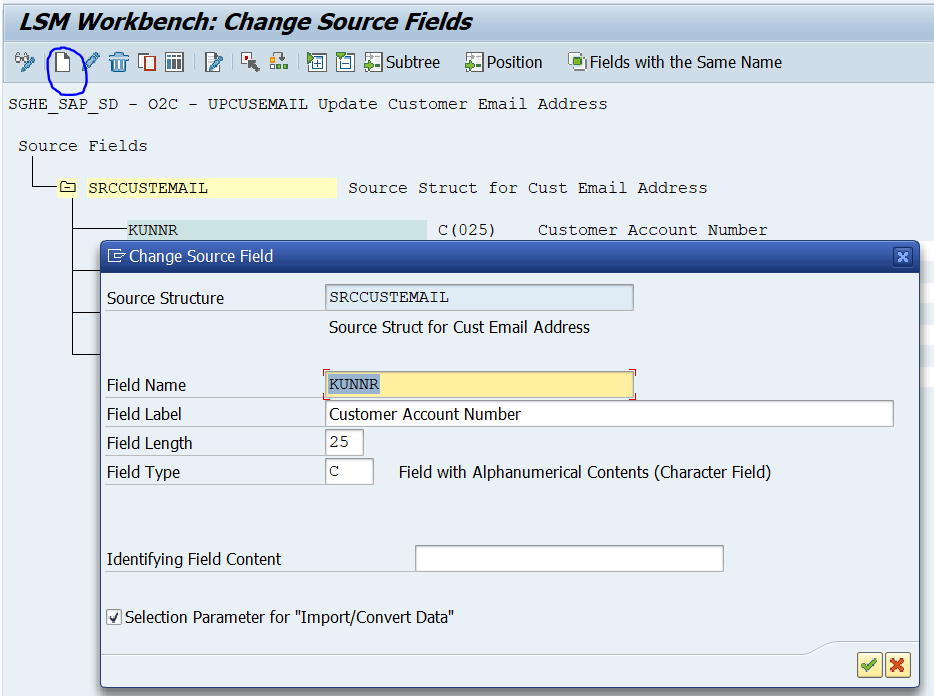
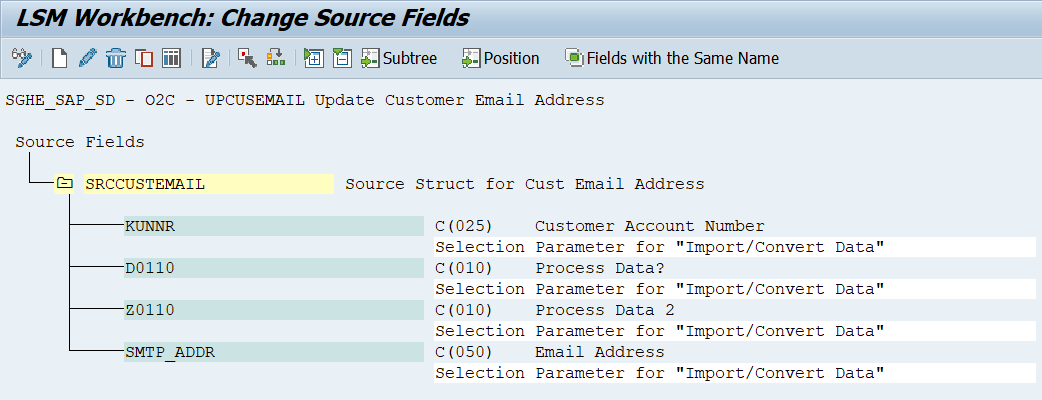
If you are using standard batch/direct input (Step 1.2 above), you have two choices to get the list of fields for source field mapping.
In the first option, if you know the fields you want to update on the customer master (in our example, email address, which is SMTP_ADDR for customer as KUNNR), you can manually add the fields as shown in the figure below.
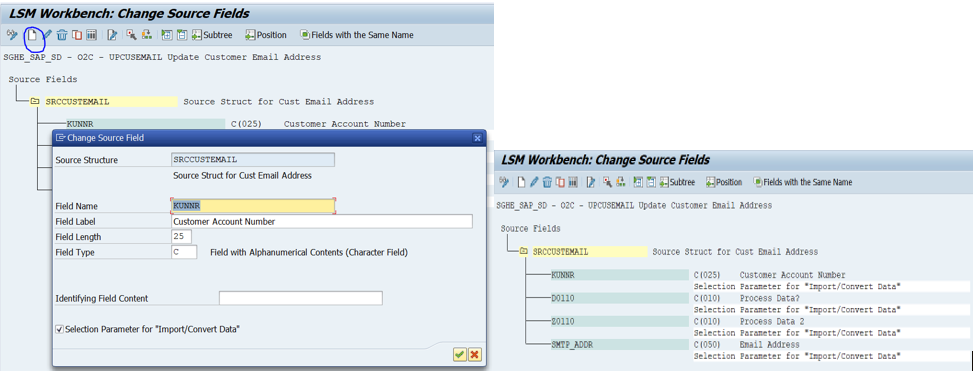
In the second option, you can do screen recording using transaction SHDB to record the fields you want to update and add as shown above.
Step 4: Define Structure Relations
The system automatically establishes the relationship for you. Toggle to change mode and save this step for the system to complete the assignment. Validate and move on to the next step.

If you are using standard batch/direct input (Step 1.2) you can maintain the structure relationship at the top of the hierarchy. To do this to a specific input structure, you need to update the fields inputted in Step 3. To do that, switch to change mode, select the input structure, and click “relationship.” The system will complete the assignment.

Step 5: Define Field Mapping & Conversion Rules
The fields from Step 3 will show up here. Go to ZCUEM and then, from the menu, go to Extras > Auto-Field Mapping or press Control + Shift + F3.
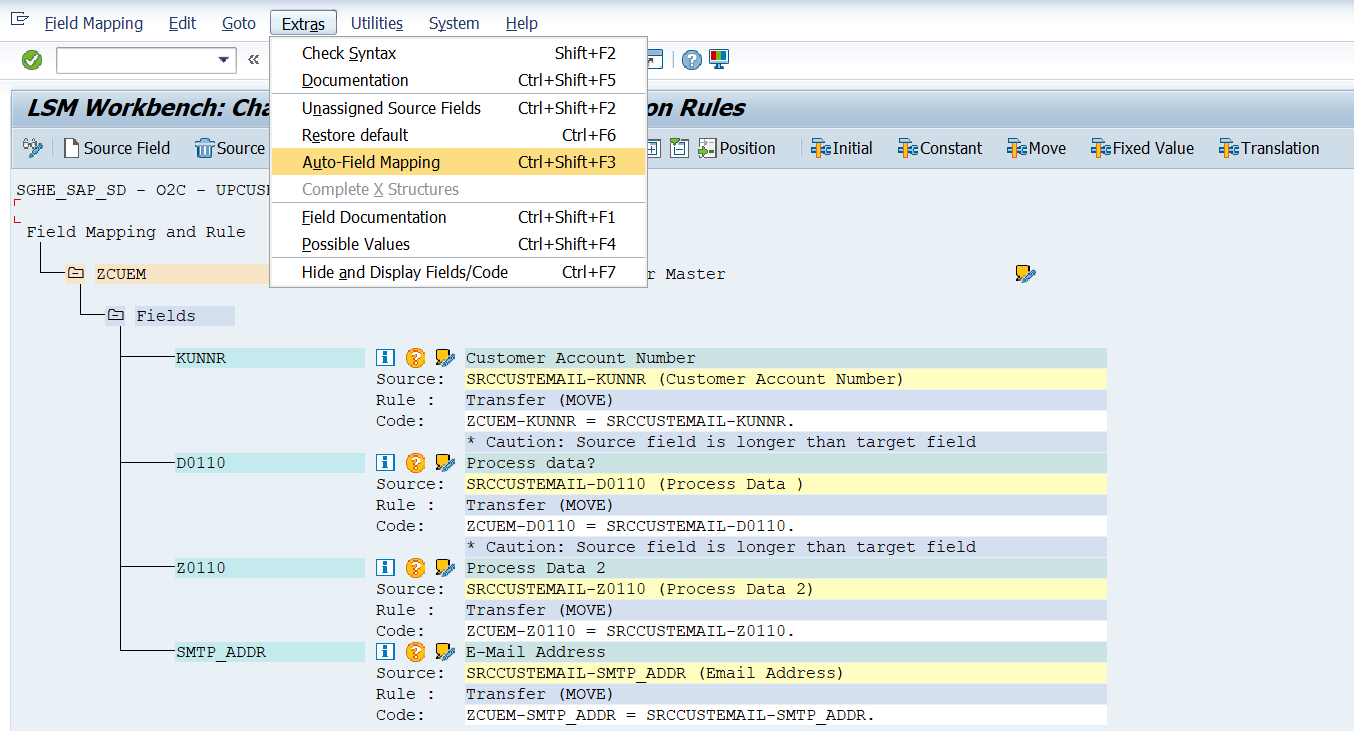
This step will automatically map fields. Typically, SAP is accurate with their proposals so you can just accept them, or you can map the fields manually in case you need changes.
If you are using standard batch/direct input (Step 1.2), follow these steps to complete this mapping:
You will have all the available input structures on the screenshot below, based on the program and method selected in the first step.
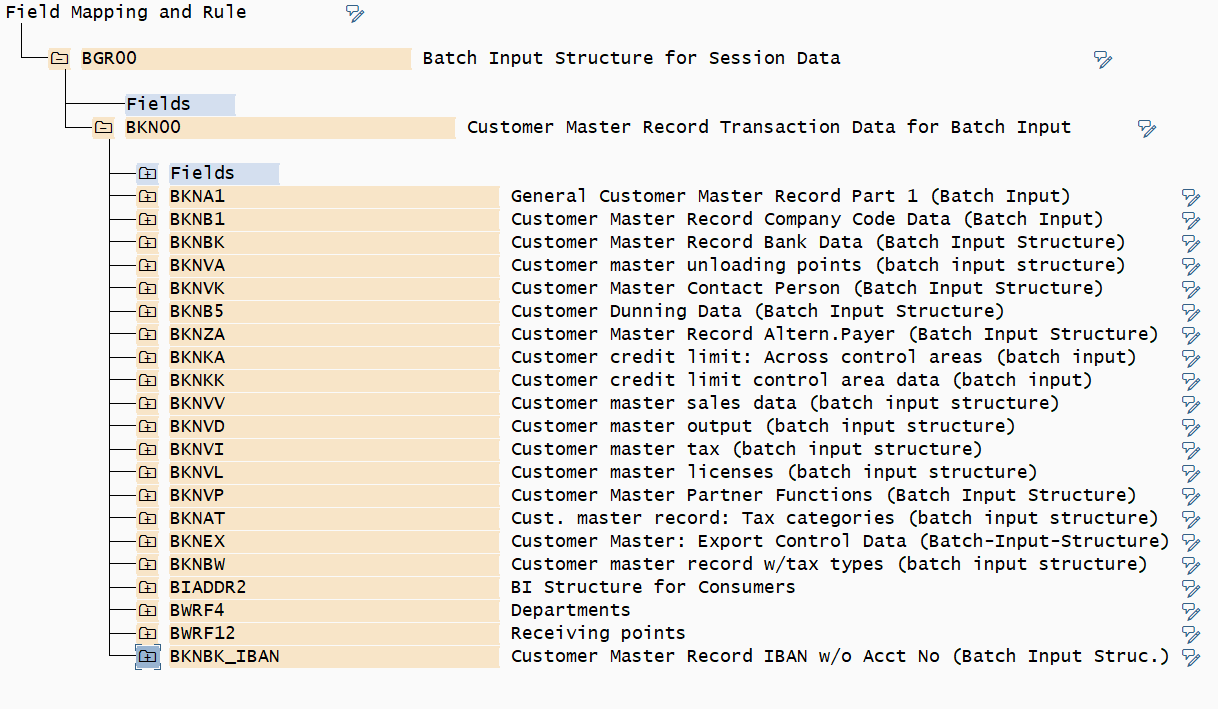
Toggle to change mode (Control + F1). For the fields selected in Step 3, expand the corresponding input structure (if you know it) or you can simply search using Control + F for the field name. Search will take you to the structure and field you are looking for. Once you find the field, select it (by clicking once on the technical field name), click on “source field” from the top menu (or hit Control + F2). It will bring the source fields from Step 3 available for assignment. Double click the corresponding field based on the field you highlighted to complete the assignment. (Pro-tip: in Step 3, use the technical field name as the description while adding fields, so it is easier to pick while assigning at this step.) Repeat this step to map all the source fields. Below is how it will look.
The screen with source fields to choose from:

After mapping:
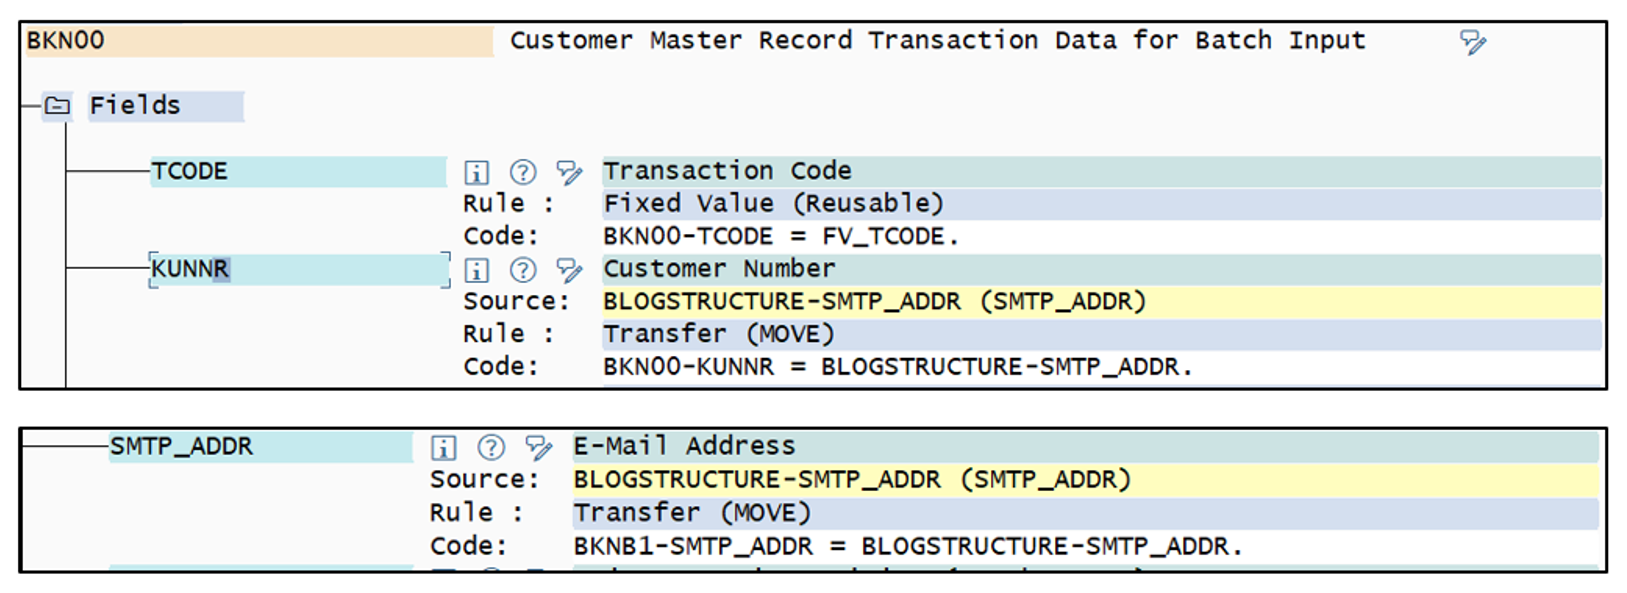
Once mapping is complete, save and move to next step.
Step 6: Fixed Values, Translations, & User-Defined Routines
Most of the time this step can be safely skipped. It is only used when you want the LSMW to use fixed values, translations, or user-defined routines which is a little uncommon. We don’t need this step for this use case.
Step 7: Specify Files
In this step, you’ll define where and how you want your file to be uploaded to the recording. This is the source file used to perform mass data modification. For this use case, we’ll use “Legacy Data On the PR (Frontend)” option. By using this option, you can use a file saved to a laptop or PC.
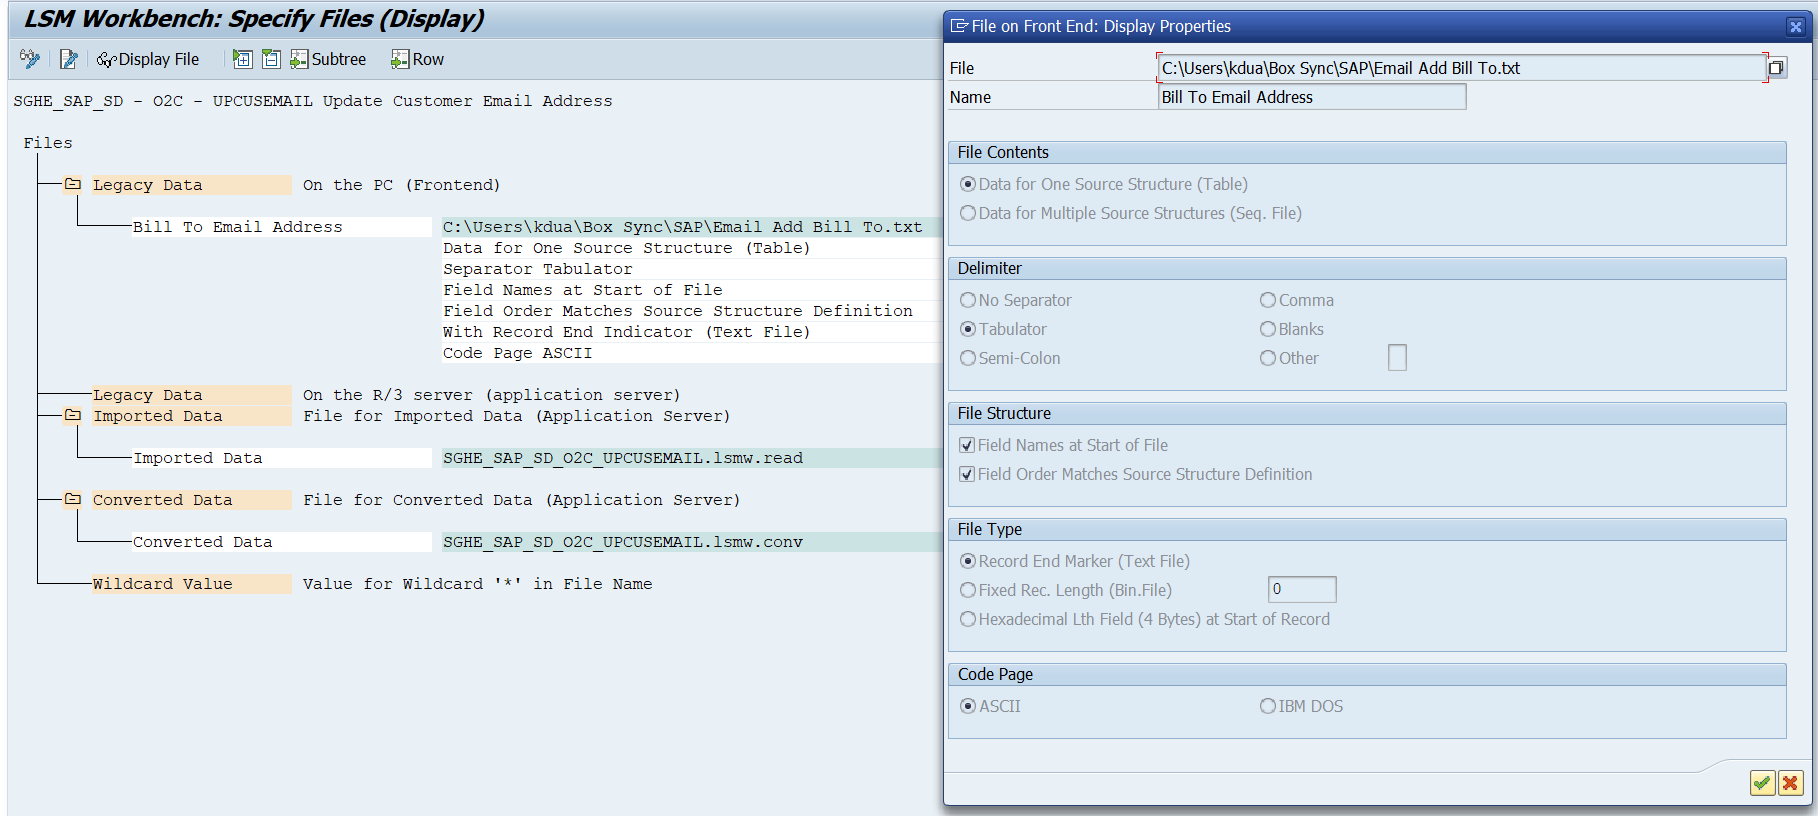
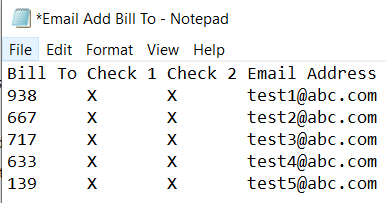
This is what the “Email Add Bill To.txt” file looks like on a laptop (it is a tab-delimited file that matches the above properties).
Step 8: Assign Files
SAP automatically does the assignment for you based on the above step. You should validate and move on to the next step.
Step 9: Read Data
This is a read-only step with selection criteria. It helps you validate the count of the records from your source file.

Step 10: Display Read Data
This step will display the data compiled in the above step.

Step 11: Convert Data
This is a technical step that converts data from the source file to an SAP-executable format.

Step 12: Display Converted Data
This will display the converted data from the above step.

Step 13: Create Batch Input Session
This step creates the batch input session which you can run in the final step. As a best practice, select the checkbox for “Keep batch input folder(s)?”

Step 14: Run Batch Input Session
This is where it all comes together and the magic happens. You have three options for processing: foreground, display errors only, and background. For this use case, we chose the background option and hit “process.” Mass updates will happen in the background and you can multitask through other things on your to-do list.

The status column helps you monitor how the job is progressing, in processing, complete, and errors. If there are errors, you can monitor the error log to troubleshoot the issue. (Pro-tip: you can compare your sources file to the addr table where the email addresses are saved by a simple Microsoft Excel compare or vlookup.)
Conclusion
This is it. This is how powerful and simple an LSMW is. If you have any questions after reading this post, feel free to comment below and we’ll get back to you when possible. Thank you for reading and stay safe!
This post was originally published 2/2022.




Comments